• Hey there Guest!
    If you enjoy BCF and find our forum a useful resource, if you appreciate not having ads pop up all over the place and you want to ensure we can stay online - Please consider supporting with an "optional" low-cost annual subscription.
    **Upgrade Now**
    (PS: Subscribers don't see this UGLY banner)
Tips
Tips

TR2/3/3A 1960 TR 3 A Wind Shield Problem

Tinkerman

Darth Vader
Offline
I have, what I suspect is a major windshield problem. I took the original apart 5 to 8 years ago, took it to the plating company that I was using. I got it back, put it into storage and haven't looked at it since. When I took it apart I didn't look at it very heavily either. I am in the process of putting it together without the glass in a dry run, so to speak. The frame is together but I don't seem to have any screws that I can use to attach the stanchions with. I bought the correct screws from one of the parts houses, 2 long and 1 short for each side. I can't get anything to fit. I sure hate to have to buy another large frame piece, so would someone tell me that I have some options, and what they might be.

Thanks, Tinkerman
 

TR3driver

Great Pumpkin - R.I.P
Offline
My guess is that you need to chase the threads in the frame. The plating process has made them smaller.
 
Country flag
Offline
Suggest you pull the glass back out and then chase threads, there is high risk of cracking the the glass. Actually put the whole frame together without the glass for a dry run.


Marv
 

TR3driver

Great Pumpkin - R.I.P
Offline
Suggest you pull the glass back out and then chase threads, there is high risk of cracking the the glass. Actually put the whole frame together without the glass for a dry run.
I agree entirely, except I thought that was what he was doing already :smile:
 
OP
Tinkerman

Tinkerman

Darth Vader
Offline
Yep, that is exactly what I was doing.Putting it together for a dry run. The frame is together, but I cannot screw the stanchions on to the frame.
I will try again tomorrow morning, after a good nights sleep. We were expecting company at the time I was looking at the situation, maybe tomorrow morning I will be able to figure out what I am doing wrong or do I REALLY have a big problem.

Dick
 

toysrrus

Yoda
Offline
Hi Dick,

Here`s something I came across with one of my previous TR3s.

I was taking the windscreen off & "No Dzus" Fasteners to secure the "Stanchions"?? That sort of surprised me.

Then after actually looking at what I had; Someone had put "Round Flat Headed Bolts" thru the Stanchions and "Nuted" from the Inside the car!! It looked fine from the outside & surely was held in place securely.

Of course; This is not a correct way of mounting the windscreen but It certainly is an "In-Expensive" way if thats what your looking for????

Just some passing thoughts.

Best Wishes,

Russ
 

TR3driver

Great Pumpkin - R.I.P
Offline
I was taking the windscreen off & "No Dzus" Fasteners to secure the "Stanchions"?? That sort of surprised me.
Later cars (after TS60000 IIRC) did not use Dzus buttons to secure the stanchions (uprights) to the body. The stanchions were different, and used a special threaded bolt (with head nearly identical to the Dzus buttons) to secure them. The body was different in that area as well, with no provisions to mount the plate that carries the Dzus sockets on the earlier cars. I believe there were supposed to be captive nuts inside the scuttle, but it's been a long time since I've worked on a post 60K car and of course they could be missing.
 

TFB

Jedi Knight
Country flag
Offline
Hi Dick,

Here`s something I came across with one of my previous TR3s.

I was taking the windscreen off & "No Dzus" Fasteners to secure the "Stanchions"?? That sort of surprised me.

Then after actually looking at what I had; Someone had put "Round Flat Headed Bolts" thru the Stanchions and "Nuted" from the Inside the car!! It looked fine from the outside & surely was held in place securely.

Of course; This is not a correct way of mounting the windscreen but It certainly is an "In-Expensive" way if thats what your looking for????

Just some passing thoughts.

Best Wishes,

Russ
Luckily you still have the glass out.If the running a tap thru the threads doesn't clean them up you will need to replace any damaged mounting blocks that are on the inside of frame.Each block,two on each side,is held in by a small screw.These small screws may need to be drilled out but no big deal if you are replacing the mounting blocks.The bottom holes are in the corner brackets,which I suggest replacing with new.Dont buy a VB windshield if you need glass,they don't fit.
Tom
 

CJD

Yoda
Country flag
Offline
Hey Dick...that's where I am. Yesterday put the glass in the frame and the lower seal. Today the tenan plates and stanchions go on. I have new stanchion to frame screws from Moss going into a re-chromed frame. I'll let you know how it goes. I hope it goes smoothly, as I do NOT want to have to remove the glass again, as it was a huge pain getting it into the pinch weld with only 2 hands.

The TR3 lower seal I used was from TRF, and it is rather stiff and thin, so it slid into the lower frame easily. The lower seal I installed yesterday was from Moss. It is more of a rubber, and it was molded to the shape of the lower frame. It could not be slid into the frame at all. I had to hook the rear lip into the frame and then use a flat blade screwdriver to push the front lip into the frame...1/4 inch at a time. It took longer to install the lower seal than it did to build the glass into the frames.

You have me concerned about the stanchions, as I had to send my frame back to the chromer for shoddy work, so it was actually re-chromed twice.
 
OP
Tinkerman

Tinkerman

Darth Vader
Offline
Mine is a post 60000 car, Randall and it does have the big cap screws. There are captive bolts on the body to hold them. They are in good shape, my problem is the stanchion to frame mounting screws and holes. Am back in my shop after a good night sleep and a clean rested mind. I am about to take a serious look at what my problem is. Will report back.
Thanks for all of your comments, Dick
 
OP
Tinkerman

Tinkerman

Darth Vader
Offline
OK here is what I have. There are three screws that hold the windscreen and the stanchion together on each side. They came from the factory as 10/32 round head screws, 2 long and one short. What I have is three threaded holes in the windscreen frame. top and bottom are threaded for 1/4 20 screws and one 10/32 factory threads in the middle. I have no idea how that came about. Was not done by me. I suspect that a previous owner had to replace the windscreen and who ever did it changed the screw pattern. Can only guess as to why. I will have to increase the size of the top and bottom screw holes in the stanchion to fit the 1/4 inch screws. Not an impossibility.

Thanks for all of your input, YA gotta love working with old cars!

Dick
 
Last edited:
OP
Tinkerman

Tinkerman

Darth Vader
Offline
Yep! However I don't have to face finding another windscreen frame.
I have a technical question though. I'm still faced with drilling out the stanchion and the tenon plate. I have a multi speed bench drill so I can set them up in a vice but what speed should I use for the safest drilling. Fast or would slow be better?

Thanks, Dick
 

CJD

Yoda
Country flag
Offline
Hold the phone, Chuck! Don't drill anything!!!

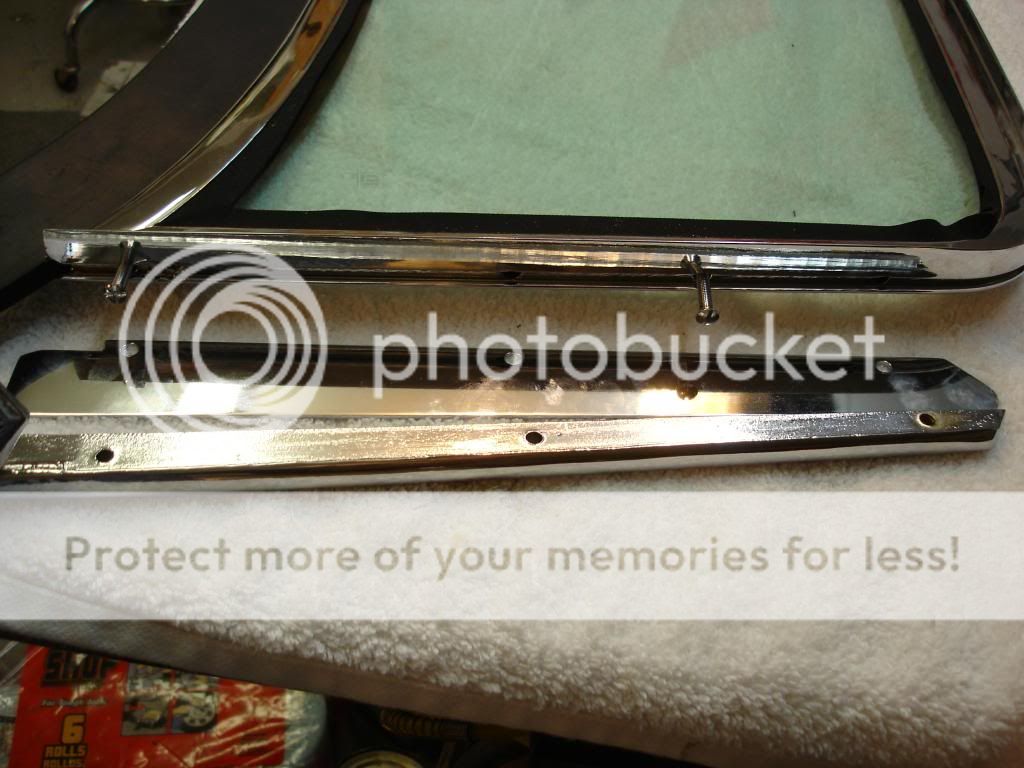
I started my rebuild and ran into the same issue. Here is a pic:


I have screws threaded into the holes that are threaded, but the other 2 are at least 1/4 inch, and never threaded...ever. That's when the brick finally hit me. I remembered there are 2 nut plates that go on the back side of the frame. The screw on the right in my pic is threaded into a hole that does not line up with any holes in the tenon plate or stanchion. That is because it takes a small screw that holds the nut-plate in position.

The lower screw...on the left of my picture, threads into the steel corner bracket. So, to recap...a nut bar goes on the glass side of the large frame piece. The only theaded hole in the frame, that does not line up with the holes in the stanchion or tenon plates, is to hold the nut plate in position...I believe with a screw from the inside of the frame outward. So...no threaded holes in the brass frame are used to hold the stanchion on. The holes are all through to the steel nut plate on the top two screws, and the angle bracket on the lower screw.

I have to go dig in the boxes to find the nut plates. I'll take a pic when I find them. I remember they were just a long steel strip with threaded holes...

Then I have to break open the dad nabit frame again to install the nut plates. Double Bummer! The catches with installing parts years after you removed them...
 

TR3driver

Great Pumpkin - R.I.P
Offline
Yep! However I don't have to face finding another windscreen frame.
I have a technical question though. I'm still faced with drilling out the stanchion and the tenon plate. I have a multi speed bench drill so I can set them up in a vice but what speed should I use for the safest drilling. Fast or would slow be better?
Speed shouldn't be all that critical. I checked a couple of charts for maximum speed, and they come out around 2000-3000 rpm for a 1/4" bit in brass (200 sfpm). But going slower should be no problem.

If you have a bit that is a little dull, that would be better than a brand new one. The stanchions are brass (unless you have the uber-rare aluminum ones) and a sharp bit will have more of a tendency to grab and bind in the soft brass.

However, rather than spread the DPO-ism, what I would do is make up a repair piece to go in the hole. Start with an ordinary 1/4 bolt, then drill & tap through the center for the original bolt size. Cut it to length, then use a bolt & nut to install it in the hole with Loctite. Wait for the Loctite to set before proceeding with it. (To hold the bolt while cutting, use a Dremel & cutoff wheel to cut through the corner of a suitable nut; then clamp the split nut in a vise to grip the threads without damaging them.)

Another problem, though, at least on my early frame, those are NOT 10-32 holes, but 2 BA (as someone already suggested). Since Moss shows only one bolt for early/late, I think the later holes are 2 BA as well.
2 BA is 31-3/4 tpi, almost but not quite 32 tpi, plus about .005" smaller than 10-32. Hard to tell the difference (I used digital calipers & a 10X loupe). So my guess is that the holes got damaged in the first place by someone forcing 10-32 screws into them.
 

CJD

Yoda
Country flag
Offline
Abort...Abort!!!

Don't Drill!!

Dick, I've been looking for a contact number for you...hope you read this before you fire up the drill press...

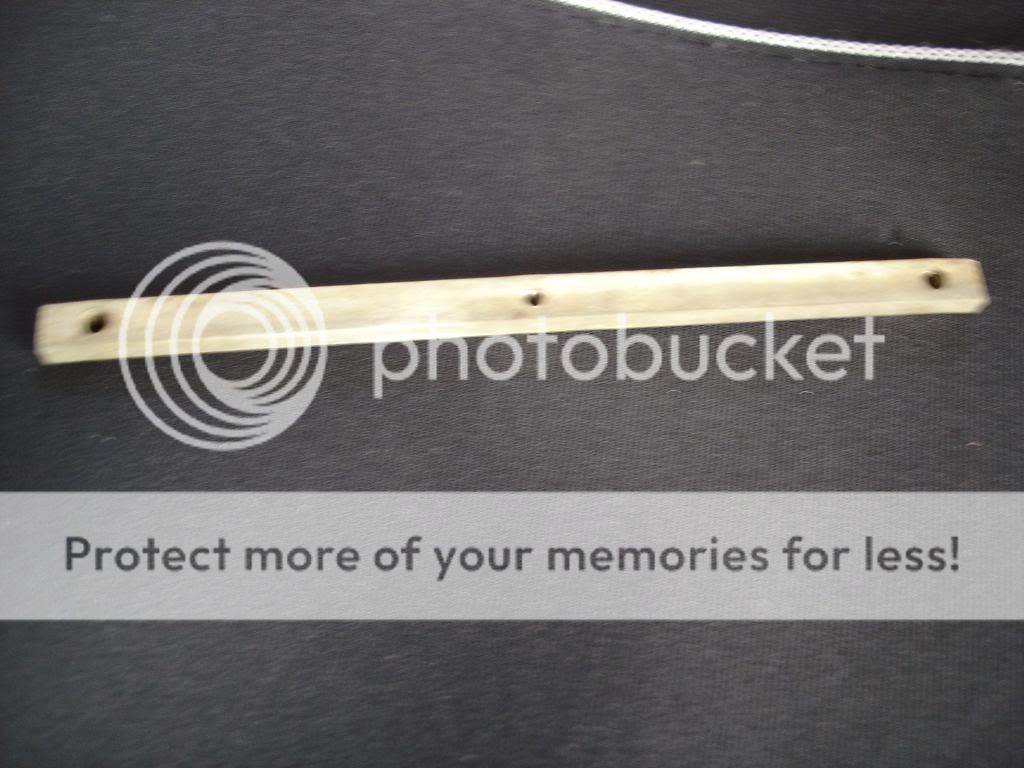
Here is a rather blurry picture of the nut plate:


It measures 5-7/8" X 5/16" X 3/16". I had to drill out the holding screw to remove this plate pictured. The screw was originally a tiny 6-32 from the outside inward. The hole in the last post to the right is not actually threaded. It turns out it just happened to be the right size to take the larger screw and "feel" like it had a thread.

Now I have to find the other plate. It turns out the one in the pic was sitting on the corner of the work table for the last 6 months. Too bad I didn't notice it before I built the frame up...
 
OP
Tinkerman

Tinkerman

Darth Vader
Offline
Thanks John, and I mean THANKS. I don't remember anything like that but, it's been a few years heh!
Thanks Randal. I will have to study on all of this for a bit. It looks like I wont have to find a new frame, yea!
I think your right randall. Thats probably how I ended up with 1/4 20 screws. That is probably why I no longer have a nut plate.
That also answers a question I have about mounting the windshield (heavy) with just 2 small screws going through the stanchion into a brass frame. Just did not make any sense to me from a mechanical strength point of view.
Now I need two nut plates. Probably can make a couple of nut bars. Sounds like a Snickes commercial, heh

Dick
 

CJD

Yoda
Country flag
Offline
Great, I was worried. I will likely have to fashion the second nut plate. I have looked everywhere, and no luck. I have a distant memory (now days most my memories are distant!?!), that one of the plates was very corroded. It may have gotten tossed, thinking the Moss "windscreen bracket kit" would include the plates. For reference...the Moss kit only has the angle brackets. No nut plates.

I have a box with the tenax studs as a last resort...but I'll post the details if I end up making the plate.

In your case, the chrome shop may have removed the plates to properly re-chrome the frame. I've had them toss a lot of my hard to find little knick knacks.
 

tinman58

Jedi Knight
Silver
Country flag
Offline
Dick
I have a spare rod that you can have. I think that I only have one , if that helps.
let me know and I will send it off.
 
Similar threads
Thread starter Title Forum Replies Date
Tinkerman TR2/3/3A Original wind screen 1960 TR3 A [free to a good home] Triumph 2
Tinkerman TR2/3/3A Wind scereen support bracket tr3 a 1960 Triumph 3
R For Sale 1960 Healey BN7 Oil Pan For Sale Austin Healey Classifieds 0
W For Sale 1960 TR3A for sale Triumph Classifieds 0
J Wanted Hood (Bonnet) for a 1960 BT7 Austin Healey Classifieds 0
G For Sale 1960 TR3 A Triumph Classifieds 0
G For Sale 1960 TR3A for sale $11,999 Triumph Classifieds 0
W TR2/3/3A 1960 TR3A Radiator replacement recommendations Triumph 11
dougie 1960 Austin Healey 3000 Works Lightweight vs. 1962 Ferrari GTO Austin Healey 6
G For Sale 1960 BugEye..Very Good..$20,500 Austin Healey Classifieds 0
5 Sold My 1960 Bugeye Spridgets 10
M TR2/3/3A 1960 TR3A--intake manifold-to-SUH6 carbs studs Triumph 3
B Fluctuating Fuel Gauge 1960 Bugeye Spridgets 4
J Wanted 1960 Sprite Bonnet Spridgets Classified 3
KellyRob BMC GEARBOX 1960 British Motor Corp 2
Pool Dad 1960 TR3 engine serial number Triumph 14
Fanch00 My 1960 BT7 History Search Austin Healey 1
poolboy General TR LeMans 1960 Triumph 8
jlaird 1960 AH Sprite Spridgets 96
O For Sale New Member from NJ 1960 TR3 Triumph Classifieds 1
C 1960 BT7 Thoughts Austin Healey 14
L For Sale 1960 Austin Healey steel oem wheels Austin Healey Classifieds 0
F Installing AC in my 1960 Healey Austin Healey 14
G 1960 3000 BN7 Top Help Austin Healey 0
M TR2/3/3A 1960 TR3A turn signal harness Triumph 6
J 1960 Bugeye Paint Codes Austin Healey 1
K MGA 1960 MGA Vin MG 3
F 1960 FriskySport Barn Find Other British Cars 6
5 Proud of my 1960 Bugeye Spridgets 5
F Three worn hubs and wire wheel centers - What to do next? 1960 BT7 Austin Healey 6
R TR3 1960 refurbish Triumph 14
B Wanted Wanted: Trailer hitch for 1960 TR3-A Triumph Classifieds 7
A TR2/3/3A 1960 TR3A front brake dust covers Triumph 5
F TR2/3/3A 1960 TR3A starting chassis work Triumph 81
P 1960 Lancia Appia coupe Other Cars 1
F Wanted 1960 Triumph TR3A fuel tank Triumph Classifieds 5
Nugget 1960 Bugeye "Patents" inherited reconstitution Spridgets 12
6 For Sale 1960 Bugeye Survivor for Sale with Original Rubber Mats Spridgets Classified 0
T Wanted 1960 Jaguar MK2 front door wood trim, both right and left. Jaguar Classifieds 0
D Great Gas Mileage in Southern California [Circa 1960!] Austin Healey 3
M Wanted 1960 Bug eye sprite 1275 ! Austin Healey Classifieds 0
red57 1960 BT7 top mounting brackets Austin Healey 4
T TR2/3/3A Accelerator Say 1960 TR3 Triumph 11
B 1960 TR3 With rust in cylinders Triumph 7
busybrit For Sale 1960 MGA 1500 Restoration Project for sale. MG Classifieds 2
T needed 1960 bugeye parts Spridgets 4
Tinkerman TR2/3/3A 1960 3A post 60,000 top installation Triumph 6
Tinkerman TR2/3/3A Hood stick assembly 1960 tr3a Triumph 7
Tinkerman TR2/3/3A 1960 TR3A engine compression question. Triumph 7
Tinkerman TR2/3/3A Rebuilding SU carbs 1960 TR3A Triumph 3

Similar threads

Top