• The Roadster Factory Recovery Fund - Friends, as you may have heard, The Roadster Factory, a respected British Car Parts business in PA, suffered a total loss in a fire on Christmas Day. Read about it, discuss or ask questions >> HERE. The Triumph Register of America is sponsoring a fund raiser to help TRF get back on their feet. If you can help, vist >> their GoFundMe page.
  • Hey there Guest!
    If you enjoy BCF and find our forum a useful resource, if you appreciate not having ads pop up all over the place and you want to ensure we can stay online - Please consider supporting with an "optional" low-cost annual subscription.
    **Upgrade Now**
    (PS: Subscribers don't see this UGLY banner)
Tips
Tips

TR4/4A TR4A Assembly by a rookie (me!)

OP
Popeye

Popeye

Darth Vader
Bronze
Country flag
Online
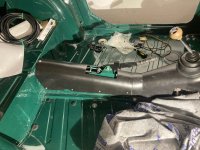
It has been some time since my last update - not for lack of progress, but while I have the right buts to make progress, I’d rather spend free time working.

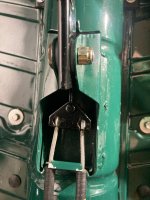
After the transmission tunnel, I installed the handbrake cables. Because I installed them on the brakes first, this resulted in some loss of paint on the handbrake area. I should have attached cables to the handle before the drums.

Installing the handbrake cover was a bit fiddly, in that I wanted to reuse the original holes in the sheet metal. Using calipers, I carefully measured the hole locations and transferred to the poly cover. Lucky me, of the eight holes I only had to “slot” two of them in the cover. The cover does require a bit of trimming in the back - easily achieved with sandpaper on a block. (I’ll have to trim some more after installing the rear bench carpet.)

Next up was installing the windshield frame. Some posts suggest the bolts cannot be accessed after installing the dashboard, and suggest to align the doors prior to installing the dashboard. I found the bolts are darn near impossible to get in the holes with the dash installed, but adjusting them is possible (awkward, but possible). Finger crossed I’m right!!

Before installing the frame, I glued the vinyl trim on, using Weldwood landau adhesive. Love the stuff, brush it on, but use a well ventilated space!

I used a piece of wire to pull out the seal flap when installing the windshield frame gasket (the one between frame and body, at the bottom of the frame.) I placed the wire on the body, lowered the windshield frame, tightened it a little, and pulled the wire out. Worked a charm.

As a side note: I used 14-ga house wire with insulation here and later when installing the windshield. I did this basis a video from “Rusty Beauties” - and find the wire is (1) stiff enough to stay where you put it, and push into places, (2) strong, and (3) the smooth insulation is slippery.
Worked for me, and I have no other experience to compare it to.
 

Attachments

  • 8BC72CCC-1C0B-48E4-B710-C17D9C0F3B4B.jpeg
    8BC72CCC-1C0B-48E4-B710-C17D9C0F3B4B.jpeg
    352.3 KB · Views: 54
  • 41132733-1B8C-4EE7-A252-1691A998D847.jpeg
    41132733-1B8C-4EE7-A252-1691A998D847.jpeg
    299 KB · Views: 54
OP
Popeye

Popeye

Darth Vader
Bronze
Country flag
Online
Plinthing:

To replace the plinth, I used a combination of old and new. The new plinth from TRF has an aluminum plate inside. The original has a steel plate. I ripped the foam off the old and glued the new foam aluminum to the cleaned up steel backing plate.
I wish I took more photographs, but the steel has more reinforcement at the edges, as well as an additional bolted connection to the dashboard near the scuttle vent cover. (Visible in bottom of lower photo.)

Unfortunately, the two metal plates meant the switches do not fit - the assembly is too thick. Using a Dremel I enlarged the holes in the steel plate and installed switches. See photo for reference.
3AB363CB-4969-4667-8E17-81DA45FBA713.jpeg
AFE548DF-AC59-4C30-A88F-85E21CBCC356.jpeg
 
Last edited:
OP
Popeye

Popeye

Darth Vader
Bronze
Country flag
Online
A few more updates; unfortunately this thread is well behind my work. It’s a pain to type on an iPhone!

After the plinth, I installed the instruments. It gets quite busy behind the dash with all the wiring. I largely followed the Advanced Auto Wire diagram. I think the wiring for the lights is incorrect on the diagram, but some measurements with a multimeter sorted things out. I’ll have to find my sketch and post it (currently at home).
The light bulbs in the new harness are wedge base, which is different to original. The “bulb kit” from TRF uses the original bulbs; a quick trip to my local FLAPS sorted this.

More importantly, the bulb holders on the new harness for the red/green warning and indicator lights do not fit. I removed the original light sockets from the original harness, cleaned them, and soldered them in.

Once this was sorted, I have a beautiful dashboard. Only issue: I tested my Speedo cable with a drill, and now my car looks like it is going 100 mph while standing still 🤪. The speedo will come out shortly for inspection and possible repairs.
58C45BAA-636F-4826-8151-3557CEC32B3D.jpeg
5A856E0A-585B-416F-A275-71611544BB7C.jpeg
E6F8F2FD-88AE-42C8-AC26-CD36B2A24B9F.jpeg
CE26A35E-EC68-4A9E-9BB2-07CC843EF2FB.jpeg
 

Attachments

  • AB1BBFD4-CD19-437E-9B30-FD500227790D.jpeg
    AB1BBFD4-CD19-437E-9B30-FD500227790D.jpeg
    273.3 KB · Views: 51
Last edited:
OP
Popeye

Popeye

Darth Vader
Bronze
Country flag
Online
Next up was the windshield installation.

I was very apprehensive about this, but in the end it was much easier than the poly gearbox install. Maybe I got lucky??

Installing the seal on the windshield was trickier than I anticipated. The seal seemed too small - but once I finally got it on it seemed almost loose. I think because it was curled up for a long time it just took some time to straighten. I used Griot’s Speed Shine as my lubricant; others have used k-y jelly. It took a bit of thinking to figure out which slot in the seal is for what - three things go in the seal: the windshield, the frame, and the chrome sealing / locking strip. The largest slot in the rubber seal is for the windshield, and the chrome strip slot points to the outside.

Once the seal was on, again it took a bit of thinking how the frame fits in the windshield seal. The slot in the seal for the frame is almost shaped like a “Y”: one flap on the outside of the body, and a second on the inside. And I can’t quite explain it, however when pushing the “rope” into the seal, it is important to put it in the frame opening closest to the interior.

For a rope, many folks suggest using paracord. However, upon seeing Rusty Beauties video using a wire, I got to thinking maybe a wire is the best. I used 14-gauge home wire (with smooth plastic insulation), pulled from a coil on Romex I had. It is strong, slippery, and holds its shape. Again, using speed shine, I pushed it into the slot, making sure it was in the side towards the interior.

Deep breath. Go check phone for email. Make dinner for family. Find any excuse. Finally I got the courage to “just do it”. Two tries later, my windshield was installed. Intact. Holy moly!

Installing is a combination of brute force (pulling the wire), pushing hard enough not to break the glass (keeping the windshield in place), and breathing (while pushing). Having a plastic trim tool is essential to pull the seal where the rope trick did not fully pull out the seal. There were a few small sections (1/2” or less), the biggest one bottom center where I started. (Easy does it, slowly working out the missing sections with the tool.) I did it alone, but having a helper push on the one side (left-right) while working on the other other would have helped.

The chrome we strip went in easily; a tiny bit of persuasion, but surprisingly well. I suspect if this does not go in easily - as happened to some folks on the internet - it is because the windshield seal is not fully seated. I cut the ends to fit with a small gap - knowing that in the future I will have to repair this as the strip shrinks. I’ll likely go with the “two joint” solution, and have kept the remnant of the strip in anticipation.

All in all, about two hours. Much easier than that dang transmission cover!!
6016A513-8764-4964-ADC5-7A9DCE7145E6.jpeg
9F9C5EA7-F5E2-4CD3-8905-8440E1E406FC.jpeg
09C1CCE9-E23C-4665-9697-81F1DC31BD2A.jpeg
 
Last edited:

KVH

Darth Vader
Country flag
Offline
Looks really great. I almost passed out putting my windshield in 3 years ago. Forget the silly tools I tried. I need to watch that Rusty Beauties video and see how the wire works. I never want to go thru that again. For me, the transmission cover was a relative breeze.
 
OP
Popeye

Popeye

Darth Vader
Bronze
Country flag
Online
A few updates - I’m months behind on my documentation!

Interior install. I used a carpet kit from The Magic Carpet Factory / TRF, plus jute underpayment. (Better products than jute exist, but I’m a sucker for originality!) Overall I am impressed with the quality. I mostly followed the Moss instructions. I used DAP landau contact cement for everything, I bought it from Grainger: https://www.grainger.com/product/29...gucid=EMT:10339122:Item:CSM-323&emcid=NA:Item

The rear wheel arches are a pain. But I think they came out ok (not perfect). I kept the original holes in the sheet metal for most the screws, using a U-shaped piece of wire to locate holes behind the panels (rear seat back, panels next to wheel arches, and footwell panels). In a few locations I moved the screw to a better location.

One caveat: the Dow adhesive reacts with the paint. Not a problem anywhere, except after I glued the jute to the floor carpets, I laid them into the car. I have some small paint wrinkles under the carpet. No one will know - but it annoys me 🤓
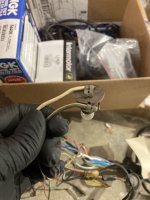
. (Paint and primer are not breached, there is no rust concern.)

And jute is messy! A lot of vacuuming was required!
79316F44-F6E2-400E-BB51-80431FAA764B.jpeg

A036D1CB-06D5-441E-AEF2-4E374B7927C1.jpeg

742A1E43-8757-4786-9BD8-77ABEE191593.jpeg

61B058F7-B834-48AC-A6F5-33893B37FF39.jpeg

F2D58C19-48AA-486A-9E96-A948629A6CE0.jpeg

C2709B25-F0BE-411C-B934-98AAB6871FB4.jpeg
 
Last edited:
OP
Popeye

Popeye

Darth Vader
Bronze
Country flag
Online
Next up was the speedo, stuck at 100. I started to disassemble it. I cleaned it, but ultimately decided to sent it out to west valley instruments for a proper rebuild (keeping the odometer reading), along with the tachometer. Both bounced when operated at a steady speed with a drill. And the trip Odo did not reset - I did not want to force it.

Both came back yesterday, and look great. I asked the faces not be repainted, as they are in good shape, plus all the restored instruments will match the unrestored ones.
 
OP
Popeye

Popeye

Darth Vader
Bronze
Country flag
Online
Installing fuel line was a bit off a pain - and should have been completed prior to me putting the body on the frame, but at the time I was not sure where the fuel tank outlet is positioned. Hindsight: run a line from the back of the t-shirt pressing to just behind the four-way brake fitting. Fit the final in from tank and out to pump after putting the body on.

I bought a tank fitting off eBay, claiming to be the correct bspp fitting. It fit, so no complaints, but I can’t vouch that you can’t get the same fitting at the hardware store.

I purchased lengths of brake line from NAPA, plus a basic tubing bender from Lowes. The NAPA guy told me I could bend the tubing around a beer bottle - he’s probably correct, but I think the $15 for the tubing bender was well spent.

I ran the tubing from pump to carburetors as original, although some say to run it behind the engine to avoid vapor lock.

Apologies for some of the “imperfect” camera angles - it’s hard to photograph under a car!

61808307-B5A4-4DBE-A057-4E834CCD9FE0.jpeg

AD3FD3E4-E9C8-4862-A669-DF5430F2445B.jpeg

8CD9912D-2302-437B-9099-96422BD03098.jpeg

61808307-B5A4-4DBE-A057-4E834CCD9FE0.jpeg

B5F075A0-2275-457C-A823-FCAABBA51A74.jpeg
 

DrEntropy

Great Pumpkin
Platinum
Country flag
Offline
Superb workmanship, Mike. 999 out of 1,000 folks who see the car when done cannot appreciate or understand what goes into a project like this.

You've gone over and above the factory's build quality, believe me. Any who've not BTDT will never understand.

Door fitment, hinges & latches will be almost as "fiddly" as the windshield install, BTW.
 
OP
Popeye

Popeye

Darth Vader
Bronze
Country flag
Online
Distributor installation was easy - once I read the instructions three times. Engine timing (timing chain) is done with number one at top of exhaust/intake stroke (when valves are opening and closing. Installing the distributor gear is when number one is at the top of the compression stroke!

Whoops. Fortunately the distributor shaft and drive gear are pokey-yoke such that it only goes together one way.

Once the engine was in the correct position, I reinstalled the distributor gear, and the distributor dropped right on.

Setting the static timing resulted in the distributor not being parallel to the engine. The attached picture is before setting the timing; once set, the distributor is rotated counter-clockwise maybe 10 degrees. Not much, but enough to catch my eye - and I am a believer in “if it does not look right, there is a good chance it isn’t right.”

However, jumping ahead, my engine runs beautifully. So I’ll leave it until I start to tweak.

Wires are NGK, plugs Champion 312 / L87YC. Distributor rebuilt by Advance Distributor. Lucas “Sport” coil - honestly not my intention, but I accidentally put it in a TRF shopping cart a while back. It is the correct resistance, so I’ll use it for now. (Astute eyes will see I used screws to attach it. I have since replaced those with the proper bolts; at the time I did not have 1/4-20 bolts. Bolts are much easier!)

84BE8A6B-EE72-46D5-BE9A-A50D5F68980C.jpeg
 
OP
Popeye

Popeye

Darth Vader
Bronze
Country flag
Online
Carburetors. Rebuilt by Joe Curto, and look beautiful. Assembling the throttle linkage is a bit fiddly, and I relied heavily on the parts manual and internet photos to assemble. Note: many photos are incorrect; don’t believe everything you read on the internet! The parts manual is correct - except for how part 145073 is installed. But with some headscratching and realizing there is only one way, I figured it out. I’ll have to get a better picture to share.

Somehow I lost the rod that connects the two choke actuators, part 511747. It is NLA, but I bought 5/16 rod from McMaster and cut to length. The two fittings, 511749 and 511750 are still available (TRF).

Installing the carbs is a bit fiddly, keeping the throttle and choke rods in place, plus some of the 1/4-28 nuts require pulling the carbs out a bit too clear the bodies - possibly because the new studs are longer than the originals??

I used basic filters; I may go with K&N later, but they are expensive. I’d love to use my original pancakes, but suspect they are not terribly efficient - I cannot find paper elements for them, and filling them with some sort of oily wool does not strike me as effective - but I have no knowledge in this area.

I also cut the choke cable housing pretty short, with hopes to not rub against the closed hood. The cable instead rubs against the carburetor housing, so I added some shrink tubing in that area. Note: since then I put shrink tubing on almost the full length of the cable. The metal sheath runs awfully close to the battery and high power bits. So I added a layer of protection.

DC5E4CF1-55B3-4CF9-9A80-338CB281C5BF.jpeg

5C9C12CF-3E27-47F2-9F80-15301AF97A8E.jpeg

6EADDA38-43FC-4330-BBB7-6B50F929485A.jpeg

857F8FA3-E3B6-4400-A1E2-D66CEFF3B980.jpeg

1266520F-CE5D-4FE8-9DAC-42C7B2636596.jpeg

7E5ADD78-848D-4C45-9642-7BB0D8F6C0C3.jpeg

B5F170F7-B626-4F52-978E-6589CCAA3CD0.jpeg
 
OP
Popeye

Popeye

Darth Vader
Bronze
Country flag
Online
Battery disconnect. I installed a Shallco 500D on the passenger side. I don’t have a good photo, but will post later.

I connected the switch to the negative side, which entailed running cables across the battery and back. (TR4A is negative ground.) A bit of extra mess, but functional. Housekeeping is needed with cable ties for the many control cables, battery cables, speedo and tacho cables, and wiring. I’ll do this once everything is in its place.

For the battery I used a group 27 Interstate, from Costco. Heavy - I got some exercise lifting it in and out!

The battery tie-down bar: I replaced the nylock nuts with double nuts. Threading the nylock down the long length of rod with the other end loose is a pain, to put it mildly. Also - more importantly, the bar comes awfully close to the terminals. I cut a recess for the positive terminal, and need to do the same for the negative terminal.

The pictures are not the greatest; I will update.

FC84B27A-41A7-4120-AA20-82634A1AFA30.jpeg

516E8DAE-2B02-4EF1-9FD8-068748EB73F1.jpeg
 
Last edited:
OP
Popeye

Popeye

Darth Vader
Bronze
Country flag
Online
First Run! Missed Sir Black’s birthday by two days.

Filled the engine with 30 weight Penn Grade oil (many thoughts and opinions on the right oil 😀), and the radiator with 50/50 NAPA antifreeze.

After completing a long checklist of items - from battery disconnect to functioning brakes and clutch, and reading an excellent post on Grassroots Motorsports: “13 steps to ensure you don't blow up your engine on first start-up” by Carl Heideman, > 13 steps to ensure you don't blow up your engine on first start-up <, with major case of the nerves, I turned the key.

First without the plugs to build oil pressure. This took a bit of time, maybe 45 seconds for the gauge to start moving. I do not have a long enough and strong enough rod (boy there is a bad joke…🤪) to run the oil pump directly via the distributor shaft.

Then I pushed the car out of the garage. I put a few gallons of gas in the tank, and primed the pump with the lever (glad I bought the upmarket TRF pump!).

Nerves! I had a drink (water), went to the bathroom, ate a cookie, and finally took a deep breath, and cranked it up. On the third try it coughed to life - and quickly settled down beautifully. I hit the accelerator to 2000 rpm, watched the oil pressure climb nicely, and soon saw a cloud of smoke…

Water was peeing out from the rear plug in the engine. I had masked it when painting the block - and did not see the missing plug. (The tape sealed coolant surprisingly well, the coolant loss was minor.) I shut it down and pushed her back into the garage.

But she sounded so good for a few short moments. Since then, I’ve opened up the idle adjustment a bit (so the motor will idle at 2000 rpm). I’ve plugged the hole this week (1/2-20 bolt plus copper washer), refilled the lost coolant (actually I drained and replaced), tightened an oil leak at the filter, and will restart this weekend.

A1DCF6EC-FFD4-43E9-91DB-097D459004AF.jpeg
 
Last edited:

charlie74

Jedi Warrior
Country flag
Offline
Congratulations! It is nerve wracking but there is no other way to know if it’s going to work or not…😄.

That article was interesting and nice that it was written about a Triumph as it will look familiar to you/us. The only thing I might quibble with and you didn’t say whether you did it or not was to do a compression before the first start. I did it and found that I had inconsistent numbers and after asking the internet, the common wisdom is that a pre-start compression test wont tell you much more than that you remembered to put all the pistons in! I do think though, that it will give you an idea that your cam timing is in the ballpark. I asked about this and was told by knowledgeable members about this and was told that compression won’t stabilize until the piston rings bed in.

Anyway, congratulations again and your car is looking great 👍!
 
OP
Popeye

Popeye

Darth Vader
Bronze
Country flag
Online
A few odds and ends:

Door seals, I used the separate fuzzy seal and door seal, both from TRF. I’ve not fitted the doors, but the seals seem soft; fingers crossed the doors close nicely.

Electric bits, I’m putting a diode and fuse on the OD solenoid. Following great write up by Randall.

Emergency hood release is installed.

Brake and clutch bleeding using a Gunson EZBleed. Great concept, not perfect in use. But once all leaks are addressed (BEFORE adding fluid), it works a charm. The brake master cylinder lid is bigger than the adaptors that come with the kit, and I modified my old lid.

The dipstick was loose; the felt too wide to fit in the engine. I used two felts, one inside the cup of the dipstick, and a second one that I trimmed the OD so it fits snugly into the engine.

Vacuum line from carb to distributor. I have a male nipple on the carb, and used a TR6 rubber elbow. The distributor has a threaded fitting, and I found a compression fitting at the hardware store.
 
OP
Popeye

Popeye

Darth Vader
Bronze
Country flag
Online
That article was interesting and nice that it was written about a Triumph as it will look familiar to you/us. The only thing I might quibble with and you didn’t say whether you did it or not was to do a compression before the first start. I did it and found that I had inconsistent numbers and after asking the internet, the common wisdom is that a pre-start compression test wont tell you much more than that you remembered to put all the pistons in! I do think though, that it will give you an idea that your cam timing is in the ballpark. I asked about this and was told by knowledgeable members about this and was told that compression won’t stabilize until the piston rings bed in.

Thanks! I did not do a compression test, as I was not sure what I would do with the results. It may make sense to keep track of compression over time - initially to confirm that the engine is built correctly, then confirmation that things are needing and breaking in as they should.
 

sp53

Yoda
Country flag
Offline
I know how you feel, my nerves are always on edge with the first start up. Sounds like things are going to work out fine. I am glad to hear that you have done an excellent job bring the old girl back to life.

Steve
 
OP
Popeye

Popeye

Darth Vader
Bronze
Country flag
Online
Woo-hoo! Once I fixed an oil leak from a folded o-ring on the oil filter, the engine no longer leaks any fluids* while running. I ran for about 25 minutes at 2000 rpm (using an electric tachometer, temporarily connected). Oil pressure held rock steady, as did engine temperature. (Ambient temps near 50 degrees.) Using a pyrometer, the exhaust manifolds temps were even between cylinders. Yay!!

After running for the initial 25 minutes, I adjusted the idle speed to 1,000. Below 1000 the idle is a tiny bit “lumpy”, perhaps needing some sorting of timing and the like. (Emphasis on “tiny”; the motor sounds good.) I was tempted to do a celebratory drive around the block, but figured I had used up my luck for the day (and i was hungry - it was dinner time).

(*Relative to TR engines… I still have a brake leak to repair. I believe I have a bad flare on the passenger side brake line between caliper and flex hose. I’ve ordered a replacement and will fit shortly.)

Off to smoke a cigar… (or maybe just a beer; I don’t smoke!)
 
OP
Popeye

Popeye

Darth Vader
Bronze
Country flag
Online
Two photos of my battery disconnect. In hindsight I might have moved the switch a little further back; I have to stretch a bit to reach it when sitting in the driver’s seat. The battery cables from NAPA are red; I put sections of black shrink tubing on them to indicate they are negative. Unfortunately the positive cable (from TRF) is black… confusing even further the “negative” or “positive” ground! (TR4A’s are negative ground.)

I may turn the battery around, this would shorten the battery cables. Later…

I definitely need to do “housekeeping”, cleaning up the cable runs - aesthetically and for safety: keep wires from touching the hot engine, and avoid any accidental shorts.

You can see the shrink tubing I put on the choke cable, to avoid inadvertent electrical connections / shorts.

I am working to finish the electrics, then on to the doors, and installing the body panels. (I may install the top before panels, if only to avoid accidental scratches.)

DBFF770C-B1C2-496E-816E-AABFECE24D45.jpeg

4F02BBB7-6892-44C6-9F7D-223EF07FDBA7.jpeg
 
Similar threads
Thread starter Title Forum Replies Date
KVH General Tech Assembly Lube and Zinc and New Cam--TR4A Triumph 7
J TR4/4A TR4A solid axle assembly Triumph 15
Scotsman TR4/4A Moss seat covers for TR4A missing spring tensioner pocket Triumph 0
trbby2 TR4/4A TR4A Intermittent rear wheel locking? Triumph 19
G Wanted Tr4a boot lid Triumph Classifieds 2
J TR4/4A TR4A automatic transmission conversion Triumph 6
D TR4/4A TR4a Fuel Pump Triumph 10
KVH TR4/4A Routing of TR4A Fuel Line Triumph 7
glemon TR5/TR250 Answering My Own Question Rear Tube Shock Conversion Numbers TR4a-TR6 Triumph 0
M Wanted Dampener Tr4a crank pulley Triumph Classifieds 9
T Wanted TR4A hardtop Triumph Classifieds 2
KVH General Tech Improvement to TR4A Muffler Triumph 1
KVH General Tech TR4A Brake Bleeding Triumph 5
KVH General Tech Reinstalling TR4A Interior Triumph 13
KVH General Tech Yes, the Horns Again--Electrical TR4A Triumph 8
Popeye For Sale Original TR4A windshield - with crack Triumph Classifieds 1
KVH General Tech New Clutch Installation--TR4A Triumph 5
RJS TR4/4A TR4A Temp Gauge Scale Triumph 6
Popeye Wanted WTB: two speed wiper motor TR4A / 75568 - Found Triumph Classifieds 2
2 Wanted Wanted - TR4A parts engine Triumph Classifieds 2
Popeye TR4/4A Latest thoughts on TR4A front springs? Triumph 8
DocDup1 TR4/4A TR4A Wiper Moror Rebuild Service Triumph 5
Ericstammer TR4/4A TR4A body on TR4 frame Triumph 0
Popeye TR4/4A TR4A rear tub repairs (likely accident damage in front of rear wheels) Triumph 6
Sarastro TR4/4A Another 50K TR4A Triumph 5
DocDup1 Wanted TR4A Accelerator Linkage Lever Triumph Classifieds 0
J TR4/4A TR4A seat retaining clip Triumph 5
Carlos Trade Free for the cost of shipping TR4A radiator Triumph Classifieds 2
C TR4/4A Advice for grafting TR6 frame front to TR4A frame rear Triumph 15
fpstude TR4/4A Replacing Rear Flexible Brake Hoses on TR4A w/ IRS Triumph 11
RJS TR4/4A TR4A Seat Upholstery - Piping Question Triumph 7
H TR4/4A 67 tr4a runs rough and losses power when hot but not over normal temp Triumph 14
RJS General TR TR4A Seat Rebuild Triumph 12
B 1966 TR4A two speed wiper motor Triumph Classifieds 1
T TR4/4A Recommendation on top for a late TR4A Triumph 8
S TR4/4A Build Date Triumph TR4A IRS Triumph 3
R For Sale Tr4a parts Triumph Classifieds 2
Sarastro TR4/4A TR4A top's rear attachment Triumph 2
H Wanted Looking for TR4A intake # 307455 Triumph Classifieds 3
fpstude TR4/4A Steering U-Joint Question for TR4A Triumph 5
S For Sale Triumph TR4 and TR4A Factory Workshop Manual on CD/ROM - 1962 - 1968 Models Triumph Classifieds 0
G TR4/4A Vin # for TR4A Triumph 3
M TR4/4A Seats for TR4A Triumph 3
B TR4/4A TR3 valve cover on TR4A Triumph 4
T For Sale TR4A Grille Triumph Classifieds 0
K For Sale TR4A Intake Manifold..Put one on your TR3...improves air intake....cheap like borsht. Triumph Classifieds 2
K For Sale TR4A Grille with Embedded Fog Lights Triumph Classifieds 0
K TR2/3/3A TR4A 16P Girling Calipers Adapted to TR3. Hose/tubing routing? Triumph 15
D Wanted TR4A Live axle frame Triumph Classifieds 0
D TR4/4A Tackling the biggest problem with my TR4A.... Frame Damage :[ Triumph 70

Similar threads

Top