• The Roadster Factory Recovery Fund - Friends, as you may have heard, The Roadster Factory, a respected British Car Parts business in PA, suffered a total loss in a fire on Christmas Day. Read about it, discuss or ask questions >> HERE. The Triumph Register of America is sponsoring a fund raiser to help TRF get back on their feet. If you can help, vist >> their GoFundMe page.
  • Hey there Guest!
    If you enjoy BCF and find our forum a useful resource, if you appreciate not having ads pop up all over the place and you want to ensure we can stay online - Please consider supporting with an "optional" low-cost annual subscription.
    **Upgrade Now**
    (PS: Subscribers don't see this UGLY banner)
Tips
Tips

TR2/3/3A TR3A Silentbloc

mrv8q

Luke Skywalker
Country flag
Offline
So I'm driving to my club's breakfast meeting, and I have to brake.... then next turn, my heart leaps into my mouth, because there's suddenly a ton of play in the steering; not fun on the 405 freeway!

After gingerly driving the rest of the way, I investigate in the parking lot, and here's what I find:

IMG_0580.jpg


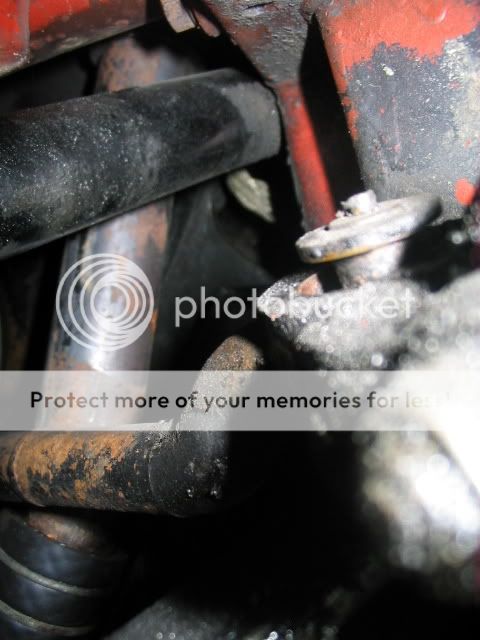
I'm guessing the silentblock disintegrated.... another pic:

IMG_0581.jpg


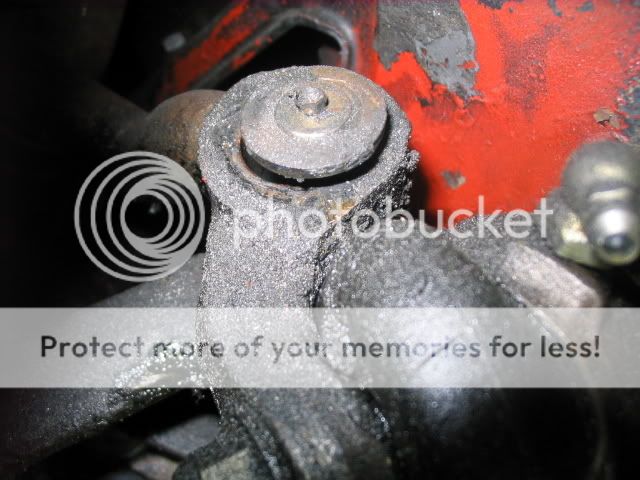
Is this a simple matter of loosening the bottom nut, tapping up the remains, and replacing w/ a new piece? I know there are 2 Silentblocs. I'm hoping I don't have to remove the front apron, etc. Any BTDTs would be greatly appreciated!
 

Harry_Ward

Jedi Knight
Country flag
Offline
Kevin,

There is an outer steel sleeve that usually becomes one with the center tie rod, while the rubber bushing disintegrates, the inner tapered steel pin just floats around or eventually pops up. Usually the center tie rod, drop arm, and idler lever has to be removed as a unit to remove the vertical links completely in a vise. There was a lot of discussion about this last winter. I suggest you try a search first. They are a cursed thing to get apart. I had my apron off to remove it but I think some have removed it with the apron on.
 

Geo Hahn

Yoda
Country flag
Offline
Kevin - If you will send me an email at ahwahnee-at-cybertrails.com I will suggest a method to deal with this. Put "TR" in the subject line to avoid the spam filter.
 

PeterK

Yoda
Offline
It requires a press to remove the outer sleeve of the silent-bloc. I just completed this on my 3A.

I suggest popping off the L&R inner tie-rod ends from the center link, unbolting the idler bracket and arm from the frame leaving the center link attached, then removing the center link from the steering lever. I think that you can do this with the wheels off and leave the apron on. The steering arm is NOT removeable from the box installed.

Then remove the idler and press out the silent-blocs. I used the standard steel and rubber replacement blocs ($30) but British Frame and Engine sells a steel/bronze replacement that won't come apart like yours for $100 or so.

You can install the new ones carefully in a vice but you need to press out the old ones. Also be sure to take pictures before removing parts because the parts manual picture show an incorrect orientation of the parts.

Check the other parts while you're in there, especially the idler.
 

MDCanaday

Jedi Knight
Offline
As long as your doing this fun little job you should give some attention to the idler arm. A lot of play in the steering can be traced to these.
A quick fix for a sloppy idler is to (after removal/cleaning) grind off the welds that fix the shaft to the arm,screw the shaft in 1/2 a turn(or more) and check the movement of the arm to make sure you still have full motion. Once the shaft is down into virgin threads the slop quickly vanishes. Re-weld it and use a high quality moly grease/high temp ....Beats buying a new one!!
MD(mad dog)
 

NickMorgan

Jedi Knight
Offline
Kevin,
I replaced my silent blocks a few years ago when the MOT tester wouldn't accept that they were meant to have some play in them. I therefore fitted brass and steel replacements from Revington TR. You press the brass sleeves into the centre tie rod and then ream them out to allow the steel pins to fit. You also have to drill the tie rod and fit a grease nipple to each side. I can't say that I noticed a great deal of difference when driving, but there is no problem with the MOT test any longer.
I didn't have to remove the front apron and I just released the two silent blocks from the steering box and idler arm and removed the centre tie rod.
2006001.jpg
 

TR3driver

Great Pumpkin - R.I.P
Offline
PeterK said:
It requires a press to remove the outer sleeve of the silent-bloc.
An alternative method is to pull out the center pin, clean out the rubber remains, then carefully saw almost through the outer sleeve with a hacksaw blade. Then drive the sleeve out with a punch & BFH. I've done it several times (before I got the press).
PeterK said:
but British Frame and Engine sells a steel/bronze replacement that won't come apart like yours for $100 or so.
Note that's $100 for the pair. I have them, and I really like them. Should last forever, while some of the replacement silentblocs weren't making it to 5 years for me.
 

PeterK

Yoda
Offline
Someone used the "alternative" method on mine at one time because after I pressed out the old steel sleeve, I found nice straight cut marks (from a hacksaw blade perhaps?) in the centerlink.

You can probably change nearly anything with a BFH and a hacksaw and hold most things together with bailing wire and duct tape (which I carry in my trunk!) Still prefer the press.

Yup, $100 pair versus $30 pair for the oem style rubber ones. But then you have to add the price of an adjustable reamer to fit the bronze bushings, drill the link for zerk fittings or pay a machine shop to do it for you so that adds a bit too.
 
OP
mrv8q

mrv8q

Luke Skywalker
Country flag
Offline
TR3driver said:
An alternative method is to pull out the center pin, clean out the rubber remains, then carefully saw almost through the outer sleeve with a hacksaw blade. Then drive the sleeve out with a punch & BFH. I've done it several times (before I got the press).

So, Randall, are you saying by removing the nut on the bottom of the silentbloc, I can drive it out the top? I've only seen a picture of the silentbloc, so I'm not exactly sure what I expect to see here, and I haven't worked on suspension since my '55 BelAir in high school, 30+ years ago..... ( I have the Silentblocs on order from TRF). If that's successful, I'll post a pic of what I find.... Thanks to all for their informative posts!

Oh, I get it now.... after looking at Nick's pic, there's a center pin, now vanished rubber surrounding that, and a circular metal piece (outer sleeve) around that....
Wow, it's going to be tight getting a hacksaw in there, hence Peter's comment. If I manage to get this all out, do I use the BFH to get it back <u>in</u>?
 

PeterK

Yoda
Offline
The slient bloc is the similar construction as the front leaf spring slient bloc. It is an outer steel sleeve that is surrounded by a layer rubber that captures a tapered steel pin. So the inner taper and outer sleeve are held together and cushioned by the rubber.

Your can remove the nut and torch out the rubber and the inner pin will come with it (if you can stand the smell.) This will leave the outer sleeve still pressed in the center link. The outer link is not tapered and can be sliced (with a hack saw blade) in order to weaken it to allow it to collapse inwards a bit as you drive it out. On my press, the intact slient-bloc gave some good resistance before finally popping and pushing out.

To install the new bloc, use a metal vise with smooth jaws to slowly squeeze the bloc into place, alternating from side to side to get it in straight.

If you go the BFH route, make sure that you support it so that all forces are directed on the sleeve and you are not hammering against the bar part of the link or you will bend it. Use a solid support directly underneath the pin with a hole big ehough for the sleeve to push through, and make sure that it is not supported by either side of the bar.

I seldom have seen used links available on ebay so be careful. And remember the the new slient-bloc press fits into the hole so don't hurt the hole or the new one won't fit either.
 

TR3driver

Great Pumpkin - R.I.P
Offline
mrv8q said:
So, Randall, are you saying by removing the nut on the bottom of the silentbloc, I can drive it out the top?
That's the general idea, but that's a locking taper joint between the bottom of the silentbloc and the idler/Pitman arm. For the BFH approach, you'll need two of them : one to back up the arm and the other to maul the end of the silentbloc. A tool like this
https://www.thetoolwarehouse.net/shop/TA-61900.html
makes the job a lot easier and reduces the chances of damaging something else. The more common "pickle fork" type tool won't work, as the top of the silentbloc will come apart before the locking taper does.
mrv8q said:
Oh, I get it now.... after looking at Nick's pic, there's a center pin, now vanished rubber surrounding that, and a circular metal piece (outer sleeve) around that....
Wow, it's going to be tight getting a hacksaw in there, hence Peter's comment.
Keep in mind Nick's photo is not of a standard Silentbloc. On a standard one, the outer shell is quite thin and hence the center hole is pretty roomy (once the rubber & center pin are out of the way). Plus it won't hurt anything if you manage to nick the center link a bit. Once you get close, stop and examine the cut frequently. It will be apparent if you've cut through the sleeve, as there will be a dark line between the bright metal of the sleeve and the bright metal of the center link.
And I agree entirely, if you have a press at your disposal, use it. The hacksaw & BFH approach is more suited to shade-tree mechanics /bcforum/images/%%GRAEMLIN_URL%%/smile.gif
mrv8q said:
If I manage to get this all out, do I use the BFH to get it back <u>in</u>?
It all goes back together much easier than it comes apart. I'd suggest a vice to push the new silentblocs into the arms, but I suppose a BFH would do.

If you want, you can bring the pieces to my place & I'll show you how. I've even got a press now (but haven't touched a silentbloc since I converted to the brass/SS ones some 10 years ago). I'm in Lakewood, off the 91.
 
OP
mrv8q

mrv8q

Luke Skywalker
Country flag
Offline
Thank you all for the advice, I'll examine the situation more this weekend.... I'm sure more Qs to follow.....
 
Similar threads
Thread starter Title Forum Replies Date
trglory TR2/3/3A TR3a spark plugs Triumph 1
P For Sale 61 TR3A Triumph Classifieds 1
D TR2/3/3A 59 TR3A Gearbox lever will not move. Triumph 11
Q TR2/3/3A 61 TR3A Fuel Pump Triumph 4
71TR6 TR2/3/3A TR3A Front Bumper Mount Triumph 11
mctriumph For Sale Project car 61 Tr3a Triumph Classifieds 0
71TR6 For Sale TR3A Nose Triumph Classifieds 0
71TR6 TR2/3/3A A TR3A wiring question Triumph 17
P TR2/3/3A 1958 TR3A missing on cyls 2 & 3 Triumph 8
mctriumph For Sale scrapping two 59 Tr3a's Triumph Classifieds 15
J TR2/3/3A TR3A Finally on the Road! Triumph 6
angelfj1 TR2/3/3A TR3A Boot Millboard Install Triumph 7
G TR2/3/3A TS37903F Is my engine a TR3A engine because my starter says no. Triumph 3
B TR2/3/3A TR3A Gearbox fluid capacity question Triumph 7
Hamish Racing TR2/3/3A Harewood hill climb Yorkshire TR3a Triumph 3
Hamish Racing Harewood Hill Climb Yorkshire TR3a Racing 0
J TR2/3/3A 58 TR3A Coil weak? 9KΩ on the secondary with a 1968 HA12 45208A non-ballasted coil. Triumph 4
J TR2/3/3A 58 TR3A Coil weak? 9KΩ on the secondary with a 1968 HA12 45208A non-ballasted coil. Triumph 1
T TR2/3/3A Looking for a TR3A front bumper Triumph 6
Hamish Racing General TR TR3a hillclimb Thumdrrstorm video uk Triumph 4
Hamish Racing General TR TR3a faster that a Lamborghini Huracan STO ?? Triumph 6
W For Sale 1960 TR3A for sale Triumph Classifieds 0
tr6nitjulius General TR 6/24/23 TRIUMPH TR6 (5) TR8 (2) Spitfire (1 RHD of 2) TR3A (1) Triumph 0
D TR2/3/3A tr3a occasional seat padding Triumph 10
G For Sale 1960 TR3A for sale $11,999 Triumph Classifieds 0
G For Sale NEW PHOTOS: Triumph TR3 Chassis Frame + Front Suspension, Fits TR2,TR3,TR3A,TR3B Triumph Classifieds 1
Hamish Racing TR2/3/3A Greenville TR3a V8 ? Triumph 8
T TR2/3/3A Would like a paper pattern for TR3A hood stick cover Triumph 0
W TR2/3/3A 1960 TR3A Radiator replacement recommendations Triumph 11
T TR2/3/3A TR3A Windshield Question Triumph 4
Hamish Racing TR2/3/3A Anglesey (Wales) TR3a track videos Triumph 3
RonC TR2/3/3A TR3A Hardtop Seals Triumph 7
T TR2/3/3A TR3A Disk Brake Question Triumph 10
G TR2/3/3A TR3A Front Sway Bars - Choice? Triumph 3
Hamish Racing TR2/3/3A TR3a British Hill Climb Shelsley Walsh Triumph 8
T Wanted Working Fuel Gauge for TR3A Triumph Classifieds 5
T For Sale TR3A Original Radiator Triumph Classifieds 3
Hamish Racing TR2/3/3A TR3a Faster Lap Times than a Ferrari F430 ?? Triumph 1
Hamish Racing UK hill climb TR3a Racing 0
Hamish Racing TR2/3/3A TR3a UK hill climb video Triumph 4
Hamish Racing TR2/3/3A 3 sisters fun in a TR3a ! Triumph 5
T TR2/3/3A TR3A Fuel Gauge problem Triumph 10
A SOLD!! TR3A Girling Type A brake caliper for right front Triumph Classifieds 0
M TR2/3/3A 1960 TR3A--intake manifold-to-SUH6 carbs studs Triumph 3
Hamish Racing General TR TR3a and TR7V8 Shelsley Walsh Hill climb action Triumph 0
Hamish Racing TR2/3/3A Fast and wet TR3a Triumph 0
Hamish Racing TR2/3/3A TR3a video Triumph 3
F Wanted TR3A rear seat peg and clip Triumph Classifieds 2
angelfj1 TR2/3/3A TR3A Stone Guards Triumph 3
Hamish Racing TR2/3/3A 1959 TR3a used in anger Triumph 5

Similar threads

Top