• Hey there Guest!
    If you enjoy BCF and find our forum a useful resource, if you appreciate not having ads pop up all over the place and you want to ensure we can stay online - Please consider supporting with an "optional" low-cost annual subscription.
    **Upgrade Now**
    (PS: Subscribers don't see this UGLY banner)
Tips
Tips

TR2/3/3A Tips for fitting tub on TR3 prepared frame

PatGalvin

Jedi Warrior
Country flag
Offline
Guys

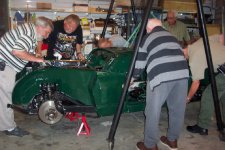
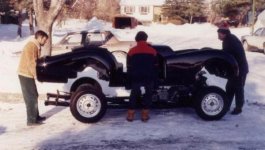
After my engine startup follies, I took a two week hiatus to catch up on fall pruning and other home repairs. The antifreeze smell is starting to diminish in my garage. I feel my mojo is returning so I'm starting to plan my next conquest - fitting the tub on the frame.

Rolling chassis is prepped and almost ready for tub. Tub was blasted and epoxy primered so is pretty clean. I don't have any problem lowering this on the tub but how does one go about shimming and fitting the tub on the frame? I've not been able to find any info on this in any of my rebuild references.

If you can provide a few tips on the steps, I'd appreciate it. I'm going to fit the body, set my panel/door gaps, and then remove and paint all (under, over, inside, engine compartment, etc.).

Thanks much. Here's a few pics for your continued enjoyment.

Pat


liftingBody2.jpg


DSCN1456.jpg


IMG_7494.jpg


IMG_7865.jpg


IMG_6737.jpg


triumph006.jpg
 
D

DougF

Guest
Guest
Offline
Each car is different and can vary a little bit, so there is nothing definitive. Did you keep a record of what shims were at each mounting point?
 
OP
PatGalvin

PatGalvin

Jedi Warrior
Country flag
Offline
Nope, we'll have to consider this mount virgin territory. After changing nearly every panel on bottom of tub, I doubt that any shim locations or thicknesses would be the same anyway.
 

luke44

Jedi Warrior
Silver
Country flag
Offline
Take a look at the mount kit illustration on TRF's website and use this as a starting point. The long rubber straps are a given so you can permanently mount them. After that, you need to mount all the body panels, doors etc, and check all the seam fits.

Then, moving, adding, subtracting shims here and there, you adjust the seams - pulling them open or closing them up. It's quite amazing how much you can change the panel seams with this method. It's a matter of patience - undoing, redoing etc.

Good luck...and keep the pix coming....
 

angelfj1

Yoda
Country flag
Offline
Pat: a couple of things that may seem obvious, but they are essential. Make sure the car is on a level surface, sitting on the tires and not on jack stands. We used an inexpensive laser level to check. When you tighten the bolts at the mounting points, do this gradually, that is move from point to point rather than tightening one point and then the next. You may find that the body shell will take some time to settle. This is normal, be patient. The entire procedure may require a few iterations. Good luck.
 

TFB

Jedi Knight
Country flag
Offline
Pat ,beautiful chassis.Just curious,Is that the wizard radiator,and did you go with electric or some other fan?
Also is that a degree wheel on the crank pulley,and what belt conversion did you use.Thanks
Tom
 

M_Pied_Lourd

Darth Vader
Country flag
Offline
Hi Pat,

Right behind you in the progress department.....just need to get the 6 into storage to give me some room in the garage to go on with the body repairs...

img_0591.jpg


What I plan to do is this. I did buy the body mounting kit from TRF and plan to use their diagram to place the pads/spacers initially. I then plan on dropping the body on the frame to work on the fit before I send it out to be painted.

Tom, I might have the same set up as Pat.

I am running a Wizard rad mounted with a SPAL puller fan and fan eliminator kit. Bought this set up from Art Lipp.

img_0312.jpg


Looking forward to your progress report Pat. Good Luck.

Cheers,
M. Pied Lourd
 

mallard

Luke Skywalker
Country flag
Offline
It looks like a few of us in in about the same stage of restoration. Your chassis looks very nice. I can't tell for sure if the trans is installed or not. Before you put the car on it's wheels, you want to have as much of the total car weight as you can. Then the frame will relax and you can get started on the spacers. When I removed my body I saved all the original spacers and marked them were they went. The locations and amount of spacers was almost exactly as TRF shows. The only area of mine that seems to have a problem is small square tube angle piece the mounts to the inner fender. This may change when I get all the weight on the car. Insted of putting my car on its tires I use an old set of rims only and set them on wood blocks. It gives you some more room to work without the tires being mounted. As mention above fit and refit is the order of the day with this stage. It takes time. I even use sand bags to help to the weight in the car. Take your time and it will look great.
 

tinman58

Jedi Knight
Silver
Country flag
Offline
Hey Pat!
There area couple of us here in Brentwood that would not mind a drive up to give you a hand on setting the tub or any thing for that matter. Just PM me when you need a hand. 160 up to Sacramento is a nice drive.
 

Tinkerman

Darth Vader
Offline
Pat, as I recall when I did mine I had an A frame hoist and four or five guys around to help me. Had to guide it in and around skinned up some paint on the frame and the steering column. But nothing major.
SWITBO supervised.

Dick
 

Attachments

  • 22958.jpg
    22958.jpg
    102.1 KB · Views: 347

Don Elliott

Obi Wan
Offline
You don't need a hoist to hold and lower the body onto the frame. Here's how we did mine on New Years Eve in 1989.
 

Attachments

  • 22959.jpg
    22959.jpg
    32 KB · Views: 345
OP
PatGalvin

PatGalvin

Jedi Warrior
Country flag
Offline
Thanks to all for responses. I'm thoroughly enjoying the thread as well.
Dan, help from the Brentwood contingent would be most appreciated and it would be great to get to know you guys. I'll PM you and we can see what dates might work for the initial fitting of the tub.

When I removed this, I just lagged a large eye bolt into the garage rafter and used a come-along to lift body off frame. Expect that would make install very easy, similar to Dick's A-Frame. It's not heavy - I move it with my two teenage sons.

Pat
 

MDCanaday

Jedi Knight
Offline
Great pix!!! Back to the original question,IMHO having done several 2's and 3's. the 4 main pads are a no brainer but you should not be less than 3 on any one out rigger. The reason is that the front and rear mounts may need to pull down slightly for proper panel alignment.This is most critical in the front.Often the apron will fit but the hood will not have room.Test assembly is the key here!!
MD(mad dog)
 

Tugboat

Senior Member
Country flag
Offline
Pat,

Let me know if you need some muscle. "Strong backs, weak minds," and all that.

Mike
 

oldman

Freshman Member
Offline
Hi Guys,
just a beginner here... will a TR 3 ('57) tub fit a TR 3A frame? My "new" tub is pretty good, but the frame
may be toast, so I need to know what to look for.
Thanks!
Oldman
 

martx-5

Yoda
Country flag
Offline
In a word, yes. It will fit on a TR2 frame also, but there were some running changes made such as beefing up the shock mounts.
 

John_Progess

Jedi Warrior
Country flag
Offline
How much can you expect to alter the door gaps by adding/removing shims? My left side rear door gaps are open about 3/32" at the bottom so the door needs to move forward at the top but my door to front fender gap is good. My right side door gaps are good. I also gather that the frame should be loaded with the engine and trans before you start this process. My car is a 1960 and was disassembled when I got it. Thanks for your help.
 

TR4nut

Yoda
Country flag
Offline
John- what is the top gap at the rear of the door? 3/32" doesn't seem like much - is that the difference between top and bottom gaps? If you add one or two shims on each outrigger pad area on that side it should spread the door width a bit if needed.
 
Similar threads
Thread starter Title Forum Replies Date
T Wheel cylinder fitting kit - any tips? Triumph 4
CraigLandrum TR2/3/3A TR3 door fitting tips? Triumph 16
T Rack gaiters - tips on fitting w/out going crazy Triumph 4
S TR2/3/3A tips for mig plug welding vertically? Triumph 11
J Tips for quarter elliiptic spring install Spridgets 3
W TR6 Anyone add Exhaust tips to standard exhaust Triumph 4
PC DIY tips from Bo his self Other Cars 0
BoyRacer Need Tips on getting wiring harness through firewall Austin Healey 4
BoyRacer Tips on gluing new fabric to dash on my BT7 Austin Healey 10
HighAltitudeTR3 TR2/3/3A Leaky Carb Tips? Triumph 11
HighAltitudeTR3 TR2/3/3A Choke setting tips? Triumph 7
drooartz Installing front hubs, tips? Spridgets 15
bugedd Bench bleed tips Spridgets 14
S TR4/4A Electrical wiring tips Triumph 2
I Tips for installing intake manifold plugs in a stock Bugeye? Spridgets 6
TEM666666 Sprite MK1 Door liner rubber mat installation.. Need tips and recommendations. Spridgets 22
F Buying a 100.... tips Austin Healey 18
drooartz MGB Changing clutch hose - tips? MG 13
T Tips for Searching FORUM Navigation Questions 2
T TR4/4A Any tips on re-torquing TR4a head now that 500 are on the rebuild Triumph 7
T TR4/4A Tips on controlling heat coming up through shifter opening? Triumph 14
M tips please on removing starter motor on 100-6 Austin Healey 6
gbtr6 TR6 Rebuilding TR6 Engine, Tips? Triumph 7
bugedd Su adjustment tips Spridgets 7
B Seam Sealer/Caulking - Any Tips on When, Where, and What to Apply? Austin Healey 45
C Any tips on how to remove frozen pistons from drum brake Wheel Cylinders??? Austin Healey 11
PatGalvin TR2/3/3A Carpet Install Tips Triumph 12
Bob_Spidell Tips Austin Healey 6
Tinkerman TR2/3/3A Front Fender Installation Tips Triumph 3
Tinkerman TR2/3/3A Windscreen mounting tips 1960 TR3A Triumph 2
W Looking for tips: BJ8 roll up windows Austin Healey 10
I TR6 Any tips on removing flasher switch Triumph 3
M Radiator Hose tips? Spridgets 0
T TR4/4A Any tips on running the overdrive switch wiring down the steering column? Triumph 11
T TR4/4A Making an OD pressure gauge - any tips? Triumph 7
bugedd About to rebuild front end...any tips? Spridgets 5
B Spitfire Changing leaf spring bushing - any tips? Triumph 6
RedTR3 TR2/3/3A Tips for Breaking in a Rebuilt TR3 Engine Triumph 6
apbos Two Restoration Tips Spridgets 11
J Tips on Re-Assembling Lenses/Gaskets? Austin Healey 5
TulsaFred Rear Hub bearing and oil seal tips Spridgets 0
5 TR2/3/3A TR3 engine building tips needed Triumph 5
TulsaFred Bugeye rear wheel cylinder replacement tips Spridgets 10
Lbp Install l-t-d fasteners on new tonneau - Tips? Triumph 8
D Spitfire '65 Spit window regulator installation tips needed Triumph 0
J 67 IRS Exhaust Tips Triumph 2
RickB Painting tips anyone? Spridgets 13
RJS Water Pump Replacement Tips Triumph 8
Russ Austin TR2/3/3A TR3 Transmission Installation Hints / Tips Please! Triumph 14
aeronca65t Kasnter tips Triumph 8

Similar threads

Top