• Hey there Guest!
    If you enjoy BCF and find our forum a useful resource, if you appreciate not having ads pop up all over the place and you want to ensure we can stay online - Please consider supporting with an "optional" low-cost annual subscription.
    **Upgrade Now**
    (PS: Subscribers don't see this UGLY banner)
Tips
Tips

The tinworm is starting to take a hold

G

Guest

Guest
Guest
Offline
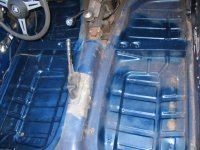
I was under the car running new hp fuel lines. It was bloody cold out there in the garage today, so I wasn't hanging around, but couldn't help but notice as I was struggling with coupling flex line to hard line by the oil filter, that the floorboard under the clutch pedal is starting to rot through - it's an area roughly 1"x2" thats affected, with the hole about the size of a quarter.

I can't face doing what Bill is doing - even if I could weld - so I'm thinking of cleaning up, por-15ing the area and epoxying a piece of sheet aluminium or steel over it as a temp (couple of year) sort of fix until I feel like doing it right.

I know its a bodge, but can't face dealing with anything other than getting it running right now.

That said, does anyone have a better suggestion for a temp fix or will this have to do?
 

YankeeTR

Luke Skywalker
Offline
Use POR-15 and fiberglass mesh. Clean the area with sandpaper to get rid of any loose rust and to ruff it up.

Then put down a coat of POR-15 on the steel...then lay a piece of fiberglass mesh on that and coat it on both sides...go back again a few times after it has tacked over a bit.

A repair like this will last for years...I've seen entire trunk floors with pinholes and minor rust out redone and they have held up well...
 

TheAssociate

Jedi Hopeful
Offline
For a temporary fix you could cut out the rust with a nibbler, then screw or rivet a piece of metal across hole, then paint with zinc paint. Not perfect, but will safely get you through a year or more without more rust occuring until you can replace your floor...

As you can see(in the attached photo), I recently braised in temporary steel for a solid backyard fix until I replace the whole floor.

Adam H.
___________________________________________________________
1973 Triumph Spitfire
 

Attachments

  • 4105-SmallFloor.JPG
    4105-SmallFloor.JPG
    151.5 KB · Views: 85
OP
G

Guest

Guest
Guest
Offline
alana said:
I can't face doing what Bill is doing - even if I could weld -

Trust me, you don't want to cut out your floorboards if you can help it. This job is killing me and causing great marital disharmony. My vote is cut out the small section and pop rivet a small piece of sheet metal over the hole from the top then seal the area with something. Actually, you can cut out the offended area, keeping it small as you can, and then paint the whole cut area really well with red lead primer (boat supply store) as well as the new piece, then load it up with a second coat top (if you can get to it - frame sometimes in the way) and bottom. Then put a coat of Super Chassis Black from Eastwood.
 

WidespreadPanic

Jedi Hopeful
Offline
I had a few pinholes in my floor pan that I used the POR15 with fiberglass mesh solution for.....worked out pretty well

Before:
100_1227.jpg


During:
100_1232.jpg


After:
100_1236.jpg
 

Brosky

Great Pumpkin
Offline
Alan,

I'm beginning to detect a bit of frustration in your posts. It's completely understandable, with all that you've been through. Don't worry about the rust, you can handle it with ease, when it warms up. The key here is working when it's comfortable. A lot less frustrating and things will not bother you as much.

Hang in there, guy!!!!
 
OP
G

Guest

Guest
Guest
Offline
If my floorboard had looked like that first picture, I would have taken my car out back and shot it! Whew! Nice job...

I cut mine out because the front area was thin as thin can be and I had screwed up the rear where the seat mount with aftermarket seats. Now the new ones are in and I fabricated a special mount for the new seat to use the original mounting holes.

A welder I ain't. I can sure tack though. I must have 50,000 tacks holding my boards in. So close they look like a continuous weld. I coated everything really well with red lead primer and will seam-seal top and bottom before adding the Chassis Black coating.
 
OP
G

Guest

Guest
Guest
Offline
Remember this, fiberglass on steel can be a problem, moisture has a way of creeping in.....
 

R6MGS

Yoda
Offline
TR6BILL said:
Remember this, fiberglass on steel can be a problem, moisture has a way of creeping in.....

Yup, I'd avoid fiberglass....moisture gets trapped under it and rots away at whatever is left of the metal. I pretty much just peeled the fiberglass off of my TR6 floor revealing some pretty nasty stuff....I can't weld at all, so I am going to rivet down a patch and POR-15 it for now.
 

Aeroken

Senior Member
Offline
I also have a couple of minor rust holes my otherwise solid floor pans that I am about the repair with the POR-15/fiberglass system. While I generally agree with avoiding fiberglass when using traditional methods, this one seems pretty well protected when the area is prepared and materials applied as directed.

Has anyone used this method and had still had moisture/rust problems under the fiberglass?
 

AweMan

Jedi Knight
Offline
I had some experiance reparing bullet holes in Hummers after desert storm, the way we were instructed to do these repairs was to cut out the damaged area removing as little parent material as possible then we would cut two patches one for the top and one for the underneath clamp these two patches together and drill poprivit holes 1/4 spacing all the way around them, then using epoxy butter both pieces placing one piece on the top and one on the bottom drilling the existing holes out of the parent material and popriviting these sandwich pieces on the damaged parent material. the epoxy serves to not only make the repair stronger but also to keep any moisture out of the repair.
Not very pretty for a repair but sure heck for stout.
P.S. I am a welder of thrity years and even I find it difficult to repair thin material without distortion. Braising is your best repair for thin areas lots of clamps {clicko type} and cool the weld often with water to minimise the distortion weld a small area then cool and so on till the weld is complete. Wire feed welding would be the next best bet but remember go slow don`t get in a hurry weld small areas at a time skip around on the patch, continuos welding is the majior cause of distortion, cool each small weld with water before going on to the next weld. Stick welding I wouldn`t even attempt on something as thin as a floorpan all you will do is end up with a nice sized mess!
If you want more tips on welding or need to ask a specific question you can email me, my email address is in my personal stats Or aweman-AT-yahoo.com
Note: replace -AT- with @
Kerry.
Ret. Aircraft Welder

Retirement isn`t an occupation, it`s an obsession about bieng occupied when, where and with whom you choose
 
OP
G

Guest

Guest
Guest
Offline
While my car is VOR, I have been looking for other areas to work on, like I really need that. Now, consider my TR6 is a driver and not a trailer queen, there are many, many areas that need attention. Now that the engine is laying patiently on the garage floor, I put a strong flashlight on everyone's favorite, the infamous battery tray shelf. I have the area coated with POR15-like material (PPG) and saw where there was a small crack around the two hold-down posts that affix the battery to the shelf. Got my trusty razor blade scraper out and I"ll be darn, rust. I end up removing all paint from the entire battery area. Took 2 days (intermittent) of scraping, pounding, chemical-peeling, finally got down to shiny, albeit ragged, metal. Still structurally sound metal. I phosphoric acid treat, red lead prime, will seal the seam and top coat (this time black, remember - restomod). It NEVER ends.
 

prb51

Luke Skywalker
Country flag
Offline
Aero,
I restored a driver MBz 190 sl some years ago that had rust and minor pinholes in the unibody floors yet you could stand on them without a problem.
I used the POR 15 black on the entire interior tub and a fine mesh fiberglass with the POR 15 on the floorboards. I sold the vehicle but in the 4 years I owned it the treated areas looked like the day I finished them. The POR 15 totally coats and permeates the mesh and makes it hard as a rock. I never had any further rust issues and if you got fancy and 'finished' the area with a filler it would look stock.
 

Twosheds

Darth Vader
Offline
Alan, I had the same problem in my TR3 floorboards and I patched the rust holes with scrap aircraft aluminum and pop rivets as a temporary repair.

That was 15 years ago and the repair is still there.

As my A&P school instructor used to say, "There's nothing so permanent as a temporary repair."
 
OP
T

Tinster

Guest
Guest
Offline
There are quite a few excellent metal to metal
adhesive "weld" materials that produce a structural
strength bond as well as a bit of flex that most
epoxy's lack. The auto and aircraft industry are
both already using these products in place of welds.
Google search, you'll find several.

It is possible to use these adhesives after a decent
cleaning, phos. etching and trimming away obvious cancer areas. The existing surface does NOT have to be mirror
bright or machined metal flat.

It intend to do my floors in this fashion with
18 Ga sheet metal. I will install a few perimeter edge
rivets while the adhesive cures, because I'm an old
geezer and that would make me feel safer. Then I will
follow Bill's advice concerning primer and painting.

PS: Several of these metal to metal products can be
machined and of course they can be sanded.

dale
 

YankeeTR

Luke Skywalker
Offline
prb51 said:
Aero,
I restored a driver MBz 190 sl some years ago that had rust and minor pinholes in the unibody floors yet you could stand on them without a problem.
I used the POR 15 black on the entire interior tub and a fine mesh fiberglass with the POR 15 on the floorboards. I sold the vehicle but in the 4 years I owned it the treated areas looked like the day I finished them. The POR 15 totally coats and permeates the mesh and makes it hard as a rock. I never had any further rust issues and if you got fancy and 'finished' the area with a filler it would look stock.

I agree...you'll never have a delamination problem with POR-15 and fiberglass mesh on a properly prepared surface..
 

Joe_Pinehill

Jedi Hopeful
Offline
the car wont dissolve overnight, so I agree with the post about waiting till warm weather.

I had the same problem, though a larger area. I cut out the area, and welded 18 gauge stock sheet metal, applied seam sealer, primed and painted. A functional repair.

You might used Phosporic acid, to remove all rust, then treat with POR or Extend.
 
Similar threads
Thread starter Title Forum Replies Date
kennypinkerton Alfa Tinworm diagnosis... Other Cars 13
K TR2/3/3A Pushing down the clutch pedal when starting the car? Triumph 13
angelfj1 TR5/TR250 TR250 - Lucas 4ST Starting Solenoid-Mounting Location/Details Triumph 2
angelfj1 TR5/TR250 TR250 Need Help identifying wires (2 - black) feeding starting solenoid Triumph 6
bigjones TR2/3/3A Starting up an engine that hasn't ran for a while. Triumph 39
S TR2/3/3A TR3 Hard Starting Triumph 4
H MGB Starting Problems MG 3
J TR4/4A 1964 Triumph TR4 - Not Starting/Running Triumph 3
angelfj1 TR5/TR250 Starting a TR250 that's been sitting for 10 years Triumph 12
T TR6 Continuous Starting and Ignition Issues Triumph 6
M TR6 Just starting out… Triumph 16
RichB4493 TR2/3/3A TR3 not starting - Slow/Weak Starter Triumph 33
M TR2/3/3A 1958 TR 3 , crankshaft nut for hand starting Triumph 7
P Wedge Starting problems TR8 Triumph 3
K TR6 tr6 not starting Triumph 11
Jim_Stevens TR2/3/3A Intermittent starting Triumph 14
R TR2/3/3A Starting car for 1st time after rebuild. Triumph 13
F TR2/3/3A starting scuttle repair Triumph 27
jdubois GT6 After over two years stalled at the body shop, my GT6 is starting come back to life! Triumph 5
R TR2/3/3A Starting TR-2 for first time after restoration Triumph 58
D Wanted TR3A starting handle Triumph Classifieds 0
D Starting After Carbs Rebuilt Austin Healey 30
Got_All_4 TR6 Starting my frame restoration Triumph 32
Jayplum TR2/3/3A Starting from scratch what color Triumph 25
sundown TR6 Starting Triumph 43
F TR2/3/3A I'm stuck... alternator/wiring/starting/? Triumph 2
F TR2/3/3A 1960 TR3A starting chassis work Triumph 81
J TR2/3/3A Starting my TR3 A restoration Triumph 8
F TR2/3/3A Starting Triumph 4
N Hesitant starting Austin Healey 16
Got_All_4 TR6 Starting The Tear Down Of MY 1969 TR6 Triumph 6
G TR4/4A Starting without Transmission attached Triumph 9
P BN4 Hesitates on Starting Austin Healey 12
D Hard Starting Austin Healey 14
mgedit TR2/3/3A 56 TR3 Starting Issue Triumph 9
M Starting from cold Austin Healey 2
R Very Difficult cold weather starting problems! Austin Healey 21
R TR4/4A Starting TR4A after 30 years Triumph 12
R winter hard starting BJ7 Austin Healey 16
P Jump starting a positive ground BJ8 Austin Healey 4
W starting motor Jaguar 0
D TR2/3/3A Starting my Bodywork journey. Triumph 166
P TR6 Quick starting Triumph 2
Joe Reed General Tech Starting a screw in a tight location... MG 9
P TR6 TR6 hard starting Triumph 24
Q Just Starting Restoration Of 1967 E Type Jaguar OTS Jaguar 13
stretchit2 Starting Issue Austin Healey 6
M TR6 Intermittant starting problems Triumph 4
Willie_P TR4/4A Starting long dormant TR engine..start up procedures? Triumph 10
S Hard starting on Webers from cold Austin Healey 12

Similar threads

Top