• Hey there Guest!
    If you enjoy BCF and find our forum a useful resource, if you appreciate not having ads pop up all over the place and you want to ensure we can stay online - Please consider supporting with an "optional" low-cost annual subscription.
    **Upgrade Now**
    (PS: Subscribers don't see this UGLY banner)
Tips
Tips

GT6 Early Gt6 Pushrod tubes

Richter12x2

Jedi Hopeful
Offline
I have a sinking feeling asking this question - it's been one thing after another with this car.

Is there a source for replacement pushrod tubes? Was having the head rebuilt to finally get the correct engine in the car, and it seems the builder has hottanked the head, only to discover that aluminum doesn't like it very much.
 

dklawson

Yoda
Offline
DOH! I have never seen them listed. They are pretty simple aluminum tubes. You could have some turned from stock and pressed in.

I may have a spare head but it would cost a mint to ship it to TX. GT6 heads are heavy.
 

Merlin63Tr4

Jedi Trainee
Country flag
Offline
Are they the same as the ones on the early Spitfire?
TRF has the Spitfire ones listed as P/N 104826

M.
 

dklawson

Yoda
Offline
You guys are all awesome. Thank you! I'll get a set shipped to the head builder.

Maybe 2 sets?

Thanks for the information guys. I hope to never need it but now I'll know where to look for the parts.
 

TR3driver

Great Pumpkin - R.I.P
Offline
No one is asking the next question : How to get those dang tubes to seal!
:D
 
OP
R

Richter12x2

Jedi Hopeful
Offline
Yeah, so that turned out to be a bust - after being backordered for a couple of months, they admitted they don't know if they'll ever be produced again. Luckily, with some ingenuity I managed to extract and clean up a set from a backup head that I had.

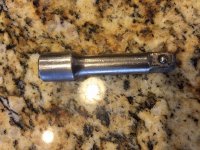
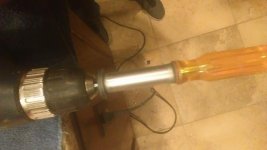
Turns out I had a special GT6 pushrod removal tool the whole time.

gt6 pushrod tool.jpg

The end that goes on the ratchet is about 1mm narrower than the diameter of the holes where the pushrod tubes sit, so I used a straight screwdriver to gently straighten the bottom flare (I wanted to keep the top perfect, since that's the direction the oil will most likely be coming from)

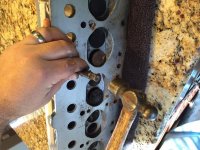
Then I used this and tapped then back through the holes. The size is the important thing - it doesn't take much force at all, (because it's thin aluminum and doesn't take much force to bend it totally out of shape, and useless). After you get enough to grab onto, you can just give it a little back and forth wiggle and usually just pull it through the top.

gt6 pushrod removal.jpg

After the new head is painted, my thought is to get the tubes mostly inserted, then put just a thin touch of oil resistant black rtv silicone around the tops and then seat them. The clamp them in place and flare the bottom back out using (hopefully) the tapered side of that socket extension, or failing that, I've also ordered a set of swaging tools (for A/C copper) and the 5/16" will probably do the trick - I just wish it nested inside the tube a little better to make sure the flare is straight - I may grind it down just a bit to make sure it seats properly before tapping the flare in.
 
OP
R

Richter12x2

Jedi Hopeful
Offline
image-20160322_224207.jpg

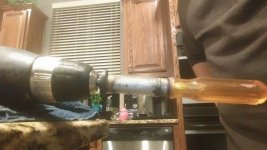
I was very pleased with myself on the polishing, with this trick I thought of. After spending 30 minutes to get one of the tubes not very clean of old paint, I thought there had to be a better way. This is what I came up with:

I found a pair of rubber washers, and a philips screwdriver the right length (pushrod + just enough to chuck in the drill)

IMAG0012.jpg

An actual bolt and nuts would work better, because it was tough to get it snug enough that it wouldn't spin - being able to tweak it down with a wrench would have been MUCH easier.

Then I cut strips of 320 grit wet-or-dry sandpaper, about 1" wide, and let them soak in warm water in the sink (plus just a dab of soap, seems to help bind the dust and make the pad easier to rinse - that tip works for wet sanding cars too.)

Locked the drill to on (has a little button) put my elbow on the drill, and wrap the paper around it like dental floss.

Run the paper until it loads up and starts to project visible dust (happens as it starts to dry out). Then rinse and repeat. After a repeat or two, much of the effectiveness is gone, so move to a new one. About 2 strips per tube, 3 if it's really bad. And also, there are some casting flaws, these weren't exactly showpieces to begin with, so there are spots that are just not going to come out.

But:

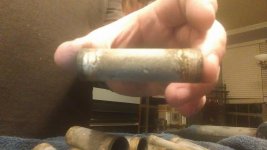
image-20160322_225212.jpg

It leaves a beautiful silky nearly brushed sheen. I went ahead and tried going further with 800 grit sandpaper and 1200, but it didn't make enough difference to make it at all worth it. Looking at it, it's almost indistinguishable from just 320.
At this point you could probably polish them further with compound and a buffing pad, but I think we're going to stick with it this way.

I'll update again when I push them into the head.
 
OP
R

Richter12x2

Jedi Hopeful
Offline
Oh another note - I gave the top flare about 1/4" of clearance with the sandpaper - I don't want it any narrower than it was, so it can still make a good seal - the bottom I didn't worry about, because having it be just a little thinner will help reinstall it in the head, and make flaring it back out easier.
 

DornTRoriginal

Jedi Hopeful
Gold
Country flag
Offline
View attachment 41940

I was very pleased with myself on the polishing, with this trick I thought of. After spending 30 minutes to get one of the tubes not very clean of old paint, I thought there had to be a better way. This is what I came up with:

I found a pair of rubber washers, and a philips screwdriver the right length (pushrod + just enough to chuck in the drill)

View attachment 41941

An actual bolt and nuts would work better, because it was tough to get it snug enough that it wouldn't spin - being able to tweak it down with a wrench would have been MUCH easier.

Then I cut strips of 320 grit wet-or-dry sandpaper, about 1" wide, and let them soak in warm water in the sink (plus just a dab of soap, seems to help bind the dust and make the pad easier to rinse - that tip works for wet sanding cars too.)

Locked the drill to on (has a little button) put my elbow on the drill, and wrap the paper around it like dental floss.

Run the paper until it loads up and starts to project visible dust (happens as it starts to dry out). Then rinse and repeat. After a repeat or two, much of the effectiveness is gone, so move to a new one. About 2 strips per tube, 3 if it's really bad. And also, there are some casting flaws, these weren't exactly showpieces to begin with, so there are spots that are just not going to come out.

But:

View attachment 41942

It leaves a beautiful silky nearly brushed sheen. I went ahead and tried going further with 800 grit sandpaper and 1200, but it didn't make enough difference to make it at all worth it. Looking at it, it's almost indistinguishable from just 320.
At this point you could probably polish them further with compound and a buffing pad, but I think we're going to stick with it this way.

I'll update again when I push them into the head.

Your shop has granite toped work bench! NICE!
 

dklawson

Yoda
Offline
This appears to be another thing we have in common. There can be little complaining about the kitchen when my wife doesn't cook! Besides, the GT6 parts that sometimes make it to the kitchen are from her car, not one of mine.
 
OP
R

Richter12x2

Jedi Hopeful
Offline
haha, exactly. This GT6 is hers as well, so she's usually so happy progress is being made that she doesn't complain too much. Which is weird, because it may be the only thing she doesn't complain about.

I will warn you, using the dishwasher as a parts washer is NOT a good idea. It does work remarkably well, but the time you save is negated by having to take the dishwasher apart and clean THAT.
 
Similar threads
Thread starter Title Forum Replies Date
Spritey For Sale .. or [TRADE] Early GT6 seats Triumph Classifieds 1
Scotsman GT6 GT6 early vs later model differences / upgrades Triumph 13
UmmYeahOk GT6 Early GT6 Wiper Motor Wiring Triumph 10
R GT6 Early ZS CD GT6 carbs - choke question Triumph 16
R6MGS GT6 Deal or no Deal? Early GT6 Triumph 13
S TR2/3/3A differential hubs early tr3 and tr2 Triumph 22
S TR2/3/3A Tr2 and early tr3 differential. Triumph 10
C Wanted Early MGB soft top and/or tonneaus, condition not very important MG Classifieds 0
drooartz Early 60's Bentley S3, maintainable? Other British Cars 13
mctriumph For Sale Odd bit for Tr3 and early 3A Triumph Classifieds 0
Joel Lester TR2/3/3A Is "later" style rear view mirror taller than the "early" style? Triumph 6
G TR2/3/3A TR3 starter disassembly rebuild early M428G bomb Triumph 6
vpanza TR2/3/3A EARLY TR3 hubs for wire wheel????? Triumph 5
mctriumph For Sale hood for early Tr4 Triumph Classifieds 0
V MGB Replace late intake manifold angled breather with early model straight? MG 1
Racer-X- Looking for old parts catalog(ue)s with listings/part numbers for early 1960s Vanden Plas 4 Litre Princess Restoration & Tools 3
S TR2/3/3A early tr3 and tr2 kick panels Triumph 3
S TR2/3/3A TR2 and early TR3 wipers Triumph 7
9 TR5/TR250 What is this? Appears to be aluminum fuel cap for TR250 and early TR6 Triumph 13
drooartz MGB Early tail lights on later car MG 17
T Wanted: Early BN1 Sidescreens Austin Healey 2
S TR2/3/3A Rebuilding the early tr3 starter Triumph 5
R For Sale Original AC Ace/Cobra seats. Early 60's, hand made Leveroll by A.W. Chapman, London Other British Classifieds 12
J TR2/3/3A Early Lucas Ignition Switch Triumph 4
J Early BJ8 Armrest Latch Austin Healey 2
B Austin-Healey early 3000 BJ8 Electrical Diagram Austin Healey 0
Boink Early Mini Fuel Gauge - adjusting it British Motor Corp 0
A Early 1967 AH Sprite - installing steering column and new directional switch? Spridgets 0
A TR2/3/3A Early TR3 starter (bomb style) bushings sizes Triumph 7
JPSmit Pre-War Is it too early to write Santa? 1933 MG J1 MG 13
Twit early TR4 Crank Handle wanted Triumph Classifieds 0
T Early BJ7 Vent Window Seal Austin Healey 2
S For Sale Early Sprite & Midget Speedometer/Tachometer/Generator etc. Spridgets Classified 2
Twit TR4/4A early tr4 check straps Triumph 4
oldbagpipe Wanted Early TR4 Silver [Aluminum] Dash Cluster Triumph Classifieds 1
rr64 Wanted Early MGB Inner Steering Track Rods Wanted MG Classifieds 1
oldbagpipe Located Early TR4 Glove Box Hinges Triumph Classifieds 0
PAUL161 MGB Early B Banjo Rear Gears MG 2
R TR4/4A Early TR4 seat pans Triumph 26
oldbagpipe SOLD!! Early TR4 Short Bubble [Bulge] Bonnet/Hood Triumph Classifieds 5
HealeyRick Early Healey History Austin Healey 2
red57 Wanted WTB Early Austin Healey Horns Austin Healey Classifieds 1
K MG Midget Early and Later model rear brake shoes.... Spridgets 2
oldbagpipe For Sale Early 1969 TR6 'Stalled Project' $4500 Triumph Classifieds 0
CharlesBN1 Wanted WTB Shelley Jack [6 INCH DL] for Early BN1 Austin Healey Classifieds 0
J For Sale Early 70s TR6 seats in new red vinyl, with new tracks, $500 OBO Triumph Classifieds 0
oldbagpipe For Sale Early 1969 TR6 Project for sale Triumph Classifieds 10
CharlesBN1 Wanted wanted to buy - sidescreen trim/strips for early BN1 Austin Healey Classifieds 5
M Old English White Paint Code for early BE Spridgets 1
B Side window question for early Longbridge BN4 Austin Healey 4

Similar threads

Top