• Hey there Guest!
    If you enjoy BCF and find our forum a useful resource, if you appreciate not having ads pop up all over the place and you want to ensure we can stay online - Please consider supporting with an "optional" low-cost annual subscription.
    **Upgrade Now**
    (PS: Subscribers don't see this UGLY banner)
Tips
Tips

Cut body in half?

Gordo

Jedi Hopeful
Offline
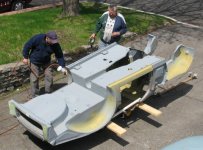
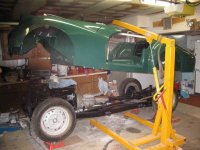
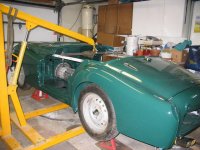
I'm sitting here with restoration books all over the floor like ducks on water. I've been following the " How to restore TR3A" for the most part with "How to improve..." thrown in for good measure.

So far the frame has been repaired and a Neil Revington kit installed. Blasted, epoxy primed and top coated.

I've dipped and reskinned the doors, epoxy primed and 1 coat of 2k primer. Also obtained 4 new hinges.

I've read/seen where alot of guys replace 1 floorpan and sill at a time. I've also noticed some guys cut the car in half at the transmisson and go from there.

I have the floorpans and inner/outer sills and thought about mounting them to the frame and build the front, attach the doors and reset the rear for door gaps.

I haven't made my mind up yet on which way I'm going to go.

So what I'm asking for is your experience, comments and warnings either way.

Thanks, Gordo
 

boxofparts

Senior Member
Country flag
Offline
I mounted and aligned the sills on the frame. Then set the floors. Then installed the front bulkhead and attached the doors and outer sills. Adjusted the door gaps and then started making tack welds.

I used Clecos and small sheet metal screws for most of the fitting work.

I also fitted the front fenders once or twice to make sure they looked ok.

I my case I had new outer panels for the rear bulkhead and new inner fenders on the front bulkhead. If I were to ever do this again I would have not replaced the front inner fenders.
 
D

DougF

Guest
Guest
Offline
I would do one floor panel at a time. It eliminates the problem of alignment when bringing the two halves together.
 

pa297pass

Jedi Trainee
Country flag
Offline
boxofparts said:
I mounted and aligned the sills on the frame. Then set the floors. Then installed the front bulkhead and attached the doors and outer sills. Adjusted the door gaps and then started making tack welds.

I used Clecos and small sheet metal screws for most of the fitting work.

I also fitted the front fenders once or twice to make sure they looked ok.

I my case I had new outer panels for the rear bulkhead and new inner fenders on the front bulkhead. If I were to ever do this again I would have not replaced the front inner fenders.

I was hoping you'd answer Gordo's question ... I knew you knew the answer! /bcforum/images/%%GRAEMLIN_URL%%/grin.gif

Matt
 

boxofparts

Senior Member
Country flag
Offline
Gordo,

I saw pics of your tub in another post.. Hard to tell how bad it is.

It seems extreme to cut it all apart but you really need to get the new sills and floors on the frame to start the process. I have read that you should have an engine and trans in the frame to ensure your door gaps don't move. I did not do that and I did not have any issues.

I went round and round on the number of shims and spacers when setting the sills. I just made sure they were true to each other. Might make some measurements on the old sills and then try to tranfer it to the new.

You could take some 1/2 steel conduit, flaten the ends and attach them with Clecos or screws to the front and rear bulkheads before you take everything apart. That way you will have some physical gage to see how things should look once you set the old bulkheads on the new sills. You can't make too many measurments. Might want to go from top hinge hole of right front bulkhead to center of left rear bulkhead striker plate. Do the same on the other axis.


Once you get the everything ligned up you will need to make the big dive and weld it up. The body tub gets pretty stiff once the sills and bulkheads are tack welded together. It is pretty hard to get to all the floor welds and I removed the tub after the bulkheads were attached and flipped it over. The final welds to the bulkhead and sills were done with the doors attached , the outer sills tacked or Clecoed and the tub on the frame. I fit the front fenders once or twice also before making the big welds.

I also installed a new rear valance and the metal above the gas tank... My car was pretty much a puzzle to put back together.
 
OP
G

Gordo

Jedi Hopeful
Offline
boxofparts,

Thanks for the insight and pointers. My tub is really not in that bad shape. It was hit on the drivers side and poorly repaired. The drivers outer closing panel and "A" post are pretty mangled and the floor board is heavily wrinkled. Hence, lots of cutting and welding coming my way.

I have taken many measurements and made some brackets to span the length of the interior to pull the two halves together.

I did notice that the inner rockers when set on the frame and the floor pans are set into the groove, there is about 11/16 gap between them at the outer mount holes. I think I'll have to cut some thick shims to fit. When you said to "true them up", were you refering to the same height above the frame?

I'm sure I'll have quite a few more questions for you guys the next several months (years)!!

Gordo
 

Banjo

Yoda
Country flag
Offline
Ideally, all major metal work would be done before the body is removed from the frame, while occasionally "test" fitting all body panals to ensure proper fit. It's a tad late for that, but that's ok.
What I would reccomend, after having done TR3s and 4s both ways, would be to completely re-bolt the entire body to the frame, setting on it's wheels (engine and trans in place isen't a bad idea) get things re-hung and aligned. doors, front fenders, front apron and bonnett. Then do one side at a time. that will save a lot of headache from things accidentily shifting, during the process.
After doing it that way, I'll never try to seperate and re-attach two halves again, unless it's necessary.
Extra perperation saves hours of frustration.
 
OP
G

Gordo

Jedi Hopeful
Offline
Banjo,

My original plan was to do it exactly as you say. After I stripped the interior, I could not get the doors, bonnet and boot to operate or align correctly, and I shimmed the heck out of everything. I bought 4 new door hinges in an attempt to try and get them to work.

I took very accurate measurements of the frame and discovered the frame was bent. The drivers side was 5/8" forward of the passenger side. Obtained a "new" used frame which is in much better shape than mine.

However, I noticed both you and Box may have used a rolling frame. Mine is not a roller at this time and was planning on making it a roller after the major sheetmetal work was done to allow for more clearance and prevent any damage to frame and suspension parts.

Bad idea on my part?

Gordo
 

boxofparts

Senior Member
Country flag
Offline
Mine was not a roller..

I had it up on jack stands but the stands were on the rear axle and under the front cross memeber.

My A and B pillars were pretty much not attached to the sills so I had nothing to work from. Also the frame mounting pads and tubes were rusted beyond repair.

I would suggest that you try to locate a local TR3 to look at. It is best to find one that has not had a lot of metal work done to it. Original Floors and sills are best.

Take a look at the gaps between the frame and inner sill mouting plates and also how the floor and front bulkhead inner fenders attach.

If I recall, there are aluminum spacers for the front inner fenders. The front bulkhead is pretty well attached even without the sills.

I had nothing to reference except pictures I took from other vehicles. As stated before.. My body was in pieces and I just started screwing it together. Then one day I just started welding.

I noticed when looking at other TR3s it was real rare to see one with perfect door gaps. Mine are better than most but considering what I started with they are great.

My car still needs to be painted and I will try to get it out of the corner of the garage and get some pictures of all the detailed metal work. I don't have many digitals pictures of it because the technology was pretty new at the time I was restoring it.

Since then there have been 3 houses, 1 bad relationship, 1 good relationship, marriage, 2 kids, a cat and a whole lot of other stuff going on. The wife talks of "when all the projects are done" but she has no idea what lurks under that cover in the back of the garage.

Kids are 2 and 4 they love dad's yellow MGB...The TR3 will be a blast..No hurry to get it done.
 

Don Elliott

Obi Wan
Offline
Click below to see how I did mine from 1987 to 1990. I MIG welded all the repair and patch panels on the front clip. Then I patched and did the rear clip. It's easier when you can lift them alone and turn them over easily to MIG weld for the easiest side. Then I ground off the excess weld and had smooth butt joints. Then I loosely bolted the new inner sills and new floor pans to the frame. Then the rear and front clips with the pads too. I adjusted the gaps to be correct - even and parallel. With the doors and front fenders on, it was easy to move it each piece forward or backward, to slot the holes in the floor pans and to add or remove more rubber pads under the floors. Then I tightened it all and saw where it wasn't right with it all bolted tightly. I corrected those areas till it was right. I would guess that I put on and removed the front fenders 6 or 8 times. Be patient and do it right. I did and people can't see that it went through all this. At VTR, the judges in my class this past July gave me 2nd with 384 points out of 400.

https://www.rucompatible.com/triumphmtl/member_cars.htm#TR3
 

Don Elliott

Obi Wan
Offline
On both the TR3As that I did, I used the same steps - as detailed above. There are some good points from others that are worth repeating. The engine and gearbox were installed for correct deflection of the frame. The stands were placed under the frame in line with the rear axle and also the front "axles". This is to simulate it sitting on the tires later. Many have not followed this advice and when they finished the car, put the engine in and lowered it onto its wheels, the frame deflected differently and the gaps were not even. Look again at my photos and you will see the engine installed and the position of the stands under the axles.

On mine, I did not use extra reinforcement. On the second TR3A, I welded bars just in case. To me it made no difference. See photo.
 

Attachments

  • 8102.jpg
    8102.jpg
    151.9 KB · Views: 89
  • 8103.jpg
    8103.jpg
    46.8 KB · Views: 71
  • 8104.jpg
    8104.jpg
    46.1 KB · Views: 72

Banjo

Yoda
Country flag
Offline
Yup. Don's done well. Good advice and with pictures!!
If you can avoid splitting the body in 2 I'd advise agenst it. but I's not impossible to reassemble 2 seperate halves.
My current project is nice. It's a 54 TR2 with solid floor pans and sills! the only rust issues I have on this one is in the dog-legs that come down in front of the rear fenders. I found mouse nests in both sides, and they rotted through at the bottoms. Other than that it will all be cleanup and repaint. What a treat after the rotten heaps I've rescued before.
 
OP
G

Gordo

Jedi Hopeful
Offline
Thanks for your experience guys. I've got to take a few days to digest and come up with my plan.

Don, I hope you had heat in the garage! Sure looked cold.

Gordo
 

Don Elliott

Obi Wan
Offline
Gordo - My garage measures 20 feet by 26 feet and is under the house with a 14 foot wide door. In the winter, it's never cooler than 50 deg. F and with a 1500 watt blower heater, it gets up to 72 deg. F in about 15 minutes, after which I only need to my working clothes and a T-shirt. It's very dry down there too so I never get any rust either.
 

sp53

Yoda
Country flag
Offline
Hi all and thanks for posting because I am somewhere in the middle of a body off myself. Don I was wondering did you find the professional sanding blasting too abrasive and did you have any trouble with sand coming out of those little hard to find places while the painter was spraying? In addition, I really like that little moving dolly you are using as you put the primmer on. What is that a floor jack with some lumber or perhaps something you made special for that application? My sills are kinda good, so Banjo do you recommend I put the body on the frame and do one floor pan at a time.
Sp53
 

Don Elliott

Obi Wan
Offline
Professional sandblasting with sharp sand on the frame, springs, suspension arms, wheel rims and other rigid parts is no problem. For mine, I used glass peening with small glass beads which doesn't generate the heat that the sharp sand does. If you sandblast panels with sand, you will get heat as the sand impacts the steel and where it gets hot, the panel will buckle or leave a "dome". This will make it really hard for the bodyman when he tries to make everthing smooth. For both the TRs I did, the tub was sandblasted where there are rigid curves which make that area strong to resist warping. Even if it does warp a bit, it's not a problem because it's already curved and most probably, it's hidden under the outer panels. With the glass peening I did in 1989 on all my outer panels, the panter had no problems to get a straight finish on all the panels.

For the green TR3A, my brother blasted all the panels for me in my sandblast cabinet using a synthetic resin which is not supposed to generate any heat. The painter said he had to live with some distortion and fix most of the outer panels, but it came out straight. He said that even with the synthetic resin blast medium, we should not have done it. He said that hand grinding to get down to the bare steel would have been easier for him. But he charged about $8000.00 to do all the final green finishing and buffing you see in the photos.
 

Don Elliott

Obi Wan
Offline
We used a dolly that you might use to move a heavy sofa. We placed a couple of 2 by 6" about 6 feet long on it to roll the tub out the garage to my driveway. We used it right side up on this arrangement and when it was upside down as you see in the photo, it sat on the reinforcement angles you can see that we welded inside the tub just near the top of the "A" post and inside the body to the rear of the "B" post.

Every part was sanded, primed and painted separately "off the car", so there was no sand or other medium that caused any problems.
 

Andrew Mace

Moderator
Staff member
Country flag
Offline
Banjo said:
...If you can avoid splitting the body in 2 I'd advise agenst it. but I's not impossible to reassemble 2 seperate halves....
True, but it's also not impossible to <s>scr</s>, er, goof up royally when doing so. I do know of someone whose TR3 underwent such treatment during restoration. Unfortunately, first time around, the reassembled body ended up being too short for the doors to fit. Talk about "fettling".... /bcforum/images/%%GRAEMLIN_URL%%/hammer.gif /bcforum/images/%%GRAEMLIN_URL%%/hammer.gif
 

sp53

Yoda
Country flag
Offline
Thanks Andrew and Don and Yes Don I hear that 8,000 price tag and kinda cringe, and I am sure that it is worth probably more if the painter considered everything he did. My driver is pretty nice even close up, not concourse (maybe). It was a down to bare metal epoxy primmer professional job done ten ears ago. However, on the 1961 I am doing now, I am not sure if I want to go through that time and money again. I am seriously considering doing a quality utilitarian job where the mechanical is rebuilt(they are) and the sheet metal fixed, perhaps holding back on all the high gloss. I might even do a kinda rat wagon design, so I would not have to worry about door dings and scratches. Maybe just leave it in a nice flat black primmer with a stripe or something.
Sp53
 
Similar threads
Thread starter Title Forum Replies Date
S TR2/3/3A Anyone cut out the spare tire compartment on a tr3? Triumph 4
G Inertia Cut-Off Switch - E-Fuel Pump to Ignition [Key] Switch Austin Healey 3
Rut Cut down windshield Spridgets 22
BN6 BJ8 Outrigger Cut Out For Exhaust Austin Healey 3
G General Tech Have new blank key for TR3 but cannot get it "cut" to fit ignition. Triumph 14
KVH TR4/4A Should I Cut the Lower Windshield Gasket Triumph 2
D You Tube made me do it. I bought a Milwaukee dry cut saw. Restoration & Tools 6
69MGC MGC Cut out the Rust! MG 9
D cut-off switch Austin Healey 20
W TR2/3/3A Why a PO cut these holes in rear floor? Also, question re dealing with captive nuts Triumph 6
K TR2/3/3A A cut down side curtain for Fall driving? Triumph 7
CJD TR2/3/3A Cut away TR3 Triumph 6
Boink Moss Healey Cut-out... I'll ask... Austin Healey 2
Boink Cut-away B series engine... MG 6
TLW1958 TR6 1972 TR6 No ignition cut off Triumph 2
BobMunch MGB The MGB Cut-away, Heritage Motor Centre Museum MG 11
J Windshield question pt.2: Why not cut the frame? Spridgets 9
Boink Battery cut-off switch options... or??? Spridgets 10
K TR2/3/3A TR3 Cut Off Side Curtain. Triumph 18
D battery cut off switch Austin Healey 29
T TR4/4A TR4a positive earth to negative cut over? Triumph 9
Tinkerman Battery cut-off switch installation Triumph 22
AUSMHLY fuel cut off Austin Healey 23
vping T-Series Adding a battery cut off switch. MG 16
G To cut or not to cut Austin Healey 3
V Intermittent engine cut out 1989 v12 xjs Jaguar 9
Ouagabambou Cut, torn steering inner tube [+ photograph] Austin Healey 22
T TR6 What year TR6 cut over to Type-J O/D? Triumph 3
roofman Looks like Dale made the cut! Triumph 13
B T-Series cut off switch in MGB? MG 7
T What year cut-over to the 1500? Spridgets 13
jmwuva05 Fuel pump cut off switch Spridgets 6
R Cut off switch wire Austin Healey 2
jlaird First cut on trophies for Lake of the Ozarks Spridgets 32
beaulieu fixing a cut in half Temperature capillary gauge Restoration & Tools 13
J TR6 Inertia cut out [off] switch TR6 Triumph 9
TR6oldtimer Fuzzy door seals to cut or not, buy new or keep Triumph 12
T What do you guys use to cut floor pan sheet metal? Triumph 7
T Wedge Cut wire on TR8 Ballast Resister Triumph 2
tahoe healey fuel pump cut off switch post Austin Healey 21
T Cut/Splice Spark Plug Wires?? Triumph 13
S Battary cut off switch Austin Healey 1
R6MGS T-Series Late MGB fuel cut off switch MG 5
A dash light cut off switch Austin Healey 9
jlaird Bat, cut off switch Spridgets 7
S TR2/3/3A TR3 Turn Signal Auto Cut-Off Triumph 5
John Loftus BJ7-BJ8 windshield seal cut Austin Healey 6
G Fuel cut-off valve MG 5
A Battery cut off switch Austin Healey 15
J Can a TF engine be installed in a TD body? MG 7

Similar threads

Top