• Hey there Guest!
    If you enjoy BCF and find our forum a useful resource, if you appreciate not having ads pop up all over the place and you want to ensure we can stay online - Please consider supporting with an "optional" low-cost annual subscription.
    **Upgrade Now**
    (PS: Subscribers don't see this UGLY banner)
Tips
Tips

TR2/3/3A Anyone got a TR2/3 Frame??

OP
CJD

CJD

Yoda
Country flag
Online
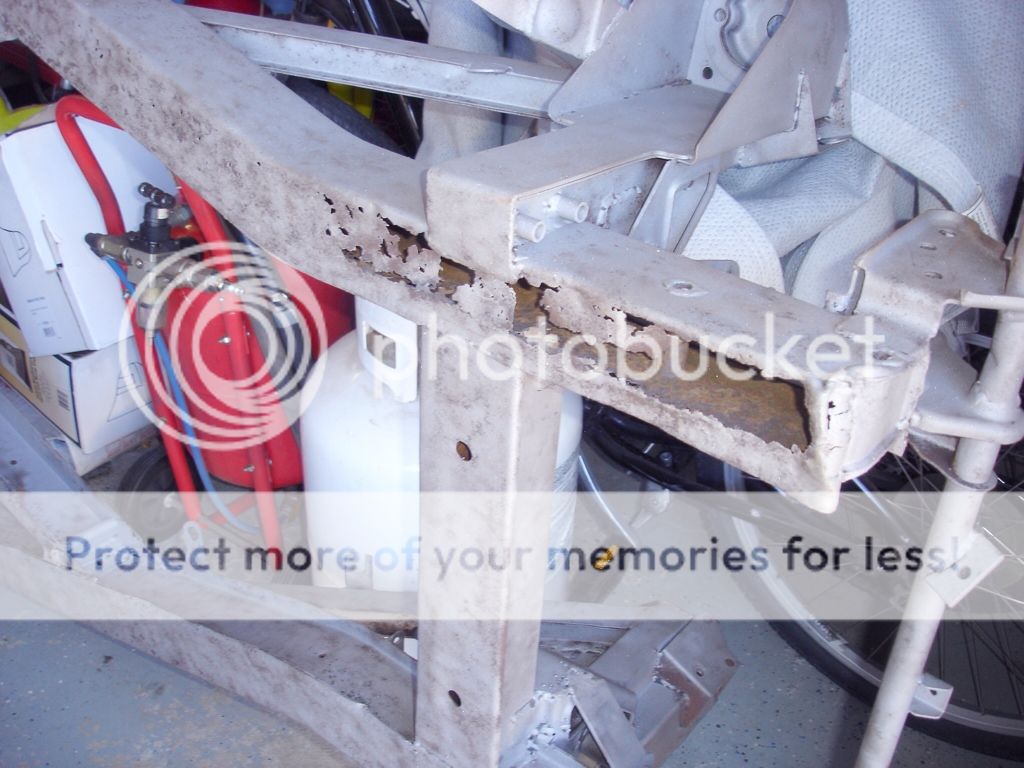
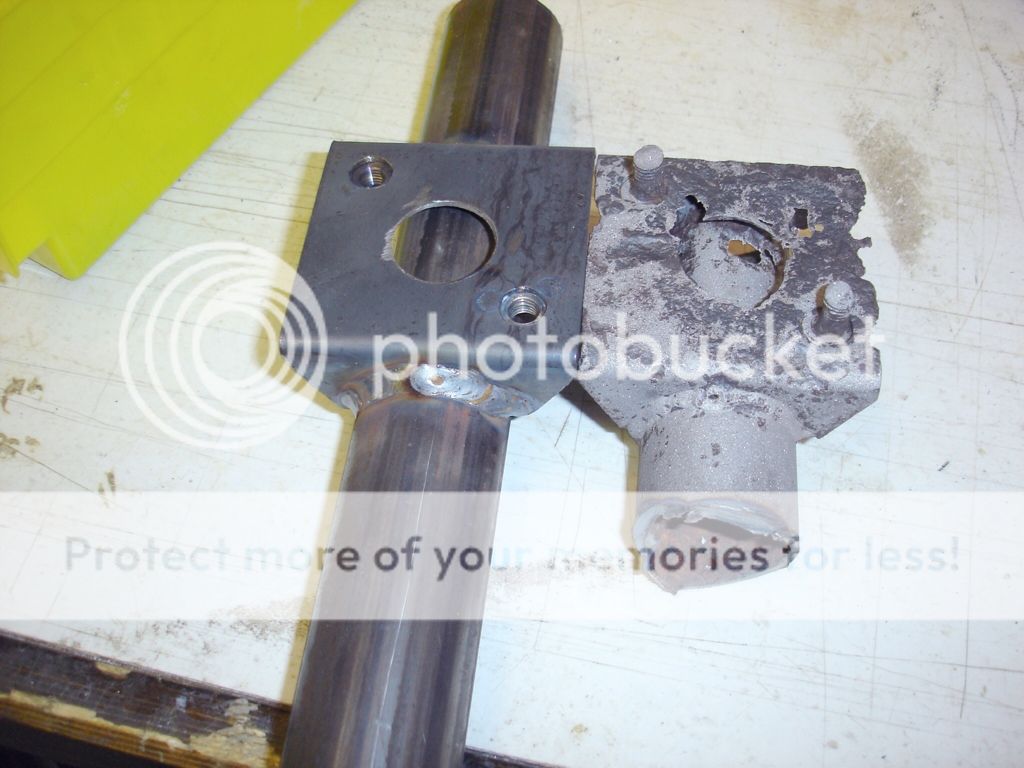
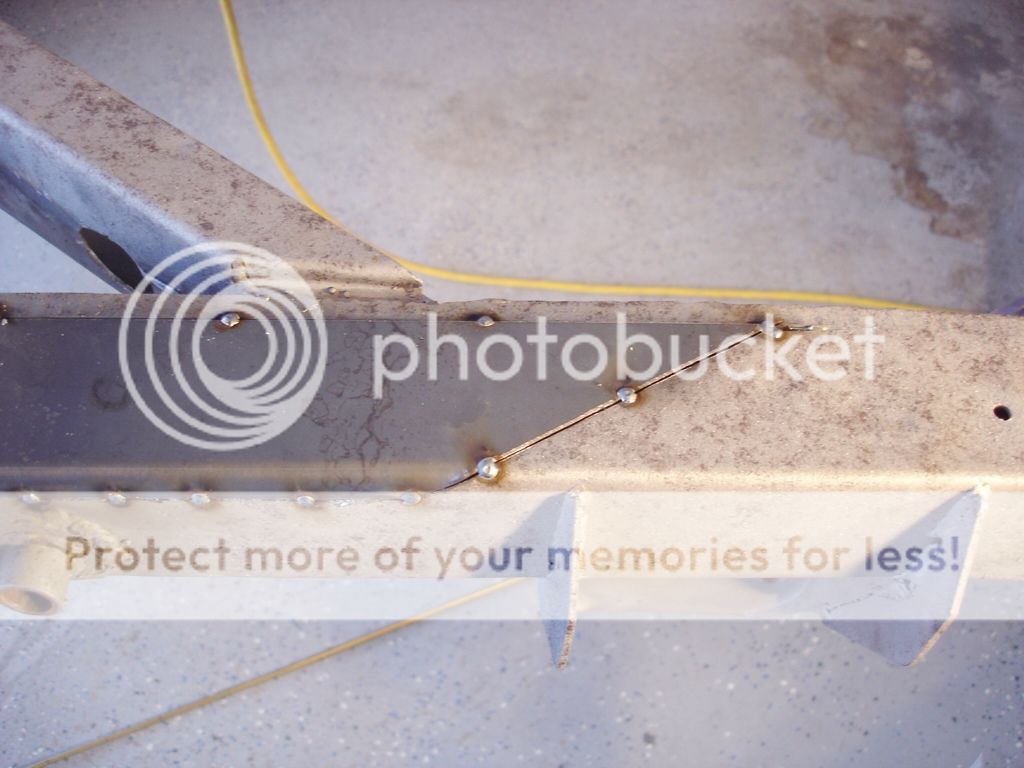
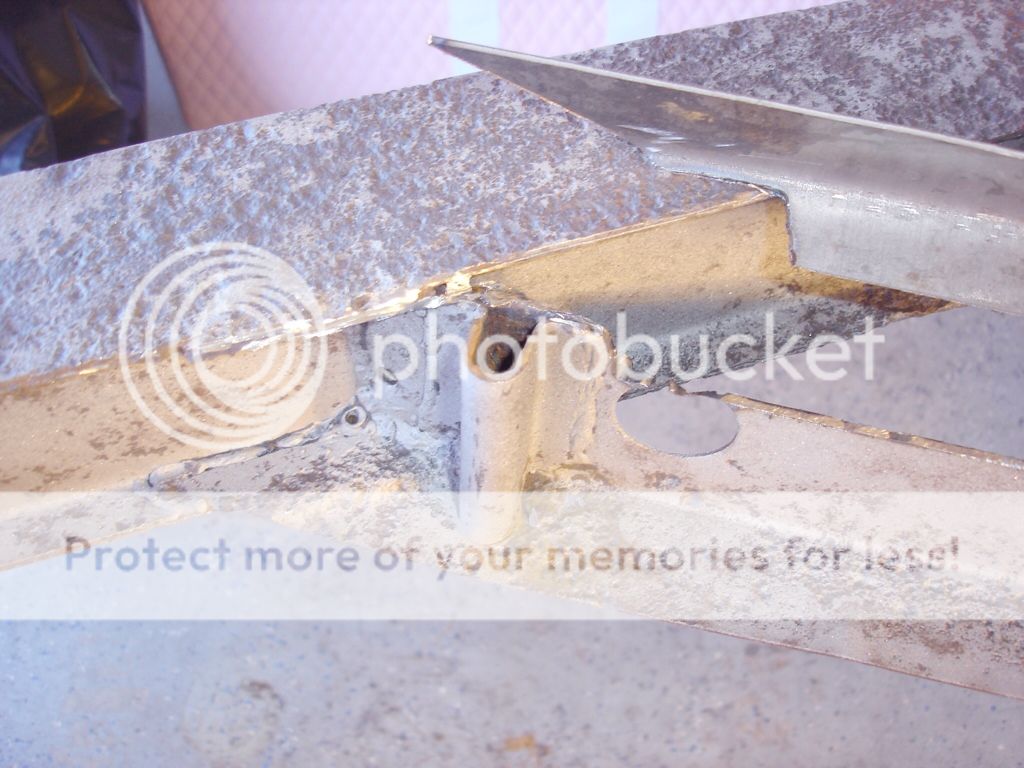
Excellent tips Al. I never thought about intentionally leaving a slight gap to keep the weld thin. Very good idea! Like you said, I have always used the low power on this kind of thin material, but will try some practice on high power...dragging the puddle may be the key to not burning through.

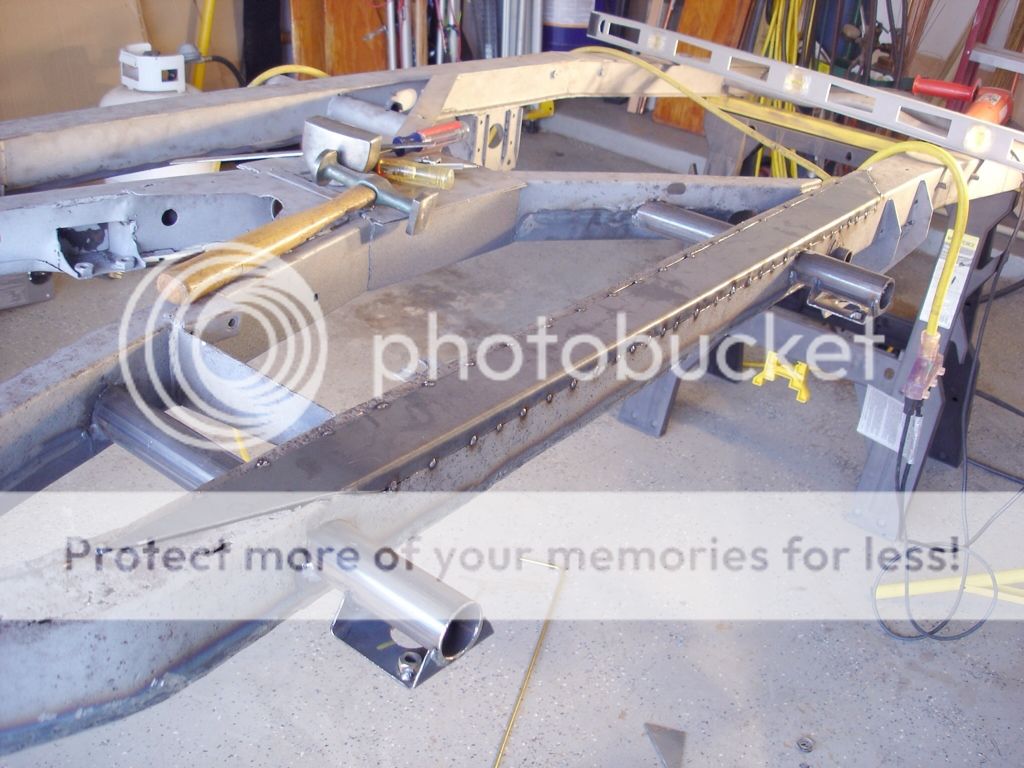
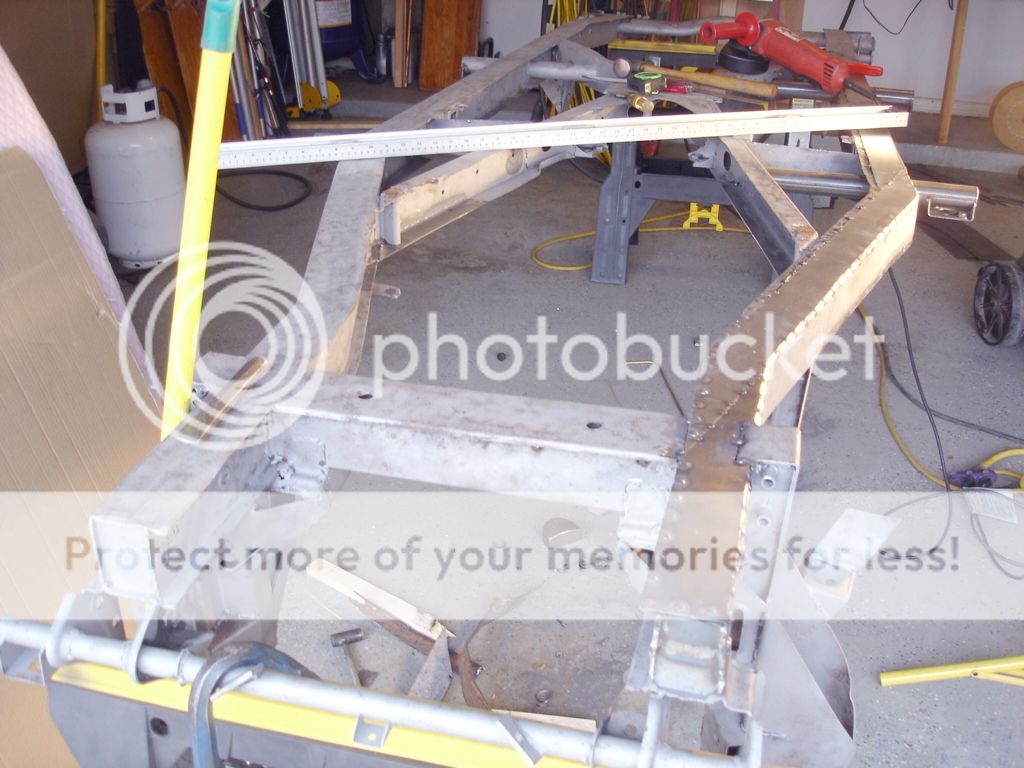
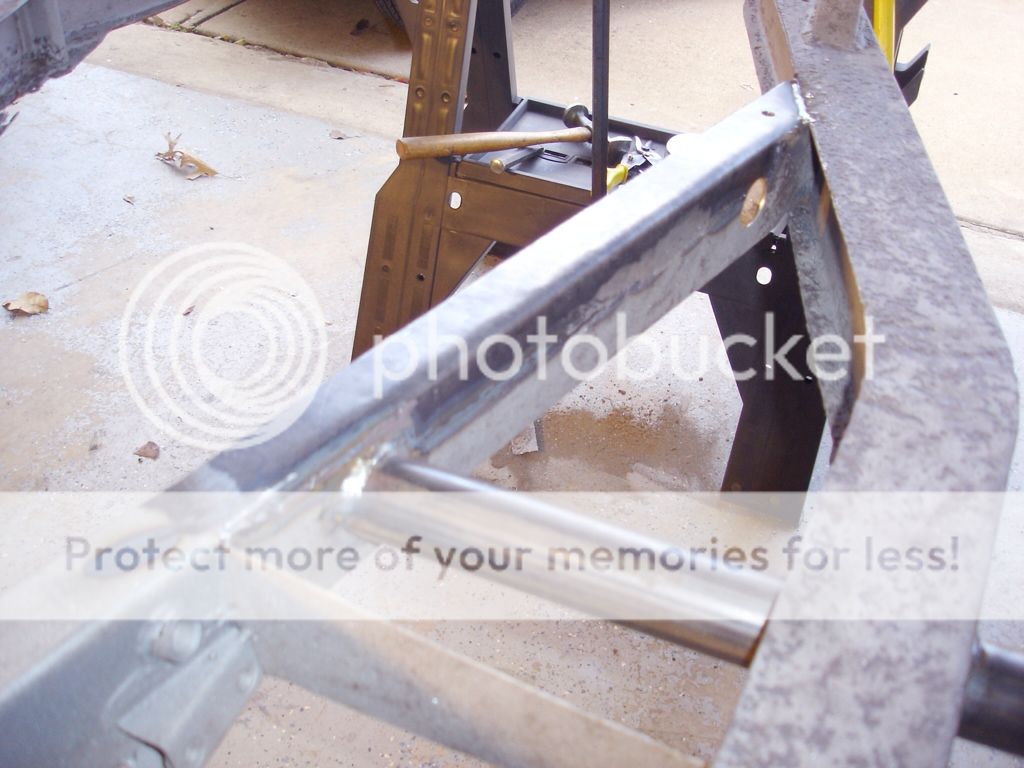
I picked up the metal yesterday, but have to spend the weekend at work. It'll be early next week when I get started. I'll be sure to post the progress...and really apprecieate any more tips as I go!
 

alanjohnturner

Jedi Trainee
Offline
Its a pleasure to have something useful to pass on to someone else. I've been welding old cars for 30 years.

The welding schools used to start with butt joining two 1/8in plates. You made a V by bevelling the edges at 45. Then filled it with weld. The backing plate/gap trick is the same thing but quicker.

1.6mm metal I regard as THICK. I can do 0.8mm, 22AWG gauge probably. This I do with a Joddler, which leaves one thickness behind the other. But 1.6mm is too thick to Joddle. So I spot on a backing strip.

With the Mig-spots you need a lot of current to get into the layer behind. You should see the wire-end poking through. If you dont then you use two holes adjacent so they break into each other and run a small bead. Done right these can be quickly linished flat.

Have you got one of those sheet cutters that has two big wheels, one knurled on the edge? This can cut 1.6mm without much distortion and beats hand-sawing.

One thing to know is that there tends to be a thin layer, between the metal that stayed cold and the metal that was liquid, that is carbon rich and goes hard. This is where the weld will crack most easily. So I usually try to add some reinforcement to welds that see a lot of cyclic stress.

In some places on the chassis repair I deliberately left 1/2in gaps between the ends of weld beads rather than running continously. This stops a crack running right round.

I clean the welds almost at once using Phosporic acid metal prep. Otherwise in our climate they will rust up overnight.

REMEMBER HIGH CURRENT ON MY WELDER MAY BE MEDIUM ON YOURS. Everything in Europe is weedy compared the the US.

Al.
 
OP
CJD

CJD

Yoda
Country flag
Online
I had to look up what a joddler is. Really cool tool I have to put on my list!

When you are talking about the backing plate, are you talking about a steel backer that stays with the weld permanently, or a copper temporary backer?

The welder I am using is a 185 amp unit, and I have been using the smallest wire it will feed. I know the highest setting with this welder is too hot, but I will definitely try setting above the min to try your technique.

I'm glad you showed up, Al. Very good pointers!

Here are a couple pics. In general, all the rust through is on the bottom. I think the tires went flat and the frame settled into the mud. The top section is pitted where there was no floor to keep the rain off.

8E079C81-6C5B-49C7-83FB-DE1934FC48EB-951-000000FAE6346CB3.jpg


2CCA142E-A4E1-4654-B303-CC17889B40F5-951-000000FAEF3910A0.jpg


I grew up in New Orleans, which has climate similar to England...always damp and frequent rain. Bare metal would rust overnight, even if kept dry. I am now spoiled here in the dry part of Texas. The bare frame as you see in the pictures will not rust at all unless I get water on it. It really makes it easy for long repairs like this frame. Here's the start of my new outrigger...


4F8493AC-2D71-4FAD-B8B5-782A627586A7-951-000000FAF48E1F2B.jpg


FA78D47D-E830-4B64-92CF-7285612EC5E3-951-000000FAF920A948.jpg


EAE42473-DFD9-4113-B1D6-DC15DDD6DE42-951-000000FAFDB8C977.jpg
 

alanjohnturner

Jedi Trainee
Offline
Nice pictures John. Mine had much worse tin-worm in this area.

If I were doing yours I would cut the side walls on their centre-line and make a new U-shaped bottom. This would put the weld on the neutral bend-axis.

If you imaging a tube supported only at its ends, with a weight in the middle, all the metal above the centre-line in being compressed and all that below is being stretched. The centre does not carry much load.

This is why you see construction beams made with a solid top and bottom but just tie wires criss-cross joining them. Like the wings on a WW1 bi-plane.

I made the backing plates from 18 SWG steel about 1in wide and spot welded them to the edge of the new metal. Same shape as the joddler makes.
Then the plate just slips behind the old metal.

The backing gets trapped by the weld. Basically you weld from the new-metal into the backing and the pickup the old metal. You get off the old metal a bit quick and go back across the backing-plate and pick-up on the new metal again. You are making like quick U-turns picking up the old-metal at the bottom of the U.

By the way I got two types of Joddler. One is two wheels that make a continuous run. The other is like a pair of hand-grips that Joddles 1/2in at a go.

Ask me to photo anything that would be of help.

Your chassis frame looks an easy fix to me. Take a bit of time but it will hone up your skills.

Al.
 

alanjohnturner

Jedi Trainee
Offline
A couple of other things:

Where the bumper irons are bolted to the frame I put a support across the frame made from 1in dia tube.
This means you can tighten the bolts without fexing the frame.

I reckon the frames fail at the end like this because they fill with water if you drive in the rain.
This just the lays for a while in the bottom of the tube.
We get some rain most days but there are not many days it rains ALL day.

This is another reason why I'd make the weld halfway up the side wall.
I also "capped" the ends.

Try the Metal Prep from Frost/Eastwood. It will get all the brown off your frame left by your blaster.
Its phosphoric based and is the ideal pep for painting with POR.

Al.
 

alanjohnturner

Jedi Trainee
Offline
You can see one of these tubes in the photo actually. Its just that mine had gone and I had to re-invent them I realise now.

Anyway its important to ensure you have these and not just bolt-up across the frame faces. It won't go tight.

Al.
 
OP
CJD

CJD

Yoda
Country flag
Online
Yep JP, that's straight bare metal after sand blasting with the low-end Northern tool blaster. The parts with a lot of brown showing are the parts that will need to be replaced, as they pitted all the way through with rust.

Al, it gives me comfort to know you fixed a frame in worse shape. I understand what you are saying about moving the seams to the mid-line for strength. I'll try to work that into the heavily rusted sections.

Can't wait to get back to work this week!
 
OP
CJD

CJD

Yoda
Country flag
Online
Well, still not done, but got everything but the final weld beads to go. If I never touch another body grinder it will be too soon! I did discover some interesting facts about TR frames...

1. The frame was painted inside. It appears it was dipped after final welding at the factory. Surprised me!
2. Rust is not uniform, as I thought it would be. It attacks in pits, that invariably go deep either from the inside out, or vise versa, but never both.
3. My frame was damaged at the front, allowing water inside. Once in, the only way out was through a single hole in the back of the frame. The result is that an inch or so was puddled inside , likely for years, till it made its own hole out.

Anyway, I think the pics speak for themselves...hope somebody learns something from my pain!


1171BF92-C5E1-4F94-AE9E-3DDE63E483A9-5150-000007D5ED155ADD.jpg


571AE59A-E403-402E-AD94-82407F83D60A-5150-000007D61BC4473C.jpg


2B76BAE8-1361-4AB8-80B6-8E5E4AA5ED12-5150-000007D61F518180.jpg
 
Last edited:
OP
CJD

CJD

Yoda
Country flag
Online
All the original metal was 16 gage, or .063", with the exception of the outrigger mounts, which was originally 14 gage, or .83".

I had a shop cut 14 gage strips that were 2-3/4" by 4', and I used these for all repairs. I don't have a sheer, so cutting was done with a body grinder using a cutoff disc. I don't have a break, so all bending was done using a 6" vise and a hammer.

0FD7A6CB-D37B-4E8F-8B71-8C587C598C18-5150-000007DD6F531F20.jpg


2C59D0BC-262A-4617-93D9-D1C4F04DED66-5150-000007DD7AE3DF8E.jpg


2741F210-99DD-4BB3-87B9-2294E289604D-5150-000007DD7574F0DE.jpg


86AF545D-4DE3-470B-A916-0EB0C17A869C-5150-000007DD7E2B6D2F.jpg
 
OP
CJD

CJD

Yoda
Country flag
Online
FA7AF3B3-E03F-4A66-81E5-7099FB5F6700-5150-000007E1BAF63AD0.jpg


D3E54E19-2788-4B43-8665-50B3871B94C4-5236-000007E6A37318B9.jpg


8AF1A761-5ADE-4409-AA78-57A2F52923EA-5236-000007E58E2553C3.jpg


BE18EC4E-4849-45EC-BA2D-771165D4A111-5236-000007E6988D61E1.jpg


And this last one is a pic of how it looks after final welding and grinding the bead smooth. By using Al's technique of high heat and dragging the puddle, I was able to get the bead equally thick on both sides...in other words, I got the bead on the front side and back side with one pass. That ensures there is no unbonded metal, with the bonus of being able to take the bead down flush. Once painted the welds will be practically hidden.

For each patch the old gets ground off, the new is cut by grinding, and then the bead gets ground flush...lord I'm tired of grinding!!!

0FBBF2AF-2557-4F80-9DCA-1D26C96DB842-5236-000007E63FB89112.jpg
 

M_Pied_Lourd

Darth Vader
Country flag
Offline
Awesome work John!

Cheers
Dave
 

mallard

Luke Skywalker
Country flag
Offline
Nice fabrication, and welding work, keep it up.
 

HerronScott

Darth Vader
Offline
Wow, wonderful work. What are you treating the inside with?

Scott
 
OP
CJD

CJD

Yoda
Country flag
Online
Thanks guys!

Good question Scott...everywhere I could access, I sprayed with black rustoleum. I sprayed the inside of the patches too.

I don't have a lot of confidence that it will help, though, since the welder heat will inevitably remove some of the paint. I am torn...on the one hand, I may see if it is cost feasible to have the whole frame dipped, like standard did originally. On the other hand, my TR3, finished 1-1/2 years ago has not seen a drop of water since it was finished (it gets wiped down instead of washed), so I doubt the TR2 will ever have a problem with rust! Even if it does get wet, the extra .020" in thickness for the patch steel should give it an extra decade before it rusts out.

I don't think this car would ever have had a corrosion issue in TX, except the bozo PO damaged the frame without plugging the hole, and then parked it for 24 years with flat tires in a mud puddle...uncovered. "whata maroon", to quote Bugs Bunny!
 
Similar threads
Thread starter Title Forum Replies Date
simon1966 Anyone got a 100 being transported? Austin Healey 10
F J hooks an wing nuts for attaching hard top to body BT-7 - anyone got photos? Austin Healey 5
weewillie my son got this yesterday and if anyone can help Other Cars 6
pjsmetana Fuel Filter, anyone got a part # for this thing? Triumph 11
JPSmit Anyone got a 1500 transmission lying around? Spridgets 38
RickB Anyone got a couple of these to share? Spridgets 2
JPSmit anyone got a radio? Spridgets 11
B Anyone got a 75 Speedo Cable? Spridgets 1
7 MGB-GT Anyone Got a Webasto Folding Sunroof in Their GT? MG 6
G AAARRRGH - anyone got a tip for these bushings? Triumph 11
TXCoyote Anyone got a LT77 for sale Rover / Land Rover 0
soren_ak hi gang - anyone got any info on this top. Austin Healey 5
Rob_Edwards Anyone else got one of these? MG 25
jlaird Oh me anyone got an extra 6 grand? Spridgets 0
A Anyone got a Sunbeam motorcycle ? Sunbeam (Rootes) 3
Basil Anyone remember Dave Russell? Austin Healey 10
AngliaGT 1997 Miata - Anyone Have a Picture on How to Mount the Front License Plate Bracket? Other Cars 12
AngliaGT Anyone Looking for a '28 Buick Drive Train for FREE? Other Cars 0
S TR2/3/3A Anyone cut out the spare tire compartment on a tr3? Triumph 4
AngliaGT Anyone Plan on Attending the SCCA Runoffs at VIR Next Week? Racing 6
R TR2/3/3A Does anyone know the paint Code for british Racing Green for a 1954 TR-2? Triumph 12
Celtic 77 Anyone recall Hobo Hill in New York State? Racing 0
T Rut's 4 speed shifter modification - anyone have knowledge? Spridgets 3
JPSmit Gear reduction starters anyone? Restoration & Tools 5
L Can anyone tell me what car this is from please? Other Cars 0
DrEntropy Show this to anyone under 40... Restoration & Tools 9
K TR2/3/3A Can anyone confirm that if you replace the ammeter with a voltmeter ( generator removed and alternator added) that you...... Triumph 5
D Can anyone identify this vintage car? Other British Cars 17
T Can anyone identify this bumper Spridgets 5
AngliaGT Morgans - Anyone Heard From John Sheally lately? Other British Cars 13
johntennyson Anyone Know These Guys? Or Remember Sprite-Midget Owners' Group? Spridgets 29
K TR2/3/3A Anyone remember the "rattling gear shift" fix? Triumph 8
roscoe Comments, anyone? Austin Healey 3
BillyB62 TR2/3/3A Anyone seen a valve cover like this Triumph 0
T TR2/3/3A Has anyone designed a hand brake warning light for the TR3? Triumph 3
Pythias Sprite Winged Bonnet Badge.... ANYONE? Spridgets 16
B Anyone have a Europa Twin Cam for sale? Lotus 6
B Anyone have spark advance data for Piper camshafts? Spridgets 1
Got_All_4 TR5/TR250 New Hazard Relays Does Anyone know How to Hook Up Triumph 7
steveg TR6 Metal Dash - does anyone make one? Triumph 13
T Powertrain locked up three times whilst driving today - anyone have thoughts? Spridgets 15
S TR2/3/3A Anyone care to share their bondo applying techniques Triumph 35
DrEntropy MGB Clevis pins, anyone? MG 3
69MGC Wanted Anyone know this guy? MG Classifieds 2
B Does anyone still make or sell a quality condenser? Austin Healey 14
W TR6 Anyone add Exhaust tips to standard exhaust Triumph 4
K TR2/3/3A Anyone have a picture of the crankshaft pulley.... Triumph 1
K Anyone racing a TR3? Racing 5
S General TR Can Anyone identify this TR Triumph 3
C Anyone know where to get one of these? Austin Healey 6

Similar threads

Top