 Hey there Guest!
 Hey - did you know if you click on the title of a thread it will take you to the first unread post since you last visited that thread?
 but were afraid to ask:
  STOP!! Never post your email address in open forums. Bots can "harvest" your email! If you must share your email use a Private Message or use the
  smilie in place of the real @
 Pretty Please - add it to our Events forum(s) and add to the calendar! >>
Jim_Gruber
Yoda
Offline
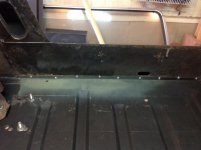
Colleen was occupied with Christmas Cookie decoration and I got a reprieve to get out of her hair and disappear to the garage for a while. With Angle Grinder, may Hammer Drill, Dremel with Cutting Blade, Wonder Bar, and my Biggest Screwdriver I set out to remove the PS Spring Plate. Tips on this job:
1) Factory Welds at the back of the Spring Plate where plate meets the Spring Box. Angle Grinder with a Cutting Blade took care of this fairly quickly. Go slow as you do not want to cut into the spring box. The back edge of the spring box has a lip and can be used as a guide to keep things in alignment. Plate has one large continuous bead across that needs to be cut through.
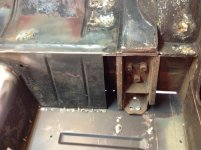
2) In the center of the Spring Plate is a 1/2" sized hole, actually a smidgeon bigger than 1/2". I took my 1/2" Hammer drill and a 1/2" bit and used that to slowly grind the weld that goes around the inside of of the Spring plate to the 3/8" hole in the Spring Box. Do not dill all of the way through. You need that lip on the Spring Box to retack weld this bracket back in place.
3) There will be some weld done at the factory from the back side I later learned you will need to start prying from the front of the spring mount and start bending them back and forth to simply pry and break apart.
4) Wonder Bar came in handy and I was able to find some sound places on he floor to pry against. However if your floor back there is as rotten as the pictures show, the Wonder Bar will simply go through the floor.
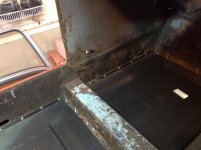
5) The floor is a single piece from factory and is between the Spring Plate and the Spring Box. All pieces are rusted together. There are not cutouts in a BE like there is on a Repair Panel for the Spring Box. So once you make all of your cuts and have the welds free, your challenge will be separating the Spring Mount from the floorpan and then getting the remaining bit of floorpan off of the Spring Box. The second picture shows the piece of floorpan that is rusted to the Spring Box.
6) Don't try to leverage on the back of the bulkhead. I bent a fairly rotten lower section of the bulkhead which I'll need to repair,
It's now out, Spring Plate likely can be cleaned up and reused. I have not checked to see if it is still flat or not.
Next steps
Attack rear bulkhead brace from the inside. Need to cut welds and remove that piece and not damage the rear bulkhead.
At that point I will be able to see both sides of the Spring Box from above. Spring box has good metal on both sides and repairs were done there when the car was taken apart 35 years ago. Unfortunately the body shop tried to do this one cheap on that side versus new floor pan and Spring Box on the DS. I believe the toughest part from here will be getting the old floor our and the new one in. A good reference "How To" on removing old floor before I start cutting away which I will not go any further on until now floor pan is in hand along with Bulkhead repair stiffener and floor stiffener. So here are the results after attacking with implements of mass destruction.
Comments and advice on those who have gone before will be appreciated along with any "How TO" Reference Links. Porter Repair Manual is behind my desk and I'll dig that out as well. It is pretty ugly under there and glad I'm doing this one the rotisserie and not from underneath. On wards and upwards. Bugsy will rise again. Now where is my MOSS Catalog. Guess a floorpan won't make it under the Christmas Tree before Christmas.


1) Factory Welds at the back of the Spring Plate where plate meets the Spring Box. Angle Grinder with a Cutting Blade took care of this fairly quickly. Go slow as you do not want to cut into the spring box. The back edge of the spring box has a lip and can be used as a guide to keep things in alignment. Plate has one large continuous bead across that needs to be cut through.
2) In the center of the Spring Plate is a 1/2" sized hole, actually a smidgeon bigger than 1/2". I took my 1/2" Hammer drill and a 1/2" bit and used that to slowly grind the weld that goes around the inside of of the Spring plate to the 3/8" hole in the Spring Box. Do not dill all of the way through. You need that lip on the Spring Box to retack weld this bracket back in place.
3) There will be some weld done at the factory from the back side I later learned you will need to start prying from the front of the spring mount and start bending them back and forth to simply pry and break apart.
4) Wonder Bar came in handy and I was able to find some sound places on he floor to pry against. However if your floor back there is as rotten as the pictures show, the Wonder Bar will simply go through the floor.
5) The floor is a single piece from factory and is between the Spring Plate and the Spring Box. All pieces are rusted together. There are not cutouts in a BE like there is on a Repair Panel for the Spring Box. So once you make all of your cuts and have the welds free, your challenge will be separating the Spring Mount from the floorpan and then getting the remaining bit of floorpan off of the Spring Box. The second picture shows the piece of floorpan that is rusted to the Spring Box.
6) Don't try to leverage on the back of the bulkhead. I bent a fairly rotten lower section of the bulkhead which I'll need to repair,
It's now out, Spring Plate likely can be cleaned up and reused. I have not checked to see if it is still flat or not.
Next steps
Attack rear bulkhead brace from the inside. Need to cut welds and remove that piece and not damage the rear bulkhead.
At that point I will be able to see both sides of the Spring Box from above. Spring box has good metal on both sides and repairs were done there when the car was taken apart 35 years ago. Unfortunately the body shop tried to do this one cheap on that side versus new floor pan and Spring Box on the DS. I believe the toughest part from here will be getting the old floor our and the new one in. A good reference "How To" on removing old floor before I start cutting away which I will not go any further on until now floor pan is in hand along with Bulkhead repair stiffener and floor stiffener. So here are the results after attacking with implements of mass destruction.
Comments and advice on those who have gone before will be appreciated along with any "How TO" Reference Links. Porter Repair Manual is behind my desk and I'll dig that out as well. It is pretty ugly under there and glad I'm doing this one the rotisserie and not from underneath. On wards and upwards. Bugsy will rise again. Now where is my MOSS Catalog. Guess a floorpan won't make it under the Christmas Tree before Christmas.
 A friendly reminder - be careful what links you click on here. If a link is posted by someone you don't know, or the URL looks fishy, DON'T CLICK. Spammers sometimes post links that lead to sites that can infect your computer, so be mindful what you click.