• The Roadster Factory Recovery Fund - Friends, as you may have heard, The Roadster Factory, a respected British Car Parts business in PA, suffered a total loss in a fire on Christmas Day. Read about it, discuss or ask questions >> HERE. The Triumph Register of America is sponsoring a fund raiser to help TRF get back on their feet. If you can help, vist >> their GoFundMe page.
  • Hey there Guest!
    If you enjoy BCF and find our forum a useful resource, if you appreciate not having ads pop up all over the place and you want to ensure we can stay online - Please consider supporting with an "optional" low-cost annual subscription.
    **Upgrade Now**
    (PS: Subscribers don't see this UGLY banner)
Tips
Tips

Weapons of Mass Destruction Have Been at Work

Jim_Gruber

Yoda
Country flag
Offline
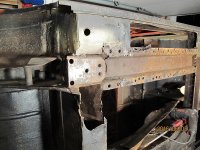
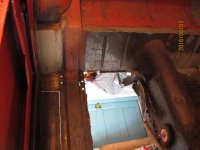
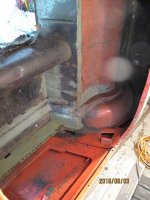
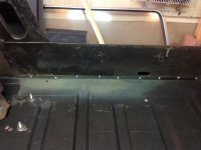
OK 95% of the PS Floorpan are now out. And here is what I find after I got things apart. Probably a bit worse than I thought and I'm open for suggestions on next steps. I am particularly concerned about rear bulkhead which has been repaired and patched and in particular Spring Box Alignment. DS Floor is new and there is a partial Rear Bulkhead Repair panel that was welded in place. My question is do I continue to rip out the rear bulkhead or try to repair what I've got. The stringer that runs up the rear bulkhead on the PS needs to be replaced. It is paper thin at the bottom around the curve where it meets up with the floor stringer. It's crap but concerned how do I remove that panel. It was put together with big 1/2" at least spot welds that are ugly. I guess I could approach them with the angle grinder and grind sideways to cut off the rear bulkhead stringer.

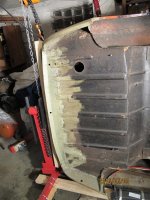
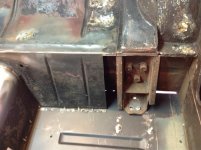
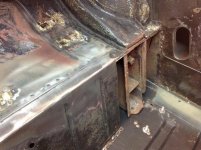
Floor stringer needs to be replaced as well. Floorboard brace right in front of the seat will need a repair done. I think I can patch in something rather than cut everything out. Rear Bulkhead will need a repair panel at the bottom where it meets up with the floor. The flange you weld to is missing about 4-5" of flange. This side of the floor BTW was covered up with Seam Sealer. PO spent $3,500 in Welding Work in 1982 and got New Outers, Inners on one side, Footwell Panels, A Posts, Rear Quarters, Bonnet repair( done badly, I sold that bonnet with my Parts Car as it needed fender beading), and a new boot was welded in. Evidently a shunt in the rear occurred.


So guys I need opinions on next steps. I have new floor, floor brace , and rear bulkhead brace in hand. Those who have gone down this road before I welcome your opinion. Peter, Rut, Chris Uddels, Gerard, et al, I welcome your advice and next steps. Scary to have done this but after driving 60FROG in San Diego up in the Mountains on some really fun roads last week, I'm ready to dive in and get Bugsy back on the road. Thanks guys.
 

Attachments

  • IMG_2711.JPG
    IMG_2711.JPG
    135.3 KB · Views: 102
  • IMG_2712.JPG
    IMG_2712.JPG
    143.6 KB · Views: 98
  • IMG_2716.jpg
    IMG_2716.jpg
    49.2 KB · Views: 107
  • IMG_2705.jpg
    IMG_2705.jpg
    55 KB · Views: 94
  • IMG_2704.jpg
    IMG_2704.jpg
    41.5 KB · Views: 94

BlueMax

Jedi Warrior
Offline
Been down that road with the old can of worms ( sorry to see). Sit down and do a good estimate of the value of your time to repair. Compare and add it to the cost of materials and parts to what you have in mind when you finish. If your time, materials and parts are close to the purchase of a very nice car that you could be driving now, I know what I would do. To do a very nice car could take you several years or more to do and we ain't getting any younger. You know what a nice car drives and looks like, so crunch the numbers and pull the trigger!!
 
OP
Jim_Gruber

Jim_Gruber

Yoda
Country flag
Offline
Unfortunately purchase of a different BE is not an option at this point. Emotionally and financially I'm invested here and let's face it if we open any of our cars up at 60 years old most will,look like this on the inside. People like us are the reason MOSS and VB exist. For the Don Quixote's of the world. The dreamers.
 

Rut

Obi Wan
Country flag
Offline
Jim,
Your Bugeye looks a lot like mine and possibly better and if I could do it you can too. My floor and bulkhead stiffeners were shot and needed replacement along with the floors and part of the bulkhead. Clean up the stiffeners so they are dead level smooth and use weld thru primer to preserve your cleaning work. Do the same to the inner sill and cross member and anyplace the new floor will be welded.
Your bulkhead looks to be in better shape than mine and I see nothing wrong with your spring box alignment, but you will need a new replacement bulkhead to cut the needed parts from. Some of the left over metal from the new bulkhead can be used to build up the shut panel where the edges are ragged and thin so they match the new floor pan. Once you have everything cleaned and primed use sheet metal screws to hold it the new floor pan in place (after the vise grips and clamps for temporary positioning) and make sure it's straight with NO gaps. This will give you an idea of where the new bulkhead panels will fit to give you a good strong joint. I used a HF pneumatic flanger to make lap joints it this area since I used a HF spot welder along with plug welding to make this as strong as I could.
The main thing is to not get caught up in worrying about it being perfect, AH didn't! Everything is correctable/adjustable and this was my therapy in retirement...I can't tell you how many times I welded and pulled things apart!
I'll add this last comment...Peter Ploof gave me the confidence to do mine thru much conversation and he has the most reassuring way of teaching you how to do things. Whether he knows it or not he was my mentor during that part of the restoration and he gave me his insight every time I asked.
HTH, Rut
 

Attachments

  • image.jpg
    image.jpg
    46.1 KB · Views: 66
  • image.jpg
    image.jpg
    68.1 KB · Views: 61
  • image.jpg
    image.jpg
    80.1 KB · Views: 57
OP
Jim_Gruber

Jim_Gruber

Yoda
Country flag
Offline
Rut, this spring box picture helps a lot. More to the spring box structure than is visible without cutting it open. Love to be able to find an unrusty BE but that is an oxymoron. Time to get catalog out and do a better look in daylight at what I have here.
 

markberry

Jedi Trainee
Offline
I agree with Rut. I had the exact same issues as you and decided to go down the path of making everything perfect. As a result it took me nine years to get the poor thing back together. I replaced the entire spring box/bulkhead/shutplate assembly and really didn't like the fit of the new parts that are available. If your spring boxes are OK I'd do like Rut says and flange in repair sections from a new bulkhead. If I was going to have to replace a spring box again I 'd make myself a jig that bolts into the wishbone attach points and runs under the floorboards to form a base to bolt the new spring boxes to. that way everything can be held tightly in alignment while I'm welding it together. Sorry if that sounds too confusing? Essentially two small pieces of pipe the are cut to fit into the rear wishbone attach points with one bolt going through. Then a tube welded to each of those running back under the floor to the rear of the floorboards. Then another piece of metal (square tube would probably be best) connecting the two tubes laterally at that end directly under the spring boxes. From there I'd drill a hole in the lateral tube directly under the point in the spring boxes where the locating pin on the leaf springs poke through and bolt the spring Boxes to the jig. Actually it would be best to pick up the holes that the spring boxes are bolted to the heavy floor stiffener through. This way everything can be held tightly in alignment for and aft, as well as side to side.
The biggest disappointment for me was the fit of the replacement rear bulkhead. It didn't match up over the hump at all and I ended up cutting that area out, modifying it, and re welding it in. Having said that, I like Rut's idea of buying a new bulkhead and flanging repair sections of it to the existing bulkhead. Stay away from the transmission hump!
mark
 
OP
Jim_Gruber

Jim_Gruber

Yoda
Country flag
Offline
MArk,

I hope to he_l this doesn't take 8 years to get back together. It's taken 3 years to find time to get to this point with Bugsy. Would you go for a complete front bulkhead panel to allow plenty of material for fitting? I think that's what both you and Rut are saying. I'll also add a 1/2 front stiffener(in front of the seats section) so I can patch that in a little easier. Some careful cutting and welding and Bob's your uncle.
 

Rut

Obi Wan
Country flag
Offline
Jim,
Once you remove the rest of the floor that covers the outside area next to the spring box and the piece of floor that covers the shut panel to bulkhead, you'll get a real good idea of what the spring box really needs. A combination of bolts and welding will secure everything prior to installing the new floor pan. I treated everything I could with rust encapsulator-neutralizer before I buttoned it up and feel good about its longevity.
Mark has some good ideas about keeping everything straight and square and I would measure everything front to rear and corner to corner from the spring boxes to the front suspension mounting points just to be sure.
Rut
 
OP
Jim_Gruber

Jim_Gruber

Yoda
Country flag
Offline
So would you brace it at this point? Rockers inner and outer are solid.
 

Rut

Obi Wan
Country flag
Offline
So would you brace it at this point? Rockers inner and outer are solid.
I think you could start by measuring and if it's square you should be good to go. The spring boxes aren't going anywhere even when you start repairing the bulkhead since you have the strengtheners in place.
Rut
 
OP
Jim_Gruber

Jim_Gruber

Yoda
Country flag
Offline
Thanks Rut,

Parts order placed to AH Spares. I was able to get 2 Front Stiffeners, Full Bulkhead Panel, Another Bulkhead stiffener just because the DS Stiffener looks a bit Shaky, and a R/H Wheel Arch Repair Panel for 110 pounds or so. With Shipping/ currency Conversion, Freight Cost $225-250 I think. Always a mystery but they ship DHL Air so by Wednesday I probably will have a big box on my front porch when I get home. There was a nice BE in Primrose with a 1275 all new Chrome, new Tire, Interior a few years old in Harrisburg, PA today for $12k. I did the value equation on cost to finish Bugsy vs. selling Project As-Is and that BE won out. Unfortunately someone got a nice BE today for a great price. Back to cutting and derusting.
 

Rut

Obi Wan
Country flag
Offline
Jim,
But it will be YOUR Bugeye, not one someone else built...yours!
Rut
 

markberry

Jedi Trainee
Offline
Hi Jim
yea I ordered most of my sheet metal from AH Spares too. That front bulkhead replacement didn't fit over the transmission hump at all for some reason. I remember there was a guy online at the time doing the same repair and his didn't fit either, so I'm somewhat confident it wasn't a mistake on my part. If you are going to replace that panel because of rot near the bottom then I would strongly suggest taking a look at the pictures Rut posted which show the bulkhead cut vertically and ready to accept a flanged repair piece welded to it. Shoring shouldn't be necessary unless you plan on having some weight on the spring boxes with the front bulkhead removed. Once you get the rear part of the floorboard and the section of the bulkhead that covers the spring boxes out, you'll be able to asses the spring boxes, like Rut says.
once those spring boxes come out it's "game on"! All my pictures are tied up in Spritespot's photo section which is down for the moment. I have some at work I'll try to post tomorrow.
mark
 
OP
Jim_Gruber

Jim_Gruber

Yoda
Country flag
Offline
Thanks Mark,

Is it possible to cut directly along the Bulkhead Stiffeners to remove them and the panel underneath. I know there are Bulkhead close panels under there but unsure just how close that are to Bulkhead Stiffener. my plan is to simply cut the full bulkhead panel, avoid tranny tunnel, and use a flanging tool to make a patch piece that fits right into place. After seeing what is underneath there that looks to be the easiest fix rather that trying to use a cutting wheel to slice the bulkhead stiffener off. The edge of the bulkhead stiffener will make a nice guide for the angle grinder.

Yes I have a concern about the bulkhead under the DS Stiffener. There are voids and dark spaces I can see in the corner where the floor stiffener meets and I have a feeling there is an ugly mess under there as well. I know the PS will need to come out to repair. I hate to drill into the new DS Floorpan but I'll need to get at the bottom of the bulkhead to see what is under there. I will not go all of the way to the inner rocker. That portion of the repair looks solid on both sides so I will leave sleeping dogs lie.
 

Rut

Obi Wan
Country flag
Offline
Jim,
All 3 parts are sandwiched and welded together, spring box, bulkhead, and bulkhead stiffener. Best way to remove it is to wire brush then drill out the spot welds that hold the 3 pieces together. Get the rest of that PS floor off and post pictures of what you find.
Rut
 
OP
Jim_Gruber

Jim_Gruber

Yoda
Country flag
Offline
OK Team here is the Plan. I removed the floor strengthener and cleaned up where I cut out the floor where it butts up against the inner rocker. I ground what is left of the flange down flush with the rocker. The remaining piece is pretty solid but scared to try and grind down / grind out the spot welds as there is some rust between the flange and the inner rocker. Don't know the extent yet I may need to piece in a inner rocker patch along the footwell. I'll make a judgment call on that later. Treat chemically or grind / cut out.


My immediate issue is the rear bulkhead. I am planning on cutting as shown between the edge of the blue masking tape. alongside the inner bulkhead brace on the door side and will cut alongside the brace on the tranny tunnel side. Eventually I will extend the cut a little further over towards the tranny tunnel so I can get strength with a fairly large patch welded in. OPen to your advice on next steps. I really want to inside the cavity to see what I am dealing with. Will use a flanging tool so repair can sit flush with the rest of the bulkhead. IMG_2723.jpg

Previous posts in this thread show the floor between the bulkhead and rear panel. New floor will close the gap. I need ot add some additional strength back there as well as flange on the bottom of the bulkhead to floor so I can weld things together.

New Crossmember will be welded in/ patched. Going about 3/4 of way across and will cut existing cross member where it is rotten. Any issues with cutting off the cross member at the inner rocker/ tips I should know before I cut. , .
 

markberry

Jedi Trainee
Offline
Hi Jim,
are you referring to the lateral crossmember in front of the seat which connects to the inner rocker, or to the longitudinal floor stiffener that runs under the seat and connects to the bulkhead stiffener shown in your picture framed in tape? I removed all spot welds and pulled everything apart. As I recall, I had to make filler pieces where the bulkhead stiffener is butt welded to the trunk frame channels that run over the axle housing and back through the trunk. so maybe leave yourself as much original metal as possible there. Only cut as much of that bulkhead out as you have to. If you end up replacing the spring boxes cut the bulkhead inboard of the spring box halfway between it and the triangular stiffener that's between the spring box and the trans tunnel. The longitudinal floor stiffener will be the last piece to go in after the bulkhead and its stiffener are all buttoned up. Nothing cosmic there; just cut it to fit square on the floor pan and plug weld it to the floor, then follow up with fillet welds at each end. There are holes to line up as well for the bolts that go through it so tighten those up before welding anything.
mark
 
OP
Jim_Gruber

Jim_Gruber

Yoda
Country flag
Offline
Mark, I'm referring to the bulkhead panel in this message. I'll deal with front crossmember later. I am going to make an initial cut alongside the the edge of the bulkhead stiffener, leaving some room at the top so I can weld top to the big brace that runs over the top of the wheel well. I need some additional material at the bottom of the bulkhead where it meets the floor, I haven't quite figured that part out yet but will know more after I get the bulkhead opened up. Spring boxes look ok as far as I can tell.
 

Similar threads

Top