
-
 Hey Guest!
British Car Forum has been supporting enthusiasts for over 25 years by providing a great place to share our love for British cars. You can support our efforts by upgrading your membership for less than the dues of most car clubs. There are some perks with a member upgrade!**Upgrade Now**
(PS: Upgraded members don't see this banner, nor will you see the Google ads that appear on the site.)

Tips
- We have a special forum called "Member Articles" where you can submit actual articles for consideration for publication. Learn More
- Don't have an Avatar? If not, your avatar will default to the 1st character in your username. Go into "Account Details" to change your Avatar.
- Some basic forum navigation info: click
 Hey - did you know if you click on the title of a thread it will take you to the first unread post since you last visited that thread?
- Hey Guest - Is your British Car Club in our Clubs database? If not, send me a PM - Basil

- Looking for a local club? Click the "Clubs" tab above and browse hundreds of clubs world-wide.
- Add Android or iPhone APP: click
- Did you know - any picture or video you add in your posts in any marque-specific forum will also get added to the Media Gallery automatically.
- A few more tips about posting and replying: click
- Hey there Guest - be sure to keep your profile page up to date with interesting info about yourself: learn more
- More tips and tricks on Posting and Replying: click
 but were afraid to ask:
  STOP!! Never post your email address in open forums. Bots can "harvest" your email! If you must share your email use a Private Message or use the
  smilie in place of the real @
- Want to mention another member in a post & get their attention? WATCH THIS

- So, you created a "Group" here at BCF and would like to invite other members to join? Watch this!
- Hey Guest - A post a day keeps Basil from visiting you in the small hours and putting a bat up your nightdress!
- Hey Guest - do you know of an upcoming British car event?
 Pretty Please - add it to our Events forum(s) and add to the calendar! >> Here's How <<
- Hey Guest - you be stylin' Change the look and feel of the forum to fit your taste. Check it out
- If you run across an inappropriate post, for example a post that breaks our rules or looks like it might be spam, you can report the post to the moderators: Learn More
- If you would like to try some different "looks" or styles for the site, scroll to the very bottom, on the left and click the Style Selector.
You are using an out of date browser. It may not display this or other websites correctly.
You should upgrade or use an alternative browser.
You should upgrade or use an alternative browser.
TVR 2500M Triple Weber 40 DCOEs
- Thread starter MatthewsTVR
- Start date

Offline
Fair enuff. Just don't leave us hangin'! Plenty of experience here with 40-DCOE Webers and all willing to help.
Your "bog" is likely due to exactly the too-large size of the "chokes." Seen it more than once. Fitting a single 40 DCOE to our personal MGB we had the similar issue, a reduced choke ID was all it took to remedy. Increased velocity past the "transition" jets to draw fuel in proper quantity. As an aside, the 40 DCOE 18's were fitted to the Lotus Elan engines, a pair to supply 1558cc. Been familiar with 'em since the early '70's. Both my personal cars and a bunch of others thru our shop. Grantura_MKI and Tybalt have BTDT too. Bill is a racer, his disdain for the poxy downdraft ones is justified, and he likely ain't talkin' IDF's.
Your "bog" is likely due to exactly the too-large size of the "chokes." Seen it more than once. Fitting a single 40 DCOE to our personal MGB we had the similar issue, a reduced choke ID was all it took to remedy. Increased velocity past the "transition" jets to draw fuel in proper quantity. As an aside, the 40 DCOE 18's were fitted to the Lotus Elan engines, a pair to supply 1558cc. Been familiar with 'em since the early '70's. Both my personal cars and a bunch of others thru our shop. Grantura_MKI and Tybalt have BTDT too. Bill is a racer, his disdain for the poxy downdraft ones is justified, and he likely ain't talkin' IDF's.
Rocky_LC
Jedi Trainee
Offline
So I took a look, but it’s not clear where I find the choke size. Here’s a picture - I took several pictures and looked as hard as I could, but no obvious answer.
How do the chokes come out? Can you change them with the carbs on the car?
My Weber manual is dated 1985
Thanks.


How do the chokes come out? Can you change them with the carbs on the car?
My Weber manual is dated 1985
Thanks.
Offline
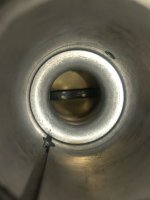
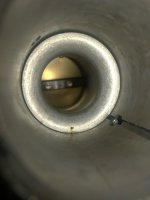
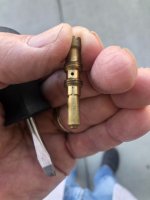
Rocky, both the front venturi tubes and the chokes can be ( or should be) able to be pulled out of the throats with little effort. Two fingers at opposing sides on the I.D. should do it. These shots are of a 40 DCOE 27, but the same thing works with all of them.
Pardon the dirt, this one's been on a shelf for years:


Pardon the dirt, this one's been on a shelf for years:
Tybalt
Jedi Warrior
Offline
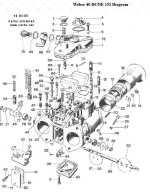
Perhaps this parts breakdown will help. You need to remove the airhorn (18) and its retainer nut, washer and retainer tab. There is a screw and lock nut (24 & 28) on the underside of the body for each barrel. Loosen that to remove the auxillary venturi (17). After that, the venturi (22) should come out as the doctor describes.
Attachments
Last edited:
Rocky_LC
Jedi Trainee
Offline
Thanks to you both.
So it looks like with care, the chokes can come out Without removing the carbs are in the mood for. Not that that’s a big deal, but I just don’t want to monkey around with the linkage and the choke control.
Once they are out, I’ll be able to tell the size, whether It’s 30 mm or smaller.
Thanks!
So it looks like with care, the chokes can come out Without removing the carbs are in the mood for. Not that that’s a big deal, but I just don’t want to monkey around with the linkage and the choke control.
Once they are out, I’ll be able to tell the size, whether It’s 30 mm or smaller.
Thanks!
Offline
That screw is mostly on 45 DCOE versions. The 40 DCOE has the casting boss for it but no hole drilled and threaded on a majority of them (the 40 DCOE 151 in Tybalt's illustration may be an exception). The venturi and choke are usually only held in place with the air bell and backing plate.There is a screw and lock nut (24 & 28) on the underside of the body for each barrel. Loosen that to remove the auxillary venturi (17). After that, the venturi (22) should come out as the doctor describes.
Can't see which version you have from the photo:
Tybalt
Jedi Warrior
Offline
Agreed, but since they are Spanish produced Webers, I thought there was a reasonable chance that they were 40 DCOE 151 units or like them in that respect. So I took a calculated roll of the dice and went that route. As always on these LBCs at this point, "your mileage may vary."That screw is mostly on 45 DCOE versions. The 40 DCOE has the casting boss for it but no hole drilled and threaded on a majority of them (the 40 DCOE 151 in Tybalt's illustration may be an exception). The venturi and choke are usually only held in place with the air bell and backing plate.
Can't see which version you have from the photo:
(photo deleted)
Offline
Everso true. What's the compression on this engine? Has the head been shaved? Overbored? How many hands have been in there? With the description Rocky gave at the beginning, the most likely and least 'intensive' first step is exactly as we've suggested with the smaller diameter chokes. After that, juggling jets, and that can get really expensive and time consuming.As always on these LBCs at this point, "your mileage may vary."
The system was installed by the previous owner. I have a receipt that shows he spent about 40 hours on a dyno tuning it.
Wondering why, if so much dyno time was spent, the issue hadn't been sorted there. It should have been!
Tybalt
Jedi Warrior
Offline
......
The system was installed by the previous owner. I have a receipt that shows he spent about 40 hours on a dyno tuning it.
I was giving this a little more thought and it may be that is at the root of the problem. One of the problems with dyno tuning is that often it is not approached with a clearly defined goal so many default to tuning for maximum power. That's all well and good for a car that isn't going to be used on the street, but if it is going to be used on the street, it really needs to be tuned more for flexibility and give up those last few high RPM ponies that make it an ill tempered beast on the street for more ponies and torque along the curves lower in the rev range. It would be interesting to see those dyno charts if they are available, that would give a better hint as to the state of things and how the engine set up was tuned......
Wondering why, if so much dyno time was spent, the issue hadn't been sorted there. It should have been!
Offline
Good postulation, you're probably right.One of the problems with dyno tuning is that often it is not approached with a clearly defined goal so many default to tuning for maximum power.
My thinking usually goes to "the lowest common denominator"... whoever did the tweaking may not have been all that familiar with DCOE's, more the Holley/Edelbrock/Carter and F.I. kinda stuff. Forty hours and a: "Nevermind that mid-range stumble, put yer boot in it and that's all th' Ferrari you'll ever need!" sorta work. I guess I've seen too much of that attitude over time.
Rocky_LC
Jedi Trainee
Offline
Well, I was looking carefully at my receipts, and saw this parts list. So it looks like not sure what jets are installed, it looks like they bought an assortment for the idle jets, at least.
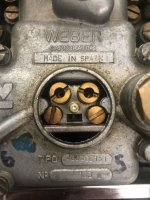
Also the carbs are 151s.
hat does the 133 below that mean?

The work was done by a shop named Brit Bits in Rye, New Hampshire

I don’t know if anything was done to the engine except a shiny valve cover.
I gave replaced the rocker assembly with a bushed one, and adjusted the valves to spec.
Thanks -
Rocky
Also the carbs are 151s.
hat does the 133 below that mean?
The work was done by a shop named Brit Bits in Rye, New Hampshire
I don’t know if anything was done to the engine except a shiny valve cover.
I gave replaced the rocker assembly with a bushed one, and adjusted the valves to spec.
Thanks -
Rocky
Last edited:
Tybalt
Jedi Warrior
Offline
Have you pulled off the jet cover so you can then pull the stack up with the air corrector jet, emulsion tube and main jet as well as the idle jet holder with the idle jet to see what is in there as well as confirming that it is indeed fitted with 28mm venturis? The main jet and air corrector jet will have three digit numbers to indicate size, the emulsion tube will be marked as Fx or Fxx depending on whether or not it is a single or double digit number and the idle jet should be something like 50f9.
Also, since your digging through old paperwork yielded those notes, any chance that you have found any of dyno charts?
As for the "133 0", I can't say with 100% certainty but think it's likely a Julian date and year code for when the carb was produced.
Also, since your digging through old paperwork yielded those notes, any chance that you have found any of dyno charts?
As for the "133 0", I can't say with 100% certainty but think it's likely a Julian date and year code for when the carb was produced.
Rocky_LC
Jedi Trainee
Offline
Started monkeying with my carbs today.
Got the Aux Venturis out, but no luck on the chokes. They are loose, and I can wiggle them around, but neither of the pair want to slide out of the body. So I still can't see the dimension stamped on it. It's funny - from the pictures the Dr. posted, I should see the value in big numbers on the chokes. There is nothing like that.
Tybalt (and the Dr.) were right - there are retaining screws/lock nuts for the venturis on the -151 carbs.
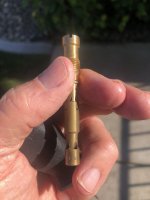
Also popped the cap off the No 5/6 carb...
It looks like the emulsion tube is an F11, and the Idle Jet (?) is a 9 - 50 There is a 9 on top, and a 50 under that).
Here's some pictures.
Where do you guys recommend ordering parts? One of the gaskets behind the Air Filter Plate came apart - likely all those need replaced (and maybe more parts).
Thanks -
Rocky
PS> No dyno sheets were provided with the car. The work was done in 2005, so I doubt that I can get anything from the "adjuster".
Got the Aux Venturis out, but no luck on the chokes. They are loose, and I can wiggle them around, but neither of the pair want to slide out of the body. So I still can't see the dimension stamped on it. It's funny - from the pictures the Dr. posted, I should see the value in big numbers on the chokes. There is nothing like that.
Tybalt (and the Dr.) were right - there are retaining screws/lock nuts for the venturis on the -151 carbs.
Also popped the cap off the No 5/6 carb...
It looks like the emulsion tube is an F11, and the Idle Jet (?) is a 9 - 50 There is a 9 on top, and a 50 under that).
Here's some pictures.
Where do you guys recommend ordering parts? One of the gaskets behind the Air Filter Plate came apart - likely all those need replaced (and maybe more parts).
Thanks -
Rocky
PS> No dyno sheets were provided with the car. The work was done in 2005, so I doubt that I can get anything from the "adjuster".
Attachments
Last edited:
Offline
Hmm. Chokes ~should~ come out with a bit of wiggling and pulling outward. Looks like there is no I.D. on the front of them. Luckily, the I.D. could be measured with some imagination. Luckily the chokes don't follow Weber's arbitrary numbering system used for the various jets and tubes!
Idle jet would seem to be right. An F-11 or F-8 emulsion tube would also seem good. Air corrector size? 185~200?
And where's/what's the main jet (#15 in Tybalt's posted diagram)? It should be stuck in at the bottom of the emulsion tube. My WAG would be something like a 125 for the displacement size of your engine.
That's all from guess & memory, still haven't found the books.
Tybalt
Jedi Warrior
Offline
Sorry for the delay, had airport duty today among other things so it has been a full day. As the Dr asked, where is the main jet and what is it? The F11 emulsion tube which should be fine for use. Here is where the Dr and I diverge for these cars from his post above:
If you are tuning for flexibility, I would think in terms of a 110 or 115 main to go with either a 27mm or 28mm venturi. For the air corrector, a 160 or 165, 45f9 for the idle jet, 35 for the pump jet and 40 for the pump exhaust as jumping off points. If you don't see a size on the venturi, get it out and get a good measure on the bore using a good set of calipers or a small inside micrometer.
Now for the part you will not want to hear. Typically the venturis come out as the Dr. described. However, I have had a few occassions where they did not want to come out easily and I wound up taking the carbs off the manifold and using a larger wooden dowel to hold the throttle plate open and using a smaller wooden dowel as a drift, I have had to apply a little bit of hammer love taps to the drift to get the venturi out. A light tap, then shift 180° across the bore, another light tap, and after a few taps, the venturi should come out using your fingers.
Rocky_LC
Jedi Trainee
Offline
Thanks to both of you guys.
It seems like some of the components, like the air emulsion tube, should have come apart. They look to have two pieces, and some slits on the side where the pieces join with a small interference fit.
I pulled pretty hard, but I couldn’t get them to come apart.
Anyway I need to spend more time with my manual, and spend more time reading over the material in this thread carefully, now that I’m getting a basic understanding of the construction of the carbs.
It seems like Pegasus racing, and Carbs Unlimited both have DCOE rebuild kits.
I have calipers if I can get them chokes out. I need to feel around underneath the carbs to see if there are some other retaining mechanism, similar to the auxiliary Venturi screw & locknut - I thought I felt something like that under there.
My guess is that the carbs were tuned properly back in 2005, and something has happened to them over the ensuing 17 years.
We shall see as I progress down my journey of discovery.
Thanks again -
Rocky