• Hi Guest!
    You can help ensure that British Car Forum (BCF) continues to provide a great place to engage in the British car hobby! If you find BCF a beneficial community, please consider supporting our efforts with a subscription.

    There are some perks with a member upgrade!
    **Upgrade Now**
    (PS: Subscribers don't see this gawd-aweful banner
Tips
Tips

Tri-Carb Project

Healey Nut

Luke Skywalker
Country flag
Offline
My 62 Tri-Carb Sideshift project is at the body shop getting shrouds and all the wings fitted and fettled.
The new aluminum wings will need “significant fettling” to make them all fit. Ah well, so be it.
Anyways what I'm looking for are pictures of the door shut area of the rear shroud. I have new front end sections to be welded in for the rear shroud where it meets the door shut.

Does anyone have pics of that area and the landing platform where the hardtop location posts fit?
Also pics of the same area all completed with door shut face trim, etc., all done.
Thanks.
 
Had a trip to the body shop today and took some pics of the progress , she’s coming along nicely. Beginning to see some real progress with the body fit . Dirk the metal magician has been working his magic .
 

Attachments

  • 9EDB88F6-2C3F-42A3-8F66-7F7D7987FD89.jpg
    9EDB88F6-2C3F-42A3-8F66-7F7D7987FD89.jpg
    63.6 KB · Views: 552
  • 0BAA27CC-344A-48F7-A652-12D0BC6981FE.jpg
    0BAA27CC-344A-48F7-A652-12D0BC6981FE.jpg
    50.9 KB · Views: 509
  • 17E78D6E-16ED-4F85-8E50-0EE75E6DEB8B.jpg
    17E78D6E-16ED-4F85-8E50-0EE75E6DEB8B.jpg
    56.9 KB · Views: 526
  • D2250189-F5DC-412B-9ADC-AD79ED19679A.jpg
    D2250189-F5DC-412B-9ADC-AD79ED19679A.jpg
    57.3 KB · Views: 518
  • A99518BD-B0EB-4AAC-8BED-B65ABC5E3928.jpg
    A99518BD-B0EB-4AAC-8BED-B65ABC5E3928.jpg
    64.3 KB · Views: 518
  • BD94DC96-1C4F-4751-B7CF-1900D62946E0.jpg
    BD94DC96-1C4F-4751-B7CF-1900D62946E0.jpg
    71.4 KB · Views: 526
  • 8B857C08-E0B3-4ABF-B22B-6ECAE965C0E5.jpg
    8B857C08-E0B3-4ABF-B22B-6ECAE965C0E5.jpg
    54.3 KB · Views: 523
Looking good, how much work was needed to fit the new aluminum panels and doors you got from Dave Hardwick?
 
Looking good, how much work was needed to fit the new aluminum panels and doors you got from Dave Hardwick?
The wings and doors didn’t come from DH . They came from AutoFarm via AH4H in the UK .
I’m waiting on the rally light pods and scuttle scoop from DH .
The doors and fenders do need “ some field modification “ to get them to fit and line up . The doors come with the door skins not fully fitted at edges to allow you to move them and rework them to fit your car .
so as this disclaimer says when you buy them ....”you will need someone who can work with aluminum to make them fit “
they were not kidding . The fenders are not to bad but the doors are whole project on their own .
I just show up at the body shop , admire , praise the work and shovel money in the wheelbarrow. :welcoming:
 
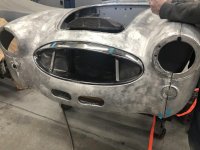
Metalwork continues , will post more pics soon .
As for the fit/quality of the new doors and wings .
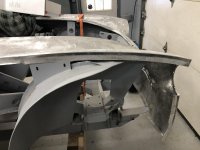
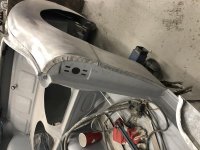
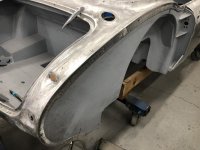
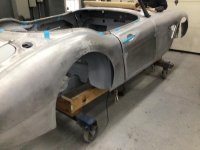
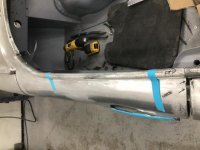
Wings get a 7.5/10 , the vents had to be reduced in width so they fit around the foot boxes ,they were too wide so the bottom edge of the wing would not meet the body as the vent was interfering with the footbox . We also relocated that short U brace between the inner wheel arch and the footbox on the passenger side to below the rally vent so you can’t see it through the vent opening .
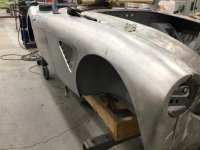
Passenger rear wing had a bulge in it which resulted in having to cut a small wedge at the top of the arch to make it pull in . You could tell from behind the cars hips were different sizes .
Swage lines on both rear wings had to be repositioned to suit the doors . They were 1/4” off .
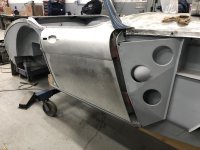
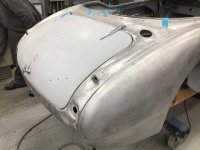
Doors , 3/10 ...Where do I start the drivers door frame was 3/4” taller than the passenger door , the indent for the door handle was 5/8” to close to the back edge of the door so the handle didn’t fit if the latch was in place .
The cutout for the door latch on the drivers door was 1/4” off where it should be .
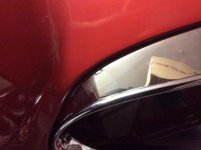
The top edge of the door where the aluminum cockpit trim fits is wrong so when the door is closed the back edge of the top of the door is 3/4” too far out so the cockpit trim doesn’t flow in one smooth line .
Maybe I got a Monday door and a Friday door ?..
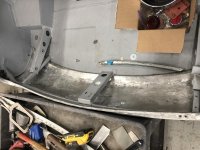
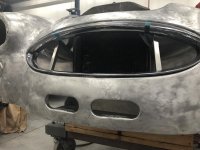
The rear shroud which is original to the car fits and so does the original rear cockpit trim so we know the rear of the car is correct .
we have looked at dozens of pics of interiors from all kinds of angles and you can clearly determine that the top edge of the door is not dead straight . It has the curve up to where it meets the dash/windshield pillar then it would have a very slight curve so that it’s edge flows to meet the rear cockpit trim .
We proved this to be correct as the original door cockpit trims when held in place at the front edge of the door where it curves line up correctly with the rear cockpit trim the top of the doors at the rear is way off .
My repro doors are dead straight (at the moment) My Metal guy is going to cut the top edge from the back for about 8” and add a wedge of material to move the top edge inward so the cockpit trim all lines up .
There’s nothing you can do but accept and modify as it’s written in block letters that the doors “will need work to fit your car “ and are non returnable .
Hopefully by the end of this coming week the major mods and fitting will be done and it’s down to the fine tweaking before it all comes off for the superstructure to be painted .
I sure hope so as my healey bank account is in hemorrhage mode right now !!!!!
 
Sounds like your doors are BJ doors, not BN/BT doors.
Check the pics in post 2 they are definitely BT doors not BJ . Not good repros but they are BT doors .
 
Latest pics , was there to have a look today .
you can see the modifications that had to be made to the top edge of the doors to make them line up with the rear cockpit trim etc .
 

Attachments

  • BA695650-ACC5-4F5C-A4A5-DE6DAFB8D5C6.jpg
    BA695650-ACC5-4F5C-A4A5-DE6DAFB8D5C6.jpg
    46.7 KB · Views: 498
  • D09FC14F-7DBE-4EB6-B1F2-15DA7DB55627.jpg
    D09FC14F-7DBE-4EB6-B1F2-15DA7DB55627.jpg
    50.3 KB · Views: 512
  • 9E5CCF14-2E2A-4C9D-A606-64080C4ACDD9.jpg
    9E5CCF14-2E2A-4C9D-A606-64080C4ACDD9.jpg
    58.5 KB · Views: 482
  • 4C1037EA-6479-4AF2-A222-1B5C30D63ABD.jpg
    4C1037EA-6479-4AF2-A222-1B5C30D63ABD.jpg
    53.2 KB · Views: 490
  • 30D39C6E-CBD7-41B4-880B-AAEF1DB6FDCA.jpg
    30D39C6E-CBD7-41B4-880B-AAEF1DB6FDCA.jpg
    59.9 KB · Views: 486
Another stop in at the body shop today to drop off the radiator so we can do trial assembly and fitting of the rally ducting in front of it .
we got into discussing grill/eyebrow fit me to at the same time .
Im sure on my BJ8s the eyebrow clipped into the grill surround behind the front edge of the grill surround .
However looking at this grill surround and eyebrow it fits together better if the eyebrow fits over the front edge of the grill surround .
Which is correct ?
Looked at pics online and it seems to me that like my BJ8s it should be clipped in behind but that would make access to the little screws at the ends of the eyebrow impossible ?
 
..."it seems to me that like my BJ8s it should be clipped in behind"
That would be correct. BJ7s the same, clipped in from behind the lip.
 
..."it seems to me that like my BJ8s it should be clipped in behind"
That would be correct. BJ7s the same, clipped in from behind the lip.
That’s what I figured and here’s a pic from a previous thread I answered to a similar question . The pic is of my red 64 when I was restoring it .
The eyebrow is clipped in / snapped into place behind the grill surround .
then why would my BT7 eyebrow seem to want to fit better in front of the grill surround ?
 

Attachments

  • DA0C75E1-295C-412D-B554-D51511050871.jpeg
    DA0C75E1-295C-412D-B554-D51511050871.jpeg
    54.2 KB · Views: 488
here you go. let me know if you need to see something else.
F6A75FAB-15B2-4215-8098-17EE2CAD42BB_1_201_a.jpg
100DB6F9-BD2A-4959-9D87-159543A09E7B_1_201_a.jpg
 
So what’s the verdict Healyers , over the front or clipped in behind ?
seems like both are possible
 
So what’s the verdict Healyers , over the front or clipped in behind ?
seems like both are possible

Over the front is looks right.
 
It is supposed to go in from behind so the edge of the oval is continuous.

Thats what I thought was correct but I’m second guessing myself having played with the parts I have and seeing how they fit together and also browsing the net and finding pics of “award winning” 62 BT7s with it over the front lip of the oval .
 
So back to the body shop today to re asses the front grill .
With the eyebrow clipped in behind the front grill lip the grill surround and eyebrow fit the shroud opening but the mounting points are not even close to lining up . With the eyebrow over the front grill lip everything lines up (see pic)
oil cooler openings now almost finished .
Rally ducting in radiator test fitted for good measure .
Next week is the test fit of the hardtop ......fingers crossed metalwork is almost done .
 

Attachments

  • B0975692-34AF-45D9-9523-5D31C52D0396.jpg
    B0975692-34AF-45D9-9523-5D31C52D0396.jpg
    58.4 KB · Views: 410
  • 77BF3009-424F-4BA1-9CBE-9D51261FF55A.jpg
    77BF3009-424F-4BA1-9CBE-9D51261FF55A.jpg
    64.1 KB · Views: 398
Back
Top