• Hey Guest!
    British Car Forum has been supporting enthusiasts for over 25 years by providing a great place to share our love for British cars. You can support our efforts by upgrading your membership for less than the dues of most car clubs. There are some perks with a member upgrade!

    **Upgrade Now**
    (PS: Upgraded members don't see this banner, nor will you see the Google ads that appear on the site.)
Tips
Tips

TR2/3/3A TR3 Body gaps

CJD

Yoda
Country flag
Offline
I wondered if anyone can give me an idea of the minimum body gaps to set for the doors, boot and bonnet. I don't have any experience with the TR3, so I really don't know how much to expect the body to flex while driving...and have no idea how tight I can get away with. I am starting from scratch and will set all gaps to the minimum...


Thanks,

John
 
John, If you hang the doors and install the latches etc. I think you'll see , there isn't a lot of movement if any that you can do to change the gap in the rear of the door. I thought mine were a little tight but don't close any when driving the car. You have up and down movement but not front to rear. Kevin
 
Leave some room for sure, too tight will cause issues and also not look "right". I'm sure one of the guys will chime in with actual measurements.
 
Well, finished the first door this morning. 3/32" on the sides and 1/8" on the bottom. That seems to look about right...and allowed for the extra vertical movement you mentioned, Kevin. You are sorta right about the rear gap...it can be adjusted, but involves grinding/welding to do it.

The restoration book has 2 photos that talk about welding the edge of the panels to close the gaps. Looks easy...it's not. The welding goes fine, but it distorts the skin, which then has to be beat and ground...for about 2 days. When done it looks great, but it's a whole lotta work to close the gap a sixteenth or so!!

Being amazed at the limited adjustment available at the hinge plates, I finally measured and found all the captured nuts were installed "off", at the factory. The result is the adjustment is always limited in any direction by a different nut. Very frustrating! Not to mention the fact you have to remove or loosen a panel any time you have to make a change. For example, the door has to come back off to tweak the front fender...so you loose all your door adjustments. Not to mention the slot head screws are a pain to work with. For the left door I plan to get some phillips head screws, just for the alignment process...so I can run them in and out without the driver slipping off the screw head (about 800 times!?!).

I find a rubber mallot is the best body alignment tool for these cars...

John
 
I hesitated to say anything about cutting and /or adding to the edge of the door skin ( done that) seeing as how your tub is painted ! We just don't need to be puttin' ideas in your head that may not be there.
 
I am just curious John, have you got the tub on the frame? The way I adjusted my rear door gap was with the body shims on the rear of the frame.
steve
 
Yes, the body is on the frame. I guess I'm a little OCD, but inconsistent gaps bug me. The problem wasn't really the size of the gaps, so much as the inconsistency. And once you commit to it...it's hard to stop!?!

Here is the gap as it was after I adjusted the door and front "wing" as closely as possible. To get to this point I had to bend the hinges (actually un-bend them from what the PO had bent), and got the rear door gap right on 3/32", and the lower gap to a consistent 1/8". The photo doesn't show that well, but the front gap varies from 1/16 to 1/4".

_DSC6097.jpg


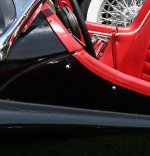
Here is a close up of the fender to door gap at the top. It was touching...but if I moved the fender forward, the gap lower on the door was over 1/4". I chose to grind the fender to match the tub and save some welding.

_DSC6095.jpg


After a little grinding on the back of the door, the rear gap was a consistent 3/32"

_DSC6096.jpg


Here is the first step, welding about 3/16" of bead along the entire front edge of the door. I started using MIG, as I thought the lower heat would prevent any panel warpage. No such luck, though. Once I saw the panel was going to warp anyway, I switched to Oxy-acetalyne. I am more comfortable controlling the gas weld on thin stock like the door edge. Plus...I hate scraping the spatter from the MIG.

_DSC6099.jpg


The last step was about 2 days of hammer and dolly work, grinding, and refitting the door at least 2 dozen times. Here is the final result. Once again, the photo does not really show it, but the gap all around and over the front of the door is a consistent 3/32".

_DSC6103.jpg


The inside, engine bay, and bottom of the tub are already painted. All of the mods were done to the door itself, though, so the paint is still untouched. The tolerance on the hammer/dolly work is within 1/64", so a good coat of primer will level the door completely. I will hit it with a smear of glaze anyway before priming. Here is the side of the car:

_DSC6102.jpg


Well, on the the other side now!?!

John
 
John,

Wish mine looked that good.....

Cheers,
M. Pied Lourd
 
Make sure the door hinge pins are a tight fit.

Saves the neighbours any shocking language when you fit the side curtains and the added weight drops a door.

Regards,

Viv.
 
Beautiful - I'd be worried if you tried to make them any narrower, especially with paint to follow. Now come on down to Houston and show us those skills - we have a couple of 3As in need of such work.

Randy
 
I need to learn the dolly hammer skills you have John....Dern nice and good pictures to boot. But back to my project.....making garage space and getting the motor assessed for now.
 
Yep, forgot about the side curtains!! How far will they sag the door?

I mounted the right door for the first time yesterday. It has the total opposite problem...the door is too long to fit. The good news is that it's far easier to increase a gap than to decrease it. These TR's are real puzzles trying to get everything to match.

JP...I have given up trying to make garage space. Every time I do, I turn around and the wife and kids have found it and used it back up! Let us know how the engine turns over.

John
 
Hi John looks great better than they did new. They are kinda funky little cars and they might need a little more wiggle room. One concern I have about getting things too close is the door hardware is kinda bulky for that little of door. I would suggest putting the handle and striker on to make sure everybody is happy.
steve
 
If your final colour is white, the gaps will be more visible than on my black 1958 TR3A. No one ever docked me points for the door gaps. You can always slide the front fenders forward or backwards to improve the gap. I had to file about 1/8" off the back of the striker plates to get my door to close and latch. You can also flat file the front hinge plates a bit for better gaps.

I hope that you have tried to swing the doors fully open to make sure that the bottom front corner doesn't interfere with the outer sill "notch" where the sill is welded to the A post. If you changed the outer sills and didn't check this with the door fully swung open, you may bend the bottom front corner of the door outwards at it hits this interference.

Have you ever been on the London (England) "tube" or subway ? Some stops are in a curve and the subway has about 5 or 6 different standards for coach width and floor height (wheel diameters) so at most stops, a voice will crackle out over the PA system to "WATCH THE GAP". This is why the Brits are so fussy about "gaps".
 

Attachments

  • 24713.jpg
    24713.jpg
    24.1 KB · Views: 625
And this is the front "notch" in the outer sill after I modifed it near the A post while I was restoring my 1958 TR3A in 1987 to 1990.
 

Attachments

  • 24714.jpg
    24714.jpg
    90.9 KB · Views: 637
Thanks for the tips, everyone. The left door is all clear with the locks and the opening corners. I will have more trouble with the right door. It is very tight...but that's the challenge!?!

Does anyone have any gaps that rubbed? I'm still trying to get a feel for how close is too close. I used to restore mid-year vettes...their frames were like tank frames. These triumphs seem very "loose" compared to that. For example, I found that just pushing about 80 pounds up or down on the door is enough to bend the hinges. The vettes have very specific ranges for gaps. I haven't seen anything in writing for the TR's. I assume the frame is going to flex out on the road...just wondering how much.

Thanks again!

John
 
Well, the right door is finally set. Here is the initial fitting...the rear gap was huge. The problem with that is, if I closed the gap, then the latch would not fit.
_DSC6109-1.jpg


That meant that a weld bead had to be added to the rear of the right door to close in the gap: The front did not take a full weld, just a few spots to even out the irregular gaps:
_DSC6118.jpg


_DSC6115.jpg


The beating went a lot quicker, and I got faster at measuring to grind the gaps. I think the next car would go faster!?!

_DSC6129.jpg


Here is the final fit, with the gaps exactly matching the left side. Sorry about the angle, I'm short on room in the garage.

_DSC6127.jpg
 
Don Elliott said:
Have you ever been on the London (England) "tube" or subway ? Some stops are in a curve and the subway has about 5 or 6 different standards for coach width and floor height (wheel diameters) so at most stops, a voice will crackle out over the PA system to "WATCH THE GAP". This is why the Brits are so fussy about "gaps".
 

Attachments

  • 24790.jpg
    24790.jpg
    16.2 KB · Views: 575
Back
Top