• Hi Guest!
    You can help ensure that British Car Forum (BCF) continues to provide a great place to engage in the British car hobby! If you find BCF a beneficial community, please consider supporting our efforts with a subscription.

    There are some perks with a member upgrade!
    **Upgrade Now**
    (PS: Subscribers don't see this gawd-aweful banner
Tips
Tips

TR2/3/3A TR2 Fitting/mounting rear wing

jfcdo

Senior Member
Country flag
Offline
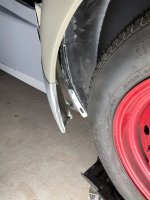
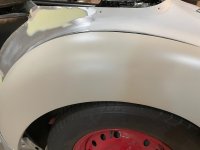
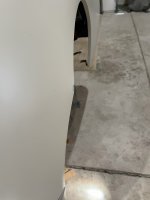
First trial fitting of a brand new left rear wing/fender (purchased from Rimmer Bros.) on my 1955 Triumph TR2 restoration project.

It seems as though the fender is too long or the curve in the front is too wide.


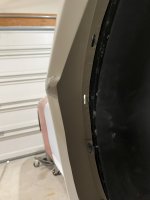
After attaching this fender from the back first and adding each screw/bolt moving forward, all of the bolt holes line up just right.

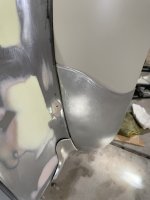
But as I get the front part that begins to curve downward, the front of the fender sits too far forward.

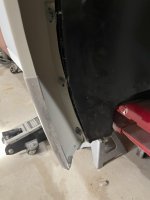
The last 5 bolt holes to get to the bottom of the front of the fender do not line up.

I do not want to try to push the front part of the fender back, as I do not want damage this "brand new" fender.


Do I need to push/pull the middle or rear section of the fender outward (away from the body)?

I see that when I do this the front part seems to move closer to aligning correctly.


So, I am looking for some advice about how to properly align this fender without damaging it.

Has anyone else seen this type of problem?

As always, any advice, direction or suggestion is appreciated.
 

Attachments

  • IMG_0102.jpg
    IMG_0102.jpg
    2 MB · Views: 96
  • IMG_0105.jpg
    IMG_0105.jpg
    2.1 MB · Views: 93
  • IMG_0106.jpg
    IMG_0106.jpg
    2.2 MB · Views: 84
  • IMG_0107.jpg
    IMG_0107.jpg
    2.3 MB · Views: 94
Yes I have. You will be surprised at how it will fit. The fenders are more flexible than you realize. Worst case would be the need to cut the backing strip ( portion where the bolts are fitted) to allow the fender itself to bend more easily. But I doubt that would be needed here.
Charley
 
That is actually a really nice initial fit. Remember, these cars were hand built, so you do not get the perfect fit of a modern car. Every body part must be "coaxed" into position.

Gently pull the front in as you continue to line up the bolts from rear to front. If it needs to bend more than the bolt flange will allow, then you can snip a cut into the flange, either through a bolt hole or midway between the bolt holes, to allow the panel to curve more. This is exactly what the factory did when they needed to.

Remember the plastic bead will also fit in the seam. The bead allows for a bit of deviation between the body and wing.

This is an example installation, starting with post #360:

 
CJD is right , a very nice initial fit. 99% of rear wings had the holes snipped to allow the wing
to arch correctly. You know that the tin worms came from the factory! treat the cuts to some primer.
Mad dog
 
Progress but with issues.
After "coaxing" this fender into place, which involved pushing a bit more than I likely should have, I was able to line up the lower front bolts, although this came with an unfortunate development. The outside edge of the front curve buckled.
Now I am wondering if taking this fender off, straightening the new crease and remounting it is going to be the best option. I expect that doing this will likely result in the same outcome, now that the metal has been stressed.
Has anyone seen this type of issue?
Any suggestions about how to proceed?
As always, thanks for any advice.
JC
 

Attachments

  • IMG_0114.jpg
    IMG_0114.jpg
    2 MB · Views: 73
  • IMG_0117.jpg
    IMG_0117.jpg
    2 MB · Views: 81
  • IMG_0116.jpg
    IMG_0116.jpg
    1.9 MB · Views: 79
  • IMG_0118.jpg
    IMG_0118.jpg
    2 MB · Views: 72
Quite unfortunate, as it will now require some dolling and perhaps some heat to shrink the
metal in the area. First back up a bit, remove the lower bolts, then gently dolly /press the edge back into shape.
Your edge looks a little bit wide in the pics. This will fight you. Try installing each bolt progressively from high
to low, gradually making the arch.
Good luck/more beer
Mad dog
 
Looking at your photos I could finally see your problem area in photo118. It is in the outer flange portion of the fender. This is an area that will not be seen without getting on your knees or laying on your back. I would say that your best bet is not to remove the fender or try to hammer and dolly the area out as there is to much material to be able to make the curve.

The appropriate thing I would do is to make a cut or snip while keeping the fender bent on the car. Let the two sides overlap each other and determine how much material in a pie shape needs to be removed to make the two sides come together with no overlap. You will need to flatten the two sides to allow a flat overlap. You can probably do that with pliers as opposed to a hammer and dolly. Cut out the pie shape. Then weld the two sides in that shape.
If you remove the fender from the car before doing the above, that bend is gone and you will not know what bend to make. I can try to better explain this if itis not clear.
Charley
 
Thank you to mctriumph and charleyf for your input.
I figured that there would be cutting and welding and hammering involved here.
At the same time, I can't help but feel kind of stupid, to have the happen with a brand new fender.
Cutting a wedge or pie shape and then welding the edges back together and hammering it out makes to most sense.
I question my skill with metal working and whether it may be better to find someone locally who can do this.
I also agree with mctriumph - good luck before the job and more beer after it's done.
Thanks again. JC
Think small, like with a dremel tool. Start your cuts from the back side and stop your cut before it gets to the front (showing) part of the fender. You want to end up with the two sides almost touching. But you will likely need to make several cuts .
Just take it slow and easy.
Or as you say find somebody with some experience.
Best of luck.
Charley
 
All it needs (for the time being), is to shrink the flange area that buckled. The buckle says the flange was preventing that area from making the necessary curvature. To shrink, you have several options:

1) (easiest), is to purchase a metal shrinker from amazon. Use the shrinker to work the edge until it conforms properly:

2) (medium skill level) Use a dolly and shrinking hammer to work the flange into shape.

3) (high Skill level) Snip the flange as necessary to allow it to conform to the needed curvature. Then weld the edges back together.

As you have learned, nothing on a Triumph is "bolt on", as with modern cars. With a modern car you can paint the fender, bolt it on and drive off. Every body part on a Triumph has to be hand fit. I know this is more work than you were expecting, but take comfort knowing it could have been much, much worse! Just follow some of my bodywork thread if you want to see how bad it can get, LOL:

 
Thank you to all. The post from CJD looks interesting with the shrinker-stretcher. I have not used one of these. This looks like a good option, with less of a potential for collateral damage.
I understand that these LBC's always take some time and creativity. After restoring 2 MG's and a Sunbeam Alpine, I have learned that this is a slow process. With those other cars, I never came across a problem like this, but those were 1960's vehicles and this one is older, although I am not sure that the era should make that much of difference, although this TR 2 has curves everywhere..
Thanks again to everyone for everything.
JC
 
At the 12:00 position on the fender I have seen the hole for the bolt cut like a pleat and a couple of holes to the left and right cut also cut into pleats almost to the fender to help the fender open up some. The fender holes at the center top or what I am calling the 12:00 need to be up as high as they can to let the ends have as much room to come into place. I work from the 12:00 center out. The back section by the tail is most forgiving and can be push in with a helper as you tighten and the chrome beading helps concealed imperfections.

I did the same thing you did after a new paint job when fitting the chrome beading. I took the fender off and the guy who painted it fixed it for free because he tried and could not get the fender perfect. The last few years I have been doing my own bodywork, and the area you are in is often a pain.

I have used bailing wire and ran that through some bolt holes and then fastened the other end making a circular loop temporarily around the frame or axle. Then I would turn the wire in a circular motion and that would shorten the loop and pull the fender into place then I would get a couple of bolts started in few spots and cut the wire and pull the wire out.

Steve
 
Back
Top