• Hey Guest!
    British Car Forum has been supporting enthusiasts for over 25 years by providing a great place to share our love for British cars. You can support our efforts by upgrading your membership for less than the dues of most car clubs. There are some perks with a member upgrade!

    **Upgrade Now**
    (PS: Upgraded members don't see this banner, nor will you see the Google ads that appear on the site.)
Tips
Tips

SU throttle shaft and bush dilemma - advice?

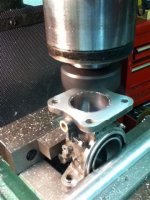
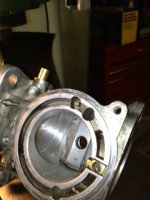
Whether the originals were "captive" or not should not really matter. If you have access to a decent drill press, it is just a matter of drilling the old out if they cannot be punched out. Match the new bushings to the new shaft size, and drill the old out with a bit to match the OD of the new bushings. Bushings can be purchased at bearing supplies to be "pressed" in. In other words, if you want to use a 3/8" drill to remove the old bushings, the new bushings can be bought to be just a few thousandths over 3/8" to allow a press fit when re-installing.

It sounds like your friend is pretty "connected" with cool tools, so to do it really right: Use bushings a few thousands smaller ID than the shaft. Press the new bushings into the holes and then use a reamer through both new bushings to get them perfectly aligned and to the perfect size.

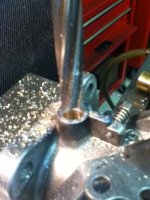
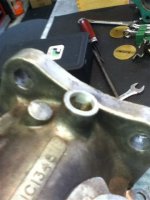
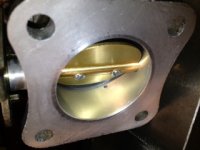
I can't make out the cracks in your picture. I would not worry about a tiny crack just at the shaft hole. If it is significant, like the old bushings were pressed in to forcefully and broke the carb body, then best to start over with a decent one.

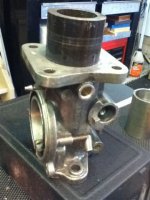
Also, can't see how much wear you are talking about in the bore...so best to put the new shaft and butterfly into the old bushings before you do anything. Just make sure the butterfly can mate to the walls of the bore without gaps. If there are gaps...once again, best to start over with a decent carb.

John
 
Thx Berry and John,
I think we have concluded so far that the HS6's (mine at least) almost certainly were bushed at the factory and hence the captive nature of the bush. There is maybe 1/8"+ body material on the outside and 1/16" at the inside/throat. One really questions whether a rebush attempt could achieve this general finished appearance. The cracking has now started on the other carb and in time I am sure it would expose the bush.

I have picked up 10 oilite bushes 3/8"OD X 5/16" ID X 3/4" lg. The depth of the shaft bores are different as one is circa 0.560" and the other 0.670". I hope to drill and ream on Tuesday and that should provide the definitive answer on OEM bush and whether we have a solution.

In line with several suggestions, I have started the search for another set of HS6's and did see some on UK Fleabay for Gbp160, but that will be a winter exercise. For now I want to repair these which are original to the car - if only for the experience and a better understanding on how a carb with four moving parts (quoting Universtity Motors) can cause so much aggravation
Ques: How does one post more than one picture?
Keep 'em coming
Cheers
 
Yep, once rebuilt, that "captured" look you are talking about will be gone. The bushings will be visible outside and in...but only if you removed the butterfly and throttle arm!

John
 
Update:
We took the plunge and first ran a 0.340" precision drill through, which confirmed that the bush is captive and installed at time of manufacture. We then ran the 3/8" reamer through and noted that it did not remove all of the bush material, so the bush OD is larger than 3/8". There is also one spot where the "parent white metal" has overlapped the bush material i.e. there is no definitive ring at the bush edge.

The new bushes were then pressed in with an arbor press until the bush penetrated into the choke, but with the top and bottoms flush to the choke. Now came the challenge of matching the profiles of the bush to the choke. As a test on the first bush, we used a short length of DOM 1 3/4" x 0.250" wall, ground a small cutting edge and turned the "tool" in slowly by hand. This did a great job and we finished with a near perfect smooth surface at the face of the bush to the choke.

Full speed ahead then, so in went the second bush only we out-smarted ourselves thinking that if one cutting edge on the "tool" was good, three would be better....What a mistake! We forgot to clean a small burr. The cutting action on the second bush forced the tool off a few thou, and we finished up with several nasty grooves about .006" deep in the choke!!!.

So, we solved one problem with nice fitting shafts and bushes but now have another "selfmade-out-of-stupidity" problem to rectify. Onward and upward
Cheers
 

Attachments

  • 29870.jpg
    29870.jpg
    43 KB · Views: 297
This shows one area where the parent metal of the carb overlaps the OEM bush - after the 0,375" reamer went through.
 

Attachments

  • 29871.jpg
    29871.jpg
    35.3 KB · Views: 296
The choke bore profiling "tool" that went wrong. We should have left it well alone with a single cutting edge and all would have been fine. This tool also helped to support the carb while the new bushes were pressed in - the bushes were pressed to the correct depth and only required a few taps to get the top and bottoms flush.

We now have a bigger challenge. The solution is likely to machine a new choke and press that in..........
Cheers
 

Attachments

  • 29872.jpg
    29872.jpg
    41.8 KB · Views: 293
A .006" scratch is mostly cosmetic. I do not think that will affect the operation of the carb, so it's just a matter of how much of a perfectionist you are!

John
 
Been away visiting with the kids for a few days.

John, you are probably right, but it looks quite bad as there are more than one gouge, and they are close to the closed position of the butterfly. If someone else looked at the carb in this condition they certainly would wonder who and why was the it butchered like that. Also, my friend feels that it reflects poorly on his maching efforts, so I know he won't let it be no matter what I might offer (he may have done something while I was away?).

Will get back to it tomorrow
 
Alec-Just out of curiosity, I have followed a couple of sets of hs6 carbs from Volvos on ebay. One set sold for $28.50. The other went for a suprising $102.00. Quite a difference.
The factory bushings must have been in place when the carb bodies were cast. Interesting technique. I have often wondered why the factory used a brass bushing with a brass throttle shaft. I used to use delrin and have noticed that Burlen uses a steel bushing with a teflon coating.
Berry
 
Forgive me for not reading all of this, all HS series carbs, with the exception of the HS2s has cast-in brass bushing from the factory, not press in bushings. HIF series carbs are the only factory carb to have press in bushing from the factory. I deal with this alot, one of the biggest misconceptions about rebuilding HS carbs is how to renew a sloppy shaft, I opt for the .010" oversized shaft every single time I can., because it is almsot a fool proof repair with the special piloted reamer, where the press in bushing to go back to standard sahfts can leave alot of room to screw up, and I see this way too often. I recently was sent a set of HS6 from another shop, for a customer on a TR4, someone had done a butcher job of pressing in bushings, they were way too loose and someone had even tried to do some Polish knurling (center-punching) around the material where the bushing are installed to correct this. The end verdict was not that these carbs could not be fixed, almost anything can be fixed, it was about cost to the customer, the better appraoch was to get a set of HS6 bodies, which I got from Joe Curto, then machine them for .010" shaft, problem solved.

The proper way to rebush a set of HS carb is to install the bushing in a step manner, much like one would do on a block cylinder sleeve, meaning yoo ream, but stop short of the end, then press the bushing in and agaisnt the shelf, or step. Boring the same size all the way thru and then stopping short with the bushing can cause a air leaks around the throttle disc, pushing the bushing all the way into the carb body means it has to trimmed.

The biggest issue we have here, is ignorance about dealing with this, we have several, so-called professional SU carb rebuilders, who speak badly about oversized shaft, this is pure inexpereince, and should speak volumes about the rebuilder, and their lack of knowledge. I've seen way too many ruined carb bodies, by novice, and even shops trying to rebush for standard shafts, when the easier and better result lied in OS shafts.

Alec, as you are demostrating, anything can be fixed, but it shame you are having to follow up on someone else's bad decsions.
 
Berry, I am tracking some HS6's on Ebay now and will certainly get some over the winter - an interesting set is currently on UK Ebay.

Hap, so sorry that you got to the party late on this one - thanks for your valued input. Unfortunately I had to learn the hard way by possibly sacrificing a carb, starting with establishing whether the HS6 has OEM bushings. At this point there is no doubt in my mind that the "first" fix of loose shafts should be to use the 0.010" oversize shafts, as I believe we have experienced all the issues you point out. The new shafts measured 0.3094", whereas the old ones I removed were 0.3097", so frankly the old shafts were still within tolerance of a new shaft. So, given that the bores on the rear carb were 0.3135", we decided that for say 0.004" just to leave the rear carb as is for now.....(the front was much worse and this carb has seen some hardship, though I can't understand why - it is quite different to the rear)

Ques: A bit late now, but can you clarify that when reaming for oversize shafts, you still have to go all the way through - that is you can't leave the step as you suggest when rebushing for standard shafts. Based on what we have just experienced, I would add that when breaking through with the reamer into the choke bore, go very , very easy as the body material is quite brittle and it is easy to have pieces break off the edge and then the butterfly can hang up. I should note that we did think about the leaving that step, but assessed that it was too risky for accomplishing good bore alignment, as you have to perform separate set-up on the body to come at it from each side.

The only consolation is that with the kind and able assistance of a friend, other than the inconvenience and not being able to drive, it is not costing me anything.

We are half done with fitting of the new choke - hold thumbs!!
thanks and cheers
 
Maybe it is just my mindset, but I have always considered o/s throttle shafts as the "last bullet in the gun." Granted, that most cars and owners will be gone before the carbs will need to be rebuilt again. I have never had a mis-alignment problem when re-bushing by using a piloted cutter in a lathe. I have made a number of pilots in .001" increments and use the largest that will fit in the bore.
Berry
 
Berry, you do have a point. I don't know enough about machining, but it seems to boil down to whether or not you can leave a step close to the choke area and press the bushes on both sidesjust up to the step. If your pilot reamer enables one to do that I would agree.

In my absence, Al bored out the carb choke and made a new choke about 0.090" wall out of aluminum tubing. This was pressed in the end faced off. He used metric size cutter to bore through the new choke material, and a regular drill to restore the vacuum hole. All seemed OK but obviously not perfect - probably 0.030" off centred. This meant we had to make a new brass spacer washer between the lever and the body at o.020" (versus the original at 0.030"), in order to get the butterfly to centre OK. You can also see some daylight at 2 and 7 o'clock when the butterfly is closed but it does not seem any worse than the other carb.

So job done, but the proof is yet to come when I try to blance and tune. There were also some other niggly bits which had to be looked at - a sign of how this carb has had a hard life
Thanks and cheers
 

Attachments

  • 29922.jpg
    29922.jpg
    46.6 KB · Views: 156
here is a picture of the finished job
 

Attachments

  • 29923.jpg
    29923.jpg
    33.1 KB · Views: 150
Not sure if this will show it but the new choke is around 0.030" off, but we think it is ok since it is on the axis of the shaft.
 

Attachments

  • 29924.jpg
    29924.jpg
    37.5 KB · Views: 160
One of the "niggle" items was that when I took the carbs apart this one had cobbled up spark plug tip for the choke lever spacer. Al made a new one from ali bar stock
 

Attachments

  • 29925.jpg
    29925.jpg
    39.9 KB · Views: 156
The other niggle item was that the choke cable was bolted firmly to the carb choke lever, so when the cable bent when the lever went through it's arc when pulled. This made the pulling the choke harder than it really should be - new one made where the longitudinal bolt clamps onto the cable.

So that is it for now. Many grateful thanks for all the welcome contributions. I'll come back, in a few weeks, after it is up and running - hopefully properly.
Cheers
 

Attachments

  • 29926.jpg
    29926.jpg
    36.9 KB · Views: 146
Congratulations Alec-That is a very elegant method of salvaging the carb body. In answer to your question about the use of the oversize reamer, it does go completely through the carb body. The enlarged hole will not cause an air leak because a larger throttle shaft will be used. The reamer is shown in the Moss catalog at the end of the carb section. It is only a paltry $190. It looks like it could be used in a drill motor or drill press because the pilot extends to the "far side" of carb bore, eliminating the risk of mis-alignment.
Berry
 
Thanks Berry. All I have to do is try and pursuade Al to spring $190 for that reamer so he can do the next set. Not sure how he will react to that.. well yest I am!!
Cheers.
P.S. Almost ready to move on with a new thread topic of interest - alternators..but for another day
 
titanic said:
Congratulations Alec-That is a very elegant method of salvaging the carb body. In answer to your question about the use of the oversize reamer, it does go completely through the carb body. The enlarged hole will not cause an air leak because a larger throttle shaft will be used. The reamer is shown in the Moss catalog at the end of the carb section. It is only a paltry $190. It looks like it could be used in a drill motor or drill press because the pilot extends to the "far side" of carb bore, eliminating the risk of mis-alignment.
Berry

Thats exactly how the piloted reamers work. This is not a item that many DIYers wll want to buy because, most of the time they are not doing that many carbs, but if you can justify buying it, go to the actual source, Joe Curto, you will find the price a bit more attractive. I use my piloted reamers on my milling machine, but thats just because I have a milling machine, not because it would be needed for this, you could use the piloted reamer on a drill press, or even hand drill. As far as the "last bullet", the ID required for the press in bushing is the largest ID you'll work with, so bascily a press in bushing is the last bullet, so to speak.
 
Back
Top