• Hi Guest!
    You can help ensure that British Car Forum (BCF) continues to provide a great place to engage in the British car hobby! If you find BCF a beneficial community, please consider supporting our efforts with a subscription.

    There are some perks with a member upgrade!
    **Upgrade Now**
    (PS: Subscribers don't see this gawd-aweful banner
Tips
Tips

Steering Box Replacement

Steve - the pic is very helpful. The steering wheel was not removed for this job and what complicates assembly is its orientation relative to the worm and peg and thinking that it must be "centered". Will it self center? Thanks. GONZO

Yes the peg will self center in the worm. The thing that makes this mostly foolproof is that the steering arm fits in only one spot on the splines. So if you insert the peg at the far end of the worm, the steering arm will be angled accordingly. If the steering wheel hasn't been moved on the splines, it should align correctly.

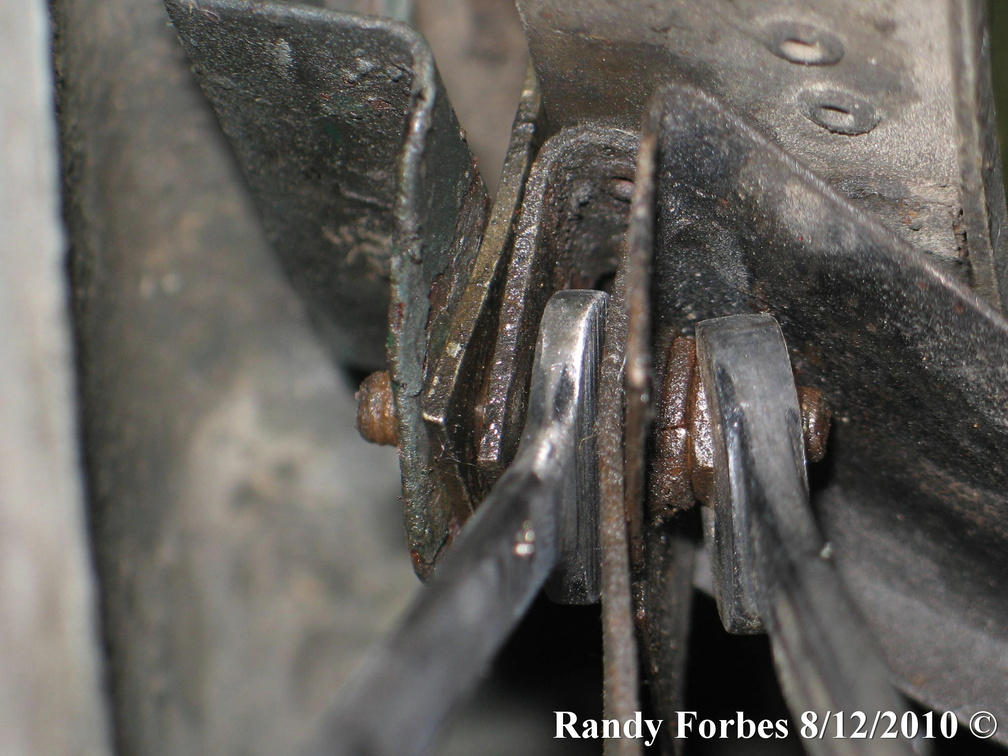
When I messed up my worm gear, the steering felt a little off-center and had rough spots. This is because the rear bearing had slipped out of its race and was binding at an angle. With your box lid off, you should be able to see the rear bearing oscillate if it's not properly seated.

The other thing that happened to me was when I tried running the DW worm with a new DW peg the steering would bind and be sloppy at the same time. Wierdest thing. Turned out the DW peg was .005" greater in diameter than the stock peg and didn't seat all the way in the needle bearings, causing the peg arm to scrape on the box cover. Replaced it with the stock peg and all was well.

PS: in the pic above, the thin line is the sheet-metal carrier for the balls in the bearing. If this is oscillating or does not appear as it does in the photo above, the bearing may be unseated on the rear race.
 
Last edited:
Yes. It is possible to push a flex tube to the bottom of the box. Or step the tube down with smaller diameter tubing to fit. Tubing could also be cut at an angle to suck out any remaining oil.

Thanks! Can that be done through the filler hole or must the entire cover come off?
 
True... I would like to replace most of the oil in there with thicker steering box oil in an attempt to stop or reduce the leaking. I suspect that I will have to repeat the process more often if I leave the remaining fluid in.
 
Thanks! Can that be done through the filler hole or must the entire cover come off?

Most people just loosen the front plate slightly as described above.

Because of the design, you're going to have a hard time pulling all the 90wt out through a hose as it won't reach too well from the filler hole in the upper right to the lower left underneath the peg arm.

If you can get the cover off with the box still in the car, you can rotate the peg arm to the right and better access the bottom front of the box.

SteeringClose.jpg
 
Unfortunately, the rear bearing is misaligned and not seating properly in the race(s). I failed to lock the adjustable steering wheel collar which may have allowed the steering rod / worm gear to slip down pulling the rear bearing with it. The challenge is to "lift" the steering rod/worm gear, offer it back up to the rear bearing and making sure all this gets aligned and seated on the race(s). First attempt will be in-situ with stator stator tube and front plate removed to gain access to the steering rod / worm gear snout, then grab it by the snout in an attempt manipulate it back into place. If this doesn't work, then the grill comes out to pull the entire steering box from the car.

On a positive note, 1Kg of Dynolite steering box lube from Moss was delivered yesterday and it smells a whole lot better than gear oil. Some John Deere corn head grease was also ordered for comparison and possible use in the idler box. Both idler and steering box were weeping / leaking gear oil, but otherwise in good condition, so it's time to service the seals. Has anyone tried stacking or "doubling-up" on the seals to prevent leakage? Thanks, GONZO.
 
Gonzo -
Many people have stacked the seals. More common than not, I'd say.

Front of worm with stator tube:
screenshot.1686.jpg


Suggesting the following procedure in lieu of removing box to bench. No risk for rear bearing alignment problem as it's already out of alignment. This is based on my recent experience of removing my box multiple times while troubleshooting first my ruined rear bearing, then the installation of my DW worm gear. :rolleye:

Am assuming you have your box cover off in the car and your rear bearing isn't bunged up at all. If you've driven the car for a while with the unseated rear bearing, you may need to remove the box to inspect the bearing and races.

Am also assuming that with the cover off, you'll be able to move the rocker shaft up a little as you lift the worm into position.
You may need to remove the grille in order to maneuver the worm shaft per below.

IMO you might get away with the following in lieu of removing the box to the bench:

--get as much oil/grease out as possible so the front bearing, worm and rear bearing are exposed.
-- You'll probably need to turn the wheel to right lock for the movement described below.
--If you have the adjustable wheel, shouldn't be necessary to loosen the wheel; if fixed, you may need to unbolt the wheel from the shaft after marking for reassembly.
--leave the olive nut tight; undo the 4 front-plate bolts and pull the front plate (with stator) out far enough to allow you to slide the worm forward far enough to reset the rear bearing on the race. Don't worry about the rear cup, as it's a light press fit in the housing and won't have moved.
--use the front plate as a tool to lift up and center the worm and the rear bearing. You may need a bottle jack under the castellated nut as a persuader to lift up the rocker shaft
--make sure the front bearing is centered properly on the worm race and that the cup is centered on that
--carefully tighten front bolts while keeping the rear bearing aligned
--observe correct rear bearing alignment per my picture pg 2 above.
 
Last edited:
Steve- Much thanks for detailed instruction on steering rod bearing alignment. Car was on jackstands when the steering rod rear bearing slipped and will remain this way until everything is fixed. The top plate is off and I plan to suspend the rocker with some wire. I also might make a wire hook to cradle the worm gear from above for better alignment control when following your procedure. BCS strongly recommends doubling up on the steering box seal: stacking two of them in the recess. They also suggest a high flow grease as replacement lubricant - they have their own alternative to Dynolite. GONZO.
 
Hi Gonzo - so you've evidently removed the steering arm off the splines with the box in the car. Kudos for that. Then you'll have no problem lifting the rocker shaft.

You can jiggle the rocker shaft from the bottom and see if there's any wear on the bushing. If no wear you'll probably be OK just replacing the 90wt with the Dynolite and skipping the seal replacement. Might be tough to get good results in situ extracting the old seal and seating new ones.

Others might want to look at Stens 00 grease as an alternative. My box used about half a quart - plenty left over for the idler:

screenshot.1689.jpg
 
I replaced the seal on mine this last winter. The ones Moss sells are half the height of the original. Buy two and insert both.
 
Two (2) stacked oil seals. One of the primary benefits is that we're now working on an unworn/less-worn section of the shaft.

IMG_2820-la.jpg


I made a "wedge" that I can drive in between the steering arm and the steering box, and the arm comes off with relatively little effort. Picture of it must be in another folder, and we're heading out to a friend's gallery exhibit opening, so I'll have to look for it later...

Meanwhile:

Another deposit for the one-use tool drawer; reduced height 7/16" open-end wrench to aid removing MK-II/III grills

IMG_2383-la.jpg


IMG_2387-la.jpg
 
The reduced 7/16 in. open end is a great solution for these somewhat inaccessible nuts. A flapper disk might do the job in grinding it down. I'm stoked in getting seals stacked. Thanks for sharing pics, GONZO.
 
Randy - grinding a Proto down and not a cheap HF!! Pretty studly!
Haha! Grind? I used the roughing end-mill in the background (call me weird, but I like seeing those tooling lines on finished pieces__a regular mill at slow feed/high speed leaves a very fine finish).

BTW, here's the wedge I made to pop off the steering arm

str_006.jpg
 
66 BJ8 steering box leaking down the steering lever splined shaft. Noticed the dust oil seal cover is missing too. No leaks at the olive nor end cover. Would sucking out what ever oil (90w?) is in the box and replacing it with the thicker steering box oil (Steering box lube by Dynolite) stop the leaking? Can the foam dust oil seal cover be cut in half in order to install with out having to take the steering lever off? Then using contact cement, glue the cut back together? I'm assuming the foam seal is only for dust protection, not sealing the oil. Is it really necessary? Notice there is a dent in the outer steering column where it attaches to the box. No leak, there. Should there be concern?
View attachment 58596View attachment 58597View attachment 58598View attachment 58600

Spent the day replacing old oil with Steering box lube by Dynolite. As I was turning the steering wheel to let the Dynolite settle in, I noticed the steering shaft was not solid where it goes into the box, was moving. I compared it to mine. Mine is solid at that connection. As pointed out, there is a dent in the shaft at the box. Is it ok that the shaft has some play at the box? How is the shaft attached to the box?
 
Ausmhly - the shaft is not dented, it's the lightweight outer tube that's dented. As long as it's not leaking or the tube is not bent, no problem.

Refer to drawing below - the steering shaft is retained in the box by the bearings with the end plate holding the works in the box.

Am assuming you're talking about in & out play. If you're describing rotational play you simply need to adjust the adjuster screw on top.
(lots of discussion on the forum). I take a washer as a screw driver and tighten the screw till it just touches, checking the wheel for lack of binding. Then tighten the lock nut.

If there's in & out play with the wheel collar tightened...

The shaft end play in the box is determined by the shims & gasket between the front cover and box casting.

Per the Bentley manual, section K.2, p.220, item 2e - "The steering wheel should turn freely when held lightly at the rim with the thumb and forefinger, but should have no end play".

If you do not have the Bentley manual, you should definitely get it as your go-to source for these kinds of questions. They are available from Moss, Amazon and direct from Bentley publishers. I bought mine used on ABEbooks.com

With the adjustable wheel, tightening the collar an any position will not hold the stator tube, as it has a slot the adjustable portion slides in. If you undo the front plate, it is possible to slide the stator tube out until it hits the car bodywork. BE CAREFUL.

screenshot.1693.jpg
 
Being captive between the bearings is what holds the shaft into the box (or do you mean the sheetmetal tube that the shaft is covered by? I've never taken one apart, but I'm sure it's either "sweated" or welded into the cast-iron box).

attachment.php


strng-box.jpg
 

Attachments

  • strng-box.jpg
    strng-box.jpg
    12.6 KB · Views: 64
Last edited by a moderator:
... How is the shaft attached to the box?

Not sure of the question, but the steering shaft--with worm gear peined on--isn't attached to the box at all. The worm is sandwiched between two sets of caged bearings and races and located, with little-to-no end play by shims--and a gasket--as Steve mentioned. I'm not sure whose box we're talking about at this point, but if it's able to move up and down noticeably the shim set needs adjusting.

The tube in which the steering shaft resides is soldered into the box; I can't imagine it causing a problem unless the dent is so deep that the shaft rubs against it.
 
Sorry, my description was not accurate. I'm referring to the outer tube..."the sheetmetal tube that the shaft is covered by"
Here is a photo of it. Notice the dent in the
outer tube where it goes into the box. This outer tube has free play when moving the steering wheel. One of my previous questions was phrased wrong...How is the shaft attached to the box. Question is, how is the outer tube attached to the box. Solder is the answer. Well it seems the solder has come free and the outer tube moves. Is that ok?
fullsizeoutput_1577.jpg
 
Honestly, I don't see a dent, but it looks like that tube has been molested somehow. The boxes I've seen--exactly 3--have had the tube 'sweated' into the box, as Randy suggested. I don't see any evidence of solder around the joint, but that may not mean anything. Still not sure what 'free play' means; does the tube move in and out as you turn the shaft, or does it move side-to-side? I think the tube should remain stationary, it's secured at the box end by soldering, and at the wheel end by a bracket under the fascia (dash), and the box itself had better be well bolted-in. If it's moving around at all when the steering wheel is turned something is amiss and bears further investigation.

EDIT: Bottom line, the only movement you should see in and around the steering box is the wheel turning and the pittman arm responding according. Everything else should be locked down.
 
Back
Top