• The Roadster Factory Recovery Fund - Friends, as you may have heard, The Roadster Factory, a respected British Car Parts business in PA, suffered a total loss in a fire on Christmas Day. Read about it, discuss or ask questions >> HERE. The Triumph Register of America is sponsoring a fund raiser to help TRF get back on their feet. If you can help, vist >> their GoFundMe page.
  • Hey there Guest!
    If you enjoy BCF and find our forum a useful resource, if you appreciate not having ads pop up all over the place and you want to ensure we can stay online - Please consider supporting with an "optional" low-cost annual subscription.
    **Upgrade Now**
    (PS: Subscribers don't see this UGLY banner)
Tips
Tips

Started adapting the datsun gearbox today

Boink

Yoda
Bronze
Country flag
Offline
Good job.
Yep... predictable fettling. Hopefully the U-joint won't hit the tunnel. Gerard makes a spacer that goes on the differential to push everything a little bit forward.
In my case, there was a very slight "ticking" as it was just touching. Our solution (in the long thread of mine mentioned above, and in addition to Gerard's spacer disk) was 1/8" plates on the motor-mounts, which tipped the drive-train JUST enough (and didn't meaningfully change the geometry).
 
OP
Bayless

Bayless

Yoda
Silver
Country flag
Online
Thanks Mark, two good ideas. Now I understand about the driveshaft spacer. And tilting things a bit at the motor mounts sounds like it could also help make the difference if I do have a problem at the back. I hope to find out Monday.
 

Rut

Obi Wan
Country flag
Offline
It’s a pita, but a good idea to test fit the engine/transmission without the rear mount and measure the space. It surprised me at how much clearance you could get on the starter/frame rail by adjusting the rear mount. Another thing to check is the fan to radiator clearance.
Rut
 

Pythias

Jedi Knight
Country flag
Offline
Oh man, ... put the speedo cable on before you put the "power unit" in the car. It's not that it can't be done, but save yourself an hour of frustration and do it the easy way. .. Here's another tip. put a tie wrap (a long one) around the end of the drive shaft that goes up the tunnel. It will make it so that you have a handle on it when it's in the tunnel and you can then easily get it to mate to the tranny. then take a razor knife and slice it off. Bob's Your Uncle..
 
OP
Bayless

Bayless

Yoda
Silver
Country flag
Online
My local Spridget pro also reminded me to put the speedo cable on before. Although the instructions say it can be done after it does look to be challenging at best.
 

Pythias

Jedi Knight
Country flag
Offline
As far as adjusting the height of the bracket goes, I remember Paul being in a tizzy because his supplier of Kindorf strut no longer carried it. Unistrut was nearly microscopically larger (less than 1/16") but it meant that the U-joint would no longer be straight, i.e. the output from the tranny to the diffy would not be absolutely straight. He was having to grind/mill away that something just less than 1/32". .....

I personally would go with Gerard's spacer if I were doing it now. A beautiful simple solution. (but I do like the broomstick method.. It's a lot more fun)

As far as the speedo cable goes.... .I have changed the cable. It would be the same ease that one would have installing the cable after the "power unit" is in the car. .. Don't try this at home. It's hard enough to access the retaining collar and even harder to get the tang to line up with the hole in the speedo driver. It's easier if you can turn the speedo end of the cable so that the drive end rotates to align everything BUT you need both hands in the hole, one to push in the cable and the other to turn that collar. ...... PITA

So much so that I'm in the process of getting a GPS speedo installed just so I don't have to do that again. Plus I'm tired of it being completely inaccurate. Change tire size or brand and the speedo is off. Change pumpkin and the speedo is off more.(I went to the 3.9. One of the best things you can do with the 5 speed) The odometer is off by a different amount than the speedo. No more for me.

My 2¢
 

Jim_Gruber

Yoda
Country flag
Offline
Bill, I added a Speedhut GPS speedo for that very reason and avoid the adapter box that is notorious,y unreliable. I customized graphics on the speedo face adding Austin Healey Script logo. Added matching Tach as well to do away w generator Tach drive.
 

Pythias

Jedi Knight
Country flag
Offline
I've been looking at Speedhut gauges for years. I didn't know how to get the graphics, after seeing what can be done (yours?) I learned how. In the end I decided to get mine from BUGEYEGUY.com as I liked the more retro look and, since I am changing from Positive Ground to Negative (to get the gauges to work) I also wanted his Genernator. I know it's available from other sources but its easier to put in one order than go shopping across the net. He also has cast iron water pumps instead of the aluminum (crap) available everywhere else. Also went with his (matching) gas gauge.

It's so nice that these cars are more valuable as drivers than as restored (stock) and that these changes add value (not that I'm selling) rather than dertract from it.
 
OP
Bayless

Bayless

Yoda
Silver
Country flag
Online
IT'S IN!

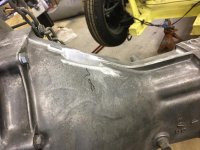
Third trial fit finally went. It did require just a little muscle to get the front pulley past the cross member then it had to slide down the back side, taking some paint off, but suddenly it all fit wit comparative ease. I did have to grind the housing pretty thin where it hits the heater box but that's all. Now getting the lower half of the rear mount was another thing. It was supposedly designed to slide in from the front as you might expect. The front of the upper piece pre-attached to the gearbox was too wide for the vertical arms for the side mounting bolts to slide past. The only answer seemed to be to pull it all part way out so they could be slid in from the back then put it all back over the cross member. If it ever has to come back out (of course it will) I will trim the upper plate for clearance. Sorry, I can't post photos right now because my computer locks up whenever I try to save one from email today as I have done for a long time. Maybe soon.
 

Jim_Gruber

Yoda
Country flag
Offline
But how about DS clearance? Bolting up DS and rotating rear tire will let you know if you have an issue.
 
OP
Bayless

Bayless

Yoda
Silver
Country flag
Online
Not quite that far yet Jim. Still have to hook up the driveshaft and speedo cable then bolt down the rear mount. Front mounts are installed but bolts still loose. I think I mentioned earlier that I am the "youngster" in our shop and almost 80 and we just wore ourselves down before finished yesterday.
 

Jim_Gruber

Yoda
Country flag
Offline
Hey but at least you have help to find each others glasses, or help to pull out the guy stuck under the car trying to install the rear tranny bolt or the driveshaft nuts and bolts. Bet you find out the side tranny bolts in the rear do not align. You may be able to play with the adjustment screws on that mount to raise up the rear of the tranny, which will move engine slightly forward, plus get you additionakl ground clearance.
 
OP
Bayless

Bayless

Yoda
Silver
Country flag
Online
Hey but at least you have help to find each others glasses, or help to pull out the guy stuck under the car trying to install the rear tranny bolt or the driveshaft nuts and bolts. Bet you find out the side tranny bolts in the rear do not align. You may be able to play with the adjustment screws on that mount to raise up the rear of the tranny, which will move engine slightly forward, plus get you additionakl ground clearance.

I know you said that jokingly but I hate to admit it aint all that far from the truth. All the bolts did align fine and there is some fore-aft adjustment to the mount.. Getting the speedo cable on was a bit fiddly and the U-joint is very close to the tunnel top although it doesn't quite touch. Probably won't know for certain until it moves under its own power.
 

Jim_Gruber

Yoda
Country flag
Offline
You can get close at least by connecting drive shaft to rear axle and turning one of the wheels. Should be easy to turn with no friction. If Yoke touches you will find that Diff will let you know if there is any resistance as the wheel you are spinning will switch to the other wheel as the drive wheel.

You can also carefully feel where the yoke is with the tranny turret removed. don't have your fingers in there if someone is spinning the back wheel or you will end up with a mangled finger. I don't know the correct distance measurement for how much the DS sticks into the tranny but there needs to be some distance as the DS moves in and out as the rear suspension moves up and down as you go down the road. Make sure you grease the splines on the Drive Shaft where it goes into the tranny. If you have trouble getting the yoke to fit in, wrapping that U Joint with Blue Masking tape to hold it steady will allow you to get things lined up. The Masking tape will come off as you drive and will automatically exit from, the rear of the tranny tunnel.
 
OP
Bayless

Bayless

Yoda
Silver
Country flag
Online
Thanks Jim. The DS is hooked up now but I haven't checked it yet. We try to keep as much of the mechanical work as possible to one of us three as he seems to have a need to keep busy. I did get the DS mated to the gearbox as well as the speedo cable through the gear stick hole yesterday before we bolted the mount down.
 

Jim_Gruber

Yoda
Country flag
Offline
I will be back to Bugsy work after a fashion and take on the driveshaft yoke and tranny tunnel issue but now in the middle of bathroom remodeling project. Mine almost done vanity and replumbing gets done Saturday along with toilet install. I’d rather work on Bugsy . Kate’s bathroom is next weekend. After that all major house projects are finished. Fix driveshaft issues and then back to wiring harness install.
 
OP
Bayless

Bayless

Yoda
Silver
Country flag
Online
Yes, I've been there too. Actually house remodeling has been a never ending process. Right now it is on hold while I play with cars but will be back to it sooner rather than later.
 
OP
Bayless

Bayless

Yoda
Silver
Country flag
Online
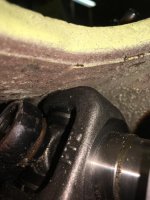
One corner of the U-joint did touch. I think I corrected it by prying the tunnel upward a little with a crowbar today. Investigating with a mirror through the gearstick hole it looks like I have about 3/16 inch clearance at the closest point. I think I can get a little more by squeezing the tunnel sides with a big C-clamp while coaxing with the crowbar. Will try to get a full 1/4 inch with that tomorrow. Then time to touch up the scratched paint and put it on its wheels again.
 

Jim_Gruber

Yoda
Country flag
Offline
A slide hammer can be quite useful for this.
 
OP
Bayless

Bayless

Yoda
Silver
Country flag
Online
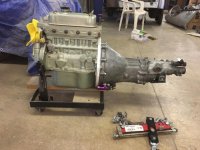
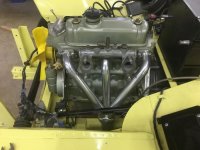
Finally got the computer straightened out (email client specifically but updated Linux anyway) so I can post some pictures now. Here is the complete unit ready to install, the necessary grinding on the bellhousing, everything installed and the U-joint clearance.
NearsideDone.jpgBellHousingGrind.jpgHeader.jpgU-Joint2.jpg
 
Similar threads
Thread starter Title Forum Replies Date
Eeffoc TR4/4A Out of the blue - started to loose power Triumph 17
J Finally getting (re) started on the Bugeye Spridgets 27
Tr3aguy TR2/3/3A Started a Car revival channel for the TR3 Triumph 12
T TR6 Car has always started without fail.....until now Triumph 10
J TR2/3/3A Finally getting started Triumph 20
Jim_Gruber 210 Tranny Case Mods started this evening Spridgets 15
G TR4/4A YAY! It started!!! Triumph 16
S TR2/3/3A Frustration has started but car wont. Triumph 4
HighAltitudeTR3 TR2/3/3A Just started burning some oil... Triumph 8
M_Pied_Lourd TR5/TR250 Started my TR250 Restoration Project..... Triumph 16
J TR2/3/3A Finally started 17 year old rebuilt motor! Triumph 3
J TR2/3/3A Joe the TR3 Guy getting started with suspension Triumph 4
David Townsend Sprite Illustration Started Spridgets 31
David Townsend Sprite Illustration Started Austin Healey 7
David Townsend 100M Illustration Started Austin Healey 32
M_Pied_Lourd TR2/3/3A TS44836LO Resto Started Triumph 6
drooartz MGB-GT Conversion has started - splines to studs MG 51
jaegzie Long time since I've been here but progress has started. Bigeye rebuild Spridgets 9
Keith_M Bugeye Restoration Finally Started Spridgets 37
M My '65 suddenly started running bad today Spridgets 37
simon1966 Started to dig out the 100 Austin Healey 3
oxford New owner BN4. Work started . More questions. Austin Healey 13
T moved post from ZS 1500/started new Spridgets 4
I Help - can't get my bugeye started Spridgets 17
S TR2/3/3A TR-3 hard to start, but runs well once started Triumph 5
J Finally got my '56 started Triumph 3
R TR2/3/3A TR3A Finally started Triumph 6
Scott_Hower Hap started my head... Yay! Spridgets 13
rikiwho123 i started my 1300 Triumph 0
R MGA ITS ALIVE! MGA Started After Sitting 4 Years MG 1
I TR6 Getting a TR6 started again-where do I start? Triumph 9
M Project started-switching dash Spridgets 17
R MGB Getting started with the MGB - first questions MG 13
Nelson It started! Spridgets 5
J Rover engine that started as Buick? Rover / Land Rover 9
scoutll Car suddenly started running poorly Spridgets 17
doughairfield Trying to get my motor started Triumph 8
JPSmit It has started Spridgets 4
GregW Started working on the Healey again Austin Healey 12
pjsmetana Started instantly... without my choke! How? Why? Triumph 5
doughairfield TR4/4A HELP not able to get my TR4 started Triumph 104
6 got it started Triumph 4
M It started! Triumph 5
LastDeadLast Offically started my hardtop project - Question Triumph 5
Brosky Dash panel replacement page started Triumph 0
R '67 Midget engine started for first time in... Spridgets 9
JodyFKerr Finally getting started Austin Healey 1
2wrench MY CAR HAS STARTED....PICS/VIDS NOW WHAT? Triumph 11
B started a rebuild of a 62 sprite. HELP required! Spridgets 20
B started a rebuild of a 62 sprite. HELP required Austin Healey 1

Similar threads

Top