• Hi Guest!
    You can help ensure that British Car Forum (BCF) continues to provide a great place to engage in the British car hobby! If you find BCF a beneficial community, please consider supporting our efforts with a subscription.

    There are some perks with a member upgrade!
    **Upgrade Now**
    (PS: Subscribers don't see this gawd-aweful banner
Tips
Tips

Seam Sealer/Caulking - Any Tips on When, Where, and What to Apply?

How much of the original piece do you have? Just yesterday I cut out mine intact so I have original reference points. You are right, the shut pillar face sweeps back a bit, but I don't have a suitable angle finder to measure it. Unless someone smarter can tell me how to do it. Of all the work on my car, this assembly spooks me the most. After I install the front quarter repair piece, I plan to loosely install the shut pillar face, the rear shroud, the rear fender, and the door, and together I believe this will result in the correct placement of the shut pillar. But as for the angle, I believe the quarter panel flange and the shut pillar (where they meet) sets the angle.

if someone lets me know how to measure the angle on my original piece, I will do so.
 
Cleah, thanks for the reply. Would it work to hold one edge of a square tight against the inner fender line, with the other edge of the square projecting out past the front face of the shut pillar? It then should be possible to use a tape measure to measure the difference to that edge of the square at the inner and outer points of the shut pillar. It would be best to do this both at the top and the bottom of the shut pillar. (Having four hands or a helper to hold things in alignment would help with taking the measurements.) My old shut pillar assemblies are pretty far gone for purposes of getting accurate measurements.
 
Just checked out this angle and your right, it does angle back. I never paid attention to that. I did a quick check with my angle gauge and come up with 77.5 degrees. This is an original B pillar so the angle should be correct.
Jim
 
So I am confused. Did you ever get an answer to your original question about the order of operations and the timing needed?

Epoxy primer > Seam Sealer > topcoat ?

How does one manage to get the seam sealer done before the Epoxy re-coat window closes? I would imagine it is going to take hours/days to finish the seam sealing process if one is being careful and thorough. Nobody has a desire to scuff sand every nook and cranny in this car so a topcoat will adhere to epoxy....

Yes, primer, then seam sealer, then topcoat. Since it was all done in one day, the primer was not sanded.
 
Use PPG DP epoxy primers, they have a chemical bond life of up to seven days. Plenty of time to caulk once dried, then apply sanding primers or top coats ect. After the seven day period ( higher temps can shorten bond times) you would have to scuff and re apply the DP for the chemical bond ( as opposed to a sanded or scuffed mechanical bond). The chemical bond is much stronger and you will never have peeling of layers due to poor adhesion.

Heres what I do at the shop for the whole process...

Strip down to bare metal , I use aircraft brand stripper (low odor) for the alum parts, media blast ( like plastic for good metal sand for rust ,black beauty is too aggressive)or chemically strip all metal.
Sand with 320 or 400 to remove any errant specs of paint (this is for good panels)
CLEAN metal with PPG DX 579 metal cleaner (follow instructions and blow off/dry water immediately ) you should clean your sheetmetal as there really is a lot of gunk on the surface even if it is sanded and shiny,trust me !
Clean with DX 330 wax and grease remover, tack areas to be primed and prime with PPG DP epoxy ( I used DP 40 or DP 90 red or black as you can now see every little defect in the sheetmetal.
Pencil your areas to be fixed
Hammer/dolly/slap spoon out what you can ,this is for the little stuff, assuming all heavy metal bumping/welding is already done.
Plastic work ( if your old school.... lead work before primer : ) I use Evercoat products over the epoxy primer.( this is done to encapsulate the plastic body filler in the process) You ever strip paint to see lots of rusty metal under body putty ???
Use the Evercoat metal glaze as a finishing putty as needed.
I use a flat black spray can and mist the plastic filler to detect any areas that need further details ( sanding down the bodywork highlites the high /low spots) A MUST DO TRICK FOR PERFECTION
Next I use PPG high build primers for sanding primer. One coat for the next step, another chance for blending and sealing the plastic filler, use same process of misting areas, sand in a cross wise method to avoid too much removal in one area ( use the long flat sanding boards for large areas , smaller for small ect. AFS boards are the best.... PERIOD !!!
If satisfied with body work , one coat of thinned out sanding primer ( these are all catalized, NEVER lacquer based ), mist again and 400 DRY sand i dont like sludge every where.
If satisfied with panel now prep for sealer, DX 330 again for final wipedown ( there are also others that remove water based contaminates), I always use nitryl gloves and keep everything hospital clean anyway.
Tack down and seal with PPG DP epoxy thinned as a sealer, ready for your top coat , last chance I go around and do a final dust check with 400 wet/dry paper but sand DRY. Tack again and top coat.

Top coat is a whole other process too... I use flattening agent where appropriate for the original un polished enamel look, no super shiny engine bays guys !

Aluminum panels are same as steel for process but use the appropriate PPG alum. cleaners , you epoxy prime and then do your plastic work.

Following these methods will pretty much give you a long lasting body restoration, Ive NEVER had any rust come back or paint related problems due to prep work.

Carroll Phillips
Top Down Restorations Inc.
 
Thank you for the detailed reply Carroll! That is awesome!

Do you have a preference for seam sealer? Is the basic 3M sealer acceptable or do you recommend the expensive urethane?
 
Carroll I have one more question. I am hoping to spray epoxy primer on my chassis sometime soon if the weather will cooperate. I will paint the chassis directly afterwards so I should have no adhesion problems there.

The panels however will be filled and sanded sometime next summer at the earliest. They will need very minor filler but I would love to get them sealed up sometime soon. Should they sit in epoxy primer during that time or should I spray other sandable primer over the top before I set them aside? I've been told that sanding epoxy is a nightmare and that you can still end up with adhesion problems. We are a very dry climate and they will be stored inside with zero chance of moisture.

Thanks!
 
The chip for Colorado Red in the Pikovnic book is nowhere near that orange. My BJ8 was originally CR, but it's been repainted a couple times; a paint shop matched the current color with GM 'Peking Red,' which looks pretty close to CR but, possibly, slightly 'oranger.'
 
Leave them in epoxy primer, you will be going over that with your filler putty , after your filler putty is done (at least 220 grit) you can use a PPG high build sanding primer that has corrosion preventative additives ( NCP270 and 271 ) or use the basic K36 primer. It really doesnt matter that much anymore which primer is used as the Quantum fillers and Metal Glaze spread filler (which I use) are far superior than fillers of the past and the Metal Glaze products also offer corrosion control. After your done with your sanding primers and touch ups (use the sanding primers as a spot filler with your spray gun) I go a thinned out even coat of sanding primer and dry sand with 400 grit. Then clean it all with PPG DX 330 ( with nitryl gloves on) tack it down , and give a thinned out DP epoxy coat, do a final dust check ( check for any tiny bits of whatever, errant bugs ect.....it happens ) and ready for top coat. The whole point again is to put the least amount of sanding primer down , no buildups, if the metal is straight to begin with, 2 coats DP epoxy, 1 coat thinned sanding primer,400 sand,seal,paint. Yes you can use the sanding primers as a sealer but the DP epoxy( as a sealer) is really thin and the color can be changed to what ever was original underneath the top coat.

The DP epoxy will sand easily if it is cured well, it really need just scuffing with a maroon pad (coarse) for a mechanical bond to the next coat of DP or what ever.
 
The chip for Colorado Red in the Pikovnic book is nowhere near that orange. My BJ8 was originally CR, but it's been repainted a couple times; a paint shop matched the current color with GM 'Peking Red,' which looks pretty close to CR but, possibly, slightly 'oranger.'

I missed it when this thread came back to life. The body panels are still waiting for paint, so the topic remains important. What is the "Pikovnic book?" Any chance of seeing a photo of that color chip?

Normally, I would not spend this much time looking for color information before painting a car, but I want to get this close to right.

Many of the Healey racers, back in the day when these cars were new, came in the Colorado Red color. Someone on this forum posted pictures or videos of those cars racing in Europe. I was struck by how orange the paint color looked. But I'm still not comfortable with the Colorado Orange that the local paint supplier here came up with. Any other thoughts or help will be much appreciated.
 
Csarneson, I haven't been following this thread so if i repeat someone sage advise I am sorry. you will be able to sand the Epoxy primer without too much trouble. It is harder than most primers but not unsandable. i have routinely had epoxied panels sit around for weeks if not months before I carried on with them. but you will have to sand it well. 320 grit on an orbital should do the job, or by hand. Also the newer "methology" for apply body filler is to apply it "on top of epoxy primer" not on bare metal and then under primer. In my day i was taught to apply any filler on the bare metal then finish to feathered edges and primer. But today they recommend to put the epoxy primer on the bare metal first. If you are doing that then this application is sealing the metal as well as building the base for all other coatings.
 
Blueskies, I can try and clean a door jam or under dash area to show you the original Colorado red on my 65 BJ8, it will give you an idea, but lighting makes a big difference and the camera and how its set up ect.

I havent gotten that far into matching the color yet, but I would start with the original ICI code and call PPG and go from there, it might be a direct crossover, IT WILL LOOK DIFFERENT in modern paints to begin with, but overall color should be super close. I would stick to a single stage urethane , it looks closest to the original enamel . If you give me a little time I can call PPG and see what I can do as Im going to need it anyway ( Im a registered business with them and it helps to get info even though you can call them yourself) I personally feel that CR is not that orange as in the underside of the car on the rotisserie in this thread, could be lighting though.
Ill see what I can do for you.

Carroll Phillips
Top Down Restorations
 
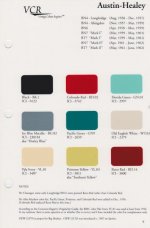
The 'Pikovnik' book is a compilation of color slides listing the available colors for Healeys by model, done by Donald Pikovnik. Here is the slide which includes BN4s:

IMG.jpg

Are Healeyphiles dedicated, or what?
 
Carroll, Thanks for your offer of help. I look forward to hearing back from you on this. I have spent hours and hours on trying get color mix information that I can have confidence in. My local paint supply store seems to think that they got it right with the paint used on the inner body and underside, but I'm not convinced.

You are right that the lighting makes a difference. Those pics are taken under fluorescent light; natural daylight does take away a bit of the orange color. Both the BN4 and the BJ7 that I am working are the same color, so it becomes even more important to try to get this right. I have also heard that the Colorado Red color changed a bit over the years that Healey used that color.
 
The 'Pikovnik' book is a compilation of color slides listing the available colors for Healeys by model, done by Donald Pikovnik. Here is the slide which includes BN4s:

Are Healeyphiles dedicated, or what?

Thanks, Bob, for the Healey dedication. That Colorado Red does look more red than I expected. And the Reno Red looks even darker.
 
Back
Top