• Hi Guest!
    You can help ensure that British Car Forum (BCF) continues to provide a great place to engage in the British car hobby! If you find BCF a beneficial community, please consider supporting our efforts with a subscription.

    There are some perks with a member upgrade!
    **Upgrade Now**
    (PS: Subscribers don't see this gawd-aweful banner
Tips
Tips

Rocker Assembly - work in progress

T

Tinster

Guest
Guest
Offline
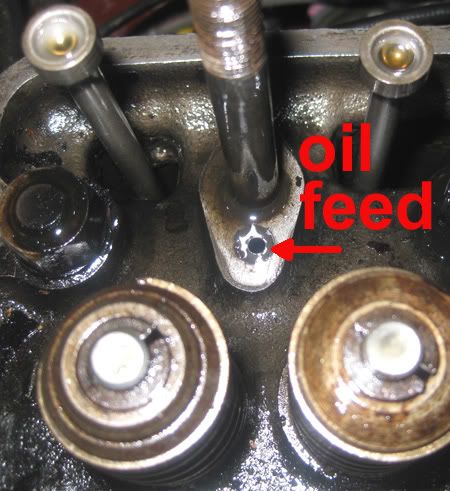
Well, I read Bentley Blue, looked at all the great reference photos, pondered the great advice and got out wrenches and camera this morning. I think it was Randal who cautioned me to back off the 6 bolts poca a poco - thanks for the tip. Paul, I think the oil feed hole looked very open.

Here are a few photos for the non-mechanic guys like me who might never have seen what is actually under that valve cover in your car. Pretty interesting really. Even better with the engine running. The look like tiny oil well pumps!

But I might have screwed up (I hope not too badly) I pulled out 2 push rods out of curiosity. Is this a majot screw up?

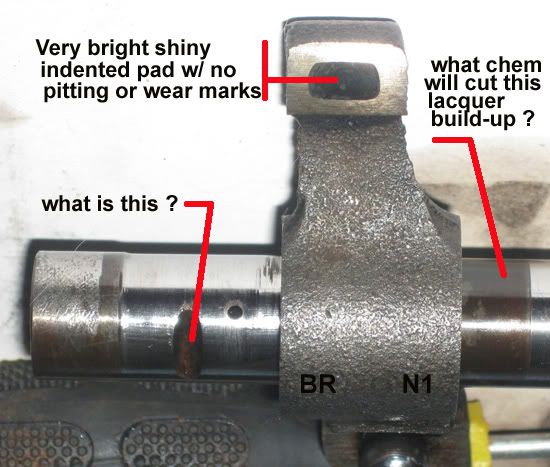
My project today was to remove the valve rocker arms assembly.
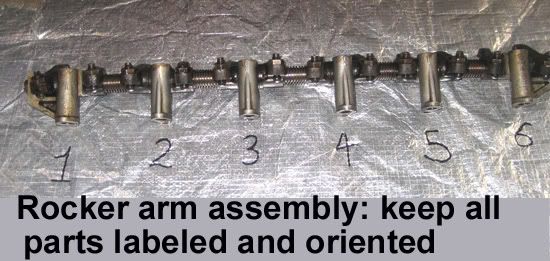
I am using a "parts board" to lable every part in proper orientation. If anyone spots anything dreadful please pipe up.
This is a bare bones project from a $$$ available viewpoint.

engineview1.jpg


engineview2.jpg


pushRods.jpg


rockersRemoved.jpg


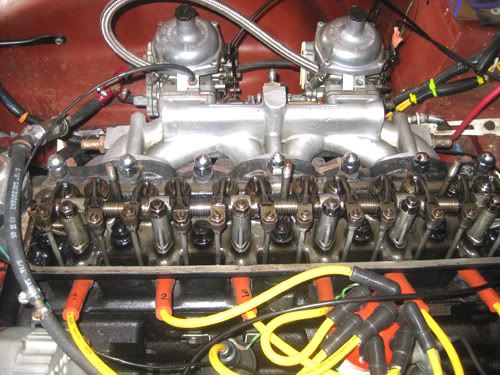
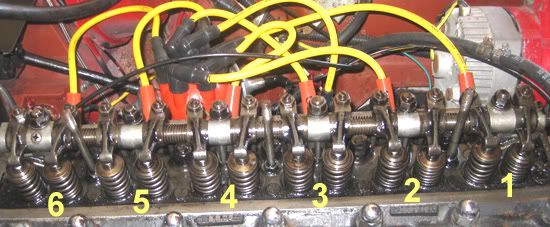
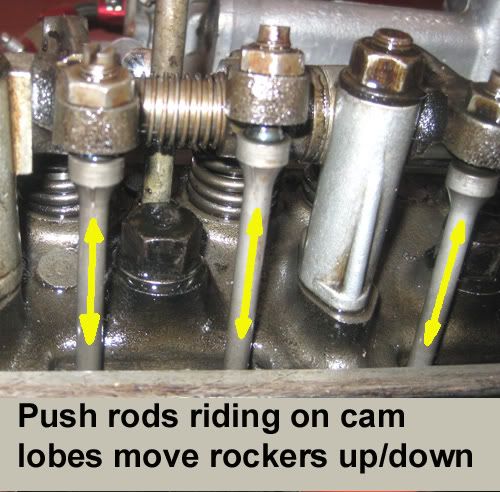
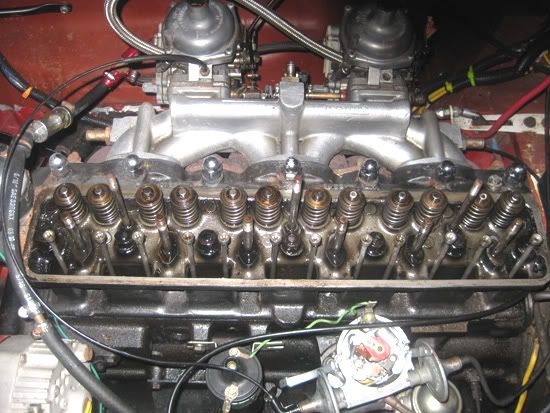
Photo above is after the rocker assembly has been removed.


oilFeed.jpg


rockerassemOUT.jpg


edit: add text.
 
Dale,

Can you put a small stiff wire down in that hole to insure that it is open?

EDIT - no screw up on the rods, just put them back where they came from. They look pretty clean to me.
 
Dale - two threads here - be careful that you don't miss something.

As David said on the other thread, make sure that the plug is in each end of the shaft. If so, then you will have to take it all apart, which you should anyhow, to see what needs cleaned and what may be worn.
 
Thanks Paul, I intend to poke in the hole.

I thought the advice thread was getting to large and taking up too much forum space. I thought a new thread made sense now that the rocker assembly is off the engine.

Yes, I plan on taking the entire assembly down to individual parts, clean them up and see what's good and what's not.

Thanks

dale(Tinster)
 
Dale: Those parts look wet with oil to me!

Did you remember to check the push rods to determine if they are straight?

BTW: Unless you have one of those expensive reusable silicone valve cover gaskets, don't forget to use a new one.
 
angelfj said:
...

BTW: Unless you have one of those expensive reusable silicone valve cover gaskets, don't forget to use a new one.

I've used the original cork type valve cover gaskets over many times. When I originally install a new one, I glue it to the cover itself, and then smear a light coating of grease on the side that mates with the head. The cover comes off easily, and the gasket doesn't stick to the head. Each time I reuse it, I smear a little more grease on it. :cheers:
 
Art, you're showing your age. I'll bet you learned how to soak them in water too!
 
Brosky said:
Art, you're showing your age. I'll bet you learned how to soak them in water too!

That's right, the wisdom of the <span style="font-weight: bold">aged.</span> :laugh:

There's nothing wrong with a well made cork gasket for a valve cover. I have it on my TR3, and it doesn't leak any oil. I've also had the valve cover on and off several times.

I've read the procedure for installing these new, hi-performance, never leak under any circumstance gaskets, and no thanks...I'll stick with the simplicity of what I know works. I just think that these newer gaskets are just making up for valve covers that aren't straight or haven't been torqued down properly.

BTW, Taking an old dried out shrunken cork gasket and soaking them in water doesn't work very well...ask me how I know...
grin.gif
 
angelfj said:
Dale: Those parts look wet with oil to me!

Did you remember to check the push rods to determine if they are straight?

BTW: Unless you have one of those expensive reusable silicone valve cover gaskets, don't forget to use a new one.

Frank- yes, most have oil, some do not. I ain't touchin' them push rods!!
Valve covers need gaskets? I just clean both surfaces very well with benzine
and run a thick bead of Liquid Nails. Tighten down the cover, let it set overnight.

Here's a photo of a typical rocker arm- it looks good to this novice.
There appear to be no wear marks on the indented pad that pushed the
valve springs. There is a mark stamped on each rocker.

I must say I am having fun trying to track down the 2 dry rocker arms
while learning how this assembly functions. Three of the six pedestals
are stuck tight with what appears to be lacquer. My instinct tells me
to use liquid paint remover ( Easy Off cousin). I have PB Blaster, de-greasers,
acetone and CRC marine. What do most folks use?

Here's a photo of typical rocker arm. I got a tiny wire brush completely down
into the head at the oil feed hole. No blockage. No blockage in rocker arms No.1
or No. 12. That leaves the shaft interior, I guess.

typicalRocker.jpg
 
Dale,

Was there a plug or screw in each end of the shaft?

Is that a wear ridge in the shaft that I see on the far left of your picture to the left of "what is this?" If you can feel that with your finger nail, the shaft is worn and the fit may be a little sloppy there.

The benzine will probably clean up that old oil varnish on the shaft.

Acetone will eat through the pedestal crud if left to soak overnight....covered and outside for your breathing sake.
 
Yes Paul, that is a ridge on firewall side of rocker
No. 12 at the rear of the assembly. The other side of
the rocker does not have the ridge., None of the others ,
so far, have a wear ridge.

What is that gouge next to every oil hole?

thanks,

dale(Tinster)
 
Dale, that "gouge" is part of the oiling design for the rocker to retain oil.

The rockers have tremendous pressure applied from the bottom by their interaction with the push rods and the valves. The rocker shaft is more inclined to wear here then elsewhere.

I use paint remover to attack the build up of lacquer and other deposits.

Doing good so far.
 
Dale those are slots to keep the shaft located, by the bolts on the pedestal, and the holes lined up. Sounds like a new shaft and end plugs is in order, but will save a lot of wear and tear down the road.

Wayne
 
So......number 12 has a ridge and was getting oil, but number one does not, but was not getting oil???

Very strange indeed. I'll be curious to see what you find in the shaft when you get it apart.

How about the plugs? Were they there?
 
No, Paul. No1 and No 12 were both dry.

Yes plugs on both ends.
How do I remove them?

thanks again,

Dale(tinster)
 
Dale,

I never removed mine, as I sent the entire assembly back as a complete unit to be reconditioned at TRF. The factory and Bentley manual don't mention them and the Haynes says to remove and refit them??? But not how, so I honestly can't answer that question. I do know that they can fall out and that supposedly can cause a pressure loss as well as a frantic hunt in the oil pan.
 
Signing off for the next 24 hours. You're in good hands. Take it slow and steady and you'll be fine. But please check the wear on all of those bushings and the shaft. If they work like a cam journal (and they may not) for lubrication pressure, everything needs to be nice and tight to keep the pressure up and through the arms, even if all of the passages are cleaned when you get done with it. I could be wrong about that theory, but perhaps another here will know for sure.
 
I would not take all that stuff apart if I was you :cryin:

LOL!

Seriously, since you've already done all this, just replace the shaft with a new one. It's a relatively cheap insurance policy.

If you opt to keep your old shaft, go to your local auto body supply and get an extra fine (gray) piece of 3M Scotch Brite and some laquer thinner. Soak the pad in a little laquer thinner and...uh, I don't know how else to say it, so, rub your shaft with it.

You can then polish it with a dry cloth and it will look like new.
 
typicalRocker.jpg


Dale the rocker looks good, however the shaft looks like it is worn out to me. There should not be a ridge where the rocker rubs against the shaft.

Since there since the bottom of the shaft is worn, there will be a larger than normal gap on the top and the oil will flow out around the sides of the rocker instead of through the little hole on top. I would not be surprised if the "dry" rockers are dry because the oil is escaping around the sides instead of being forced out of the top.
 
Back
Top