• Hi Guest!
    If you appreciate British Car Forum and our 25 years of supporting British car enthusiasts with technical and anicdotal information, collected from our thousands of great members, please support us with a low-cost subscription. You can become a supporting member for less than the dues of most car clubs.

    There are some perks with a member upgrade!
    **Upgrade Now**
    (PS: Subscribers don't see this gawd-aweful banner
Tips
Tips

Rocker arm stud replacement

The Phillips head screw in the rear most top section of the rocker shaft is in place and tight. When I spray cleaner into the rocker assembly it does spray out the weep holes, so I think I have at least some flow through the shaft.

I do not have the plugs at the end of the rocker shafts, but there isn't any oil weeping from them so I think the problem is elsewhere.

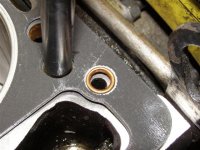
How can I check to see if I have flow from the block to the pedestal? Do I need to pull the rocker assembly again, push-rods (keeping them in order) and then crank the engine over to see if oil flows out of the hole in the block?

Other ideas?
 
The oil to the rockers is feed from seepage around the rear cam bearing, so you will not have as much flow as you would if you tapped into the main gallery, but it should be more then what you are observing.

If you remove that oil gallery plug, do not start the engine. Instead, remove the spark plugs and then turn over the engine until oil pressure builds, or you see oil coming out of the plug hole. Or you can remove the spark plugs and the rocker assembly and once again turn over the engine and observe oil flow or lack of...
 
The plug I'm talking about is in the back of the cylinder head; item AK9 in the TRF diagram . This is the lateral oil passage through the head, that feeds the rocker shaft, and the only access without removing the head.

I would first remove the plug and start the engine briefly, to see if oil flows out. It won't gush under full pressure but you should get a definite flow within 30 seconds or so of the oil pressure coming up. If not, it's time to pull the head.

If you do get the flow, then the problem is between there and the rocker shaft. I'd remove the shaft and try squirting some "Jet Spray Gumout" or similar into the hole under the rear rocker pedestal, to see if you can blow any gunk out of the passage. If that doesn't work, try poking some baling wire from each end.

You can also use the Gumout to check the passages through the rocker shaft, but you'll need to reoil it afterwards.
 
When I did the first head swap on my TR6, despite all of the care and oil changes every 3,000 miles, there was still some build up in and around the block area where that passage that Randall and Ray describe is being fed from. I have added two pics that will show the exposed hole in the block as well as the hole on the cleaned head.

When my head was cooked and cleaned, all of the plugs were removed and the passages were cleaned at that time. The same went for the head as well as the block when I did the total rebuild last spring.
 

Attachments

  • 14821.jpg
    14821.jpg
    59.8 KB · Views: 175
  • 14822.jpg
    14822.jpg
    53.2 KB · Views: 172
This can be a problem getting good oil flow to the rockers.Often a bypass-line is the best answer.It goes from the oil pressure sender to the head. This direct feed will give you a lower reading on the oil pressure gage due to its parasitic nature ahead of the sensor......but will make the upper end oil well. Some people theorize that the factory used upper end oil starvation to cut down on oil consumption this saved the expense of valve guide seals.......
MD(mad dog)
 
Thanks guys - I pulled the rear oil gallery plug and no oil leaked, sprayed, telegraphed, phoned or otherwise came out.

I am seeing some OK oil flow now from pedestal for cylinder #6, but front still looks dry.
 
per your advice guys - I did carefully poke into the oil passageways and didn't see any gunk on the probe, but the probe didn't have any oil on it either. I did spray from cleaner down the passageway, followed by some oil so there was lubrication, and that seemed to help a bit.

Did some more driving after that and the bottom of the pedestals and valves are now getting decent oil coverage from front to back. The top weep holes look dry still, which is a bit disappointing, but it seems like the oil flow is "loosening" itself up a bit.

She is still rumbling at lower RPM, which given the rest of the symptoms, I am assuming means the bottom bearings are shot.

Thanks for the help guys - I think I have a decision to make here about how I want to go forward.
 
From "rocker arm stud replacement" to this...
Bummer.
Just life in the old TR world, I guess.
 
Tom,

Have you pulled the plug wires, one at a time, to isolate the knock to one or more cylinders?
 
Brosky said:
Tom,

Have you pulled the plug wires, one at a time, to isolate the knock to one or more cylinders?

Hi Paul - thanks for the help. She doesn't actually have a knock. I get a rumble at start up and low RPM that to me sounds like the symptoms of bad lower end bearings. Unfortunately that would seem to be consistent with an engine that was run with infrequent oil changes, and that appears to have happened here as evidenced by the sludge that was built up. Back when I bought here and put on a canister style moil filter housing she had thick clumps of sludge that had restricted flow into the oil filter.

Once the rumble goes away she is smooth, pulls like a train, and doesn't smoke or use excessive amounts of oil. It is pretty amazing to me she runs at all give prior history - these cars are tough.

All that nice stuff said, she's been damaged through neglect and that check is coming due soon I think. Trying to be realistic and grounded here....

Short of a rebuild, which is going to be needed at some point soon, I have been debating trying new bearings as a work around. It seems fairly straightforward to do and might help with the rumbling. What do you think?

Other ideas?
 
tdskip said:
Short of a rebuild, which is going to be needed at some point soon, I have been debating trying new bearings as a work around. It seems fairly straightforward to do and might help with the rumbling. What do you think?
I've not tried it on a TR6, but have done on TR3 engines several times with good results. The short block that was in TS39781LO when it got wrecked had apparently been abused even worse than your engine (pushrods were literally rusty!) but I never did get around to doing a proper rebuild ... it covered probably 100,000 miles that way, including winning the class at the 2000 VTR autocross (1000 miles from home) and was still running great.

OTOH if the oil pressure is still OK, you might consider just driving it and saving your money for the eventual rebuild.

Somewhere (Haynes?) I've even read a recommendation to change the rod bearings every 30,000 miles, as preventative maintenance (on the TR2-4 motor).
 
Hi Randall.

Specifically, we're looking at replacing bearing sets #3 and 5 right? Reading up via prior posts, including a question I asked on this before here, suggests this is an engine in place job, and access can be secured via dropping the pan.

Will the existing bearings have a stamping that shows the size?

Part of me it itching to give it a try because it would be a good learning experience and <span style="font-style: italic">might</span> work, but I should probably ratio my time to focus on other things if she's already "past it"...


TRS-002.gif
 
Why not try replacing the main and rod bearings? It's worth a shot and as Randall says you may get a lot of miles out of it. You may want to order new thrusts at that time as well, since you have to drop that cap anyhow.
 
Sets #3 & #5 are the main & rod bearings, respectively. As Paul says, you might want to do #4 (thrust washers) as well, since some TR6 motors seen to wear them quickly and they are relatively inexpensive.

Doing the mains with the crank in place is a little tricky, not usually covered by the manuals. Again I'm not sure about the TR6 motor, but it may be like the TR3 motor where the sealing block for the front main touches the front plate gasket; meaning the gasket usually tears when you remove the sealing block. So depending on how the lower halves look, you may want to leave them alone.

Generally, undersize inserts have the undersize stamped on the back (eg "010"). Standard size inserts usually do, but sometimes don't. If they aren't marked, I'd want to measure somehow ... you should be able to get in there with a dial caliper and get a reading good enough to distinguish between stock and .010" or .020" undersize. If you don't have a dial caliper, get one. (I have several of the $15 ones from Enco, they are reasonably accurate and cheap to replace if they get damaged.)
 
TR3driver said:
Somewhere (Haynes?) I've even read a recommendation to change the rod bearings every 30,000 miles, as preventative maintenance (on the TR2-4 motor).

Never heard of that one... If true, it must be a ecommendation from the UK mechanics union. :jester:
 
Sounds like the mains are ticker than the rod bearings.

Doing both the rod and mains required, or will "just" the rod bearings and trust washers likely buy me some time?
 
While you are down there, do them all. You will sleep better knowing you will not have to return to the dark side of the engine for awhile.
 
Getting back to the orignal post (kind of), I stripped three of the four rocker pedestal bolts when I was rebuilding my latest Spitfire engine. I had never stripped one before that, but I almost ran out of my supply. You may want to order new ones.
 
Have you checked the timing chain cover with a stethoscope, or long screwdriver held to the bone behind your ear?

Rule out the simple stuff, timing chain, tensioner, etc. before going for the bottom end..
 
Back
Top