• The Roadster Factory Recovery Fund - Friends, as you may have heard, The Roadster Factory, a respected British Car Parts business in PA, suffered a total loss in a fire on Christmas Day. Read about it, discuss or ask questions >> HERE. The Triumph Register of America is sponsoring a fund raiser to help TRF get back on their feet. If you can help, vist >> their GoFundMe page.
  • Hey there Guest!
    If you enjoy BCF and find our forum a useful resource, if you appreciate not having ads pop up all over the place and you want to ensure we can stay online - Please consider supporting with an "optional" low-cost annual subscription.
    **Upgrade Now**
    (PS: Subscribers don't see this UGLY banner)
Tips
Tips

removal of transmission cover from 1959 100-6

Chet Zerlin

Jedi Trainee
Country flag
Offline
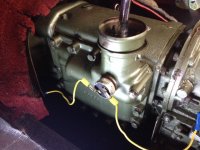
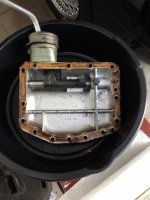
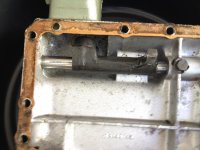
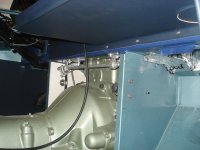
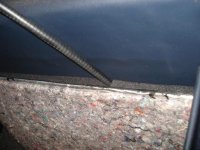
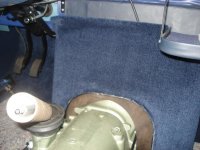
Hello all. I'm in the process of trying to remove the transmission cover from my 2 seater 100-6. As much as I try I can't get it to clear the handbrake - and as a result I can't lift it up high enough to get it to clear the shifter (so that I could lift it out enough to get the "lip" out from under the handbrake). Kind of in a Catch 22 situation...

Do I need to remove the handbrake in order to remove the cover or is there another way that I'm simply not seeing?

Thanks in advance for your help!
Chet
 
Country flag
Offline
If you back off a few turns on the rear drum brake adjustment, you'll be able to raise the handbrake lever significantly higher.
 
Country flag
Offline
Here's a couple of shots from one of the last times I did my own BN6 (this was still in Ohio, so I know I've done it at least once more since moving to Florida...).

IMG_8005.jpg


IMG_8006.jpg
 
OP
C

Chet Zerlin

Jedi Trainee
Country flag
Offline
Thanks Randy...since I've not yet touched the brake system on my car if you could give this novice just a little more specifics on doing what you describe it would be greatly appreciated!

:smile:
Thanks again!
Chet
 
Country flag
Offline
There is a SQUARE-headed peg sticking out of the brake backplates, maybe in about the 10:00/11:00 O:clock position on the RH and 1:00/2:00 O:clock position on the LH (as viewed from under the car in the center.

Counter-clockwise to "back the shoes off" allowing the handbrake lever to be lifted higher. When you're all done with the tunnel cover work, don't forget to tighten the adjustment back up again!

Study up in either the manual or online when it comes time to readjust the brakes again, as the four (4) sided (the OPPOSITE END) pyramid may throw you off, until you understand how it operates ;)
 

RDKeysor

Jedi Trainee
Bronze
Country flag
Offline
Good advice given here. For certain don't consider removing the emergency brake. I have a '60 BN7 and have had occasion to remove the tranny cover a number of times. I've taken out the seats to do this, but never the emergency brake.
 

DerekJ

Luke Skywalker
Country flag
Offline
I seem to remember unscrewing the two bolts that hold the handbrake in position. This allows it to be more manoeuvrable when trying to avoid the transmission cover.
 

kozelding

Senior Member
Country flag
Offline
It's a puzzle in my BT7 too. I clearly remember at one point, the first time I tried pulling the tunnel, I thought it was impossible with the handbrake in place, but then suddenly I got it. Something like starting with the gear selector in 1st, wiggling the tunnel up enough so it can rotate clear of the overdrive, then shifting into Reverse to pull the tunnel back off.

Now, I DO remove the seats, do NOT adjust the handbrake, but DO remove the shift knob (and put a piece of tape over the threads to keep from scratching the bottom of the tunnel).
 
OP
C

Chet Zerlin

Jedi Trainee
Country flag
Offline
"It's a puzzle in my BT7 too. I clearly remember at one point, the first time I tried pulling the tunnel, I thought it was impossible with the handbrake in place, but then suddenly I got it. Something like starting with the gear selector in 1st, wiggling the tunnel up enough so it can rotate clear of the overdrive, then shifting into Reverse to pull the tunnel back off."

The good news is I got it off! But.....I have no idea how :smile: Exactly as you described I just moved and wiggled it and all of a sudden it was loose and out it came....should be an interesting experience to see if I can get it back on when I'm done!!

So...my whole reason for doing this entire exercise was because my transmission was jumping out of 2nd gear. The idea was to pull the transmission cover, take off the side cover of the transmission - replace the three silver balls and springs that operate as the detents that hold the shaft "in gear" - put the whole thing back together (with a new gasket of course) and enjoy driving the car.
Obviously it took me way longer than I had thought just to get the transmission cover off and now I'm wondering if I can get away with not removing the second (bulkhead) cover that is in front of the transmission cover or if I'll need that room to have the clearance needed get the side cover off and on.
Here's a photo of my newly revealed transmission :smile:
attachment.php


does anyone who has done this before think the clearance is sufficient? What exactly happens when I remove the 13 bolts that hold the cover on? Does it just come off or is there some connection that I need to be aware of inside? (since the gear shifter mechanism is included in the side panel).


Thanks!
Chet
 

Attachments

  • IMG_0497.JPG
    IMG_0497.JPG
    130.1 KB · Views: 229

Rob Glasgow

Jedi Knight
Country flag
Offline
Your last photo reminds me of something I just learned, even after owning my car for 50 years. When installing the transmission tunnel, it became obvious the the bottom part of the rubber gear shift gaiter is designed to fit over the round rim of the part that holds the shift lever in place on the transmission. I had never installed it that way, I just made sure to upper groove of the gaiter was installed in the tunnel hole. By having the rubber installed at both places, you get a much better seal to keep the hot air out of the cockpit. I guess that's why we get up each morning.
 
Country flag
Offline
I've been turning people's shift boots over for decades! Even the center-shift guys have a propensity for putting them on upside down__that's why their boots are usually torn!

I think the reasoning on the side-shift tans, is it keeps the ball/cup mechanism clean and free of road grit, and obviously, to keep the elements out of the car.

I keep mine secured with a Ty-Wrap, so I can't accidentally pull it off while getting it seated in the tunnel cover.

IMG_7989.jpg


Even though I didn't have the lever to install. I put the boot on this transmission so that the installer would have no doubt as to how it should be oriented.

IMG_1348.jpg
 
OP
C

Chet Zerlin

Jedi Trainee
Country flag
Offline
Since I started this thread I wanted to report back that I've successfully replaced the three springs/balls in my side shift transmission. Took a test drive this afternoon and IT - STAYED - IN - SECOND - GEAR!!!! :encouragement:
Some observations in case another could benefit from my experience. The removal of the side cover was easy but fitting it back on was a learning experience. Getting the shifter mechanism aligned took a long time until I got used to how moving the shifter rod rotates and moves the mechanism that is inside the side cover. It's rather difficult to describe so here are two photos that should help:
attachment.php
attachment.php

I also initially had an issue where it seemed like something was binding when I tried to put the cover plate back on. But it turned out to be the three springs that could not be compressed easily to permit the cover to meet the gearbox. The solution was to insert the bolt that is directly above the three springs and tighten it to snug everything up.
Once that was done everything went together just fine.
 

Attachments

  • IMG_0507.jpg
    IMG_0507.jpg
    32.3 KB · Views: 213
  • IMG_0506.jpg
    IMG_0506.jpg
    62.2 KB · Views: 210
Country flag
Offline
Thats ok I flipped it over when I got it


Just kidding.
;) You're lucky I didn't put a stainless steel Ty-Wrap on there! I still have a couple of boxes (not sure if there were 50 or 100/box) left over from the oil-patch days. It took nearly two (<2) decades, but I finally used up my stash of T&B 527MX Ty-Wraps (about 1/4" x 14"); I didn't think I would ever have to buy more of them! :cheers:
 
OP
C

Chet Zerlin

Jedi Trainee
Country flag
Offline
I've been turning people's shift boots over for decades! Even the center-shift guys have a propensity for putting them on upside down__that's why their boots are usually torn!

I think the reasoning on the side-shift tans, is it keeps the ball/cup mechanism clean and free of road grit, and obviously, to keep the elements out of the car.

I keep mine secured with a Ty-Wrap, so I can't accidentally pull it off while getting it seated in the tunnel cover.

IMG_7989.jpg


Even though I didn't have the lever to install. I put the boot on this transmission so that the installer would have no doubt as to how it should be oriented.

IMG_1348.jpg

Hi Randy - could you please advise as to where your speedometer cable is routed through your firewall to enable it to meet the transmission as shown in your picture?

Thanks!
Chet
 

healeyblue

Jedi Warrior
Gold
Country flag
Offline
like so.
 

Attachments

  • 2012-09-13 september 2012 017.jpg
    2012-09-13 september 2012 017.jpg
    52.2 KB · Views: 131
  • 2013-01-08 014.jpg
    2013-01-08 014.jpg
    62.3 KB · Views: 121
  • 2013-01-09 008.jpg
    2013-01-09 008.jpg
    59.2 KB · Views: 131
Similar threads
Thread starter Title Forum Replies Date
M TR2/3/3A Transmission Removal Tool Thread Triumph 2
R TR6 Transmission Removal Anything Special To Know Triumph 9
nevets Transmission tunnel removal Austin Healey 4
jfarris TR2/3/3A Transmission Removal Triumph 22
AHS TR2/3/3A TR3 transmission clutch fork & shifter removal? Triumph 5
Kleykamp Transmission/engine mount removal Triumph 4
O TR2/3/3A TR3 Transmission Removal Triumph 2
TimK Transmission Removal/Replacement Austin Healey 3
M Transmission tunnel removal Triumph 14
R 1996 Jaguar XJS transmission cooling line removal Jaguar 0
L 3000 Transmission Removal, alone or with engine? Austin Healey 16
Jayrz Transmission removal Spridgets 4
T Transmission removal Quickie Triumph 23
R_Lyle TR6 TR6 Transmission rear seal removal Triumph 4
G TR6 [TR6] removal of front transmission seal Triumph 5
Sprocket BJ-7 Transmission Tunnel Removal Austin Healey 5
Morris Transmission removal Spridgets 22
Slider748 TR6 TR6 transmission removal problem Triumph 12
703MGB Transmission removal question MG 2
W Transmission Removal? Austin Healey 19
CharlieCarpenter Need some guidance on transmission removal Austin Healey 5
K TR2/3/3A Cylinder head removal and valve adjustment Triumph 2
scottkilpatrick TR4/4A TR4 Rear Brake Drum Removal - Basic Question Triumph 16
BoyRacer Door Skin Removal Austin Healey 6
K TR2/3/3A Front brake hub removal to access Vertical Link bolts(screws) Attached pictures. Triumph 1
C MGB Rubber Bumper cover removal MG 5
kodpkd Antenna Removal Austin Healey 9
B General MG Crankshaft Nut Removal MG 4
BN6_2197 Gearbox/Overdrive Removal Austin Healey 25
W BN1 Steering Box Removal Austin Healey 11
S TR2/3/3A engine removal Triumph 12
S TR2/3/3A Steering wheel removal. Triumph 4
D Clutch Fork Pin Removal Austin Healey 4
A 78 MG MIDGET EMMISIONS REMOVAL Spridgets 1
C MGA Dash removal MG 0
Darrell_Walker TR4/4A Speedo Drive removal (non-OD) Triumph 8
AUSMHLY Spigot Bush, Pilot Bushing Removal Austin Healey 4
R TR2/3/3A Steering wheel hub removal Triumph 11
MadRiver TR5/TR250 Water pump housing removal advice Triumph 0
V 1969 Sunbeam Alpine coupe glovebox lock removal Sunbeam (Rootes) 0
newmexTR3 TR2/3/3A TR3 outer wishbone bushing removal Triumph 5
D Heater knob removal Spridgets 6
S 1275 oil pan removal Spridgets 30
K TR2/3/3A The grease gun brake caliper piston removal trick..... Triumph 6
E austin van heater removal Other British Cars 0
C TR2/3/3A TR2 Axle/wheel bearing removal Triumph 2
nevets Water Pump Removal Austin Healey 6
M TR2/3/3A Crankshaft Sludge Plug Removal Triumph 6
F Interior Door Handle Removal Austin Healey 2
Z Front Springs Removal Austin Healey 3

Similar threads

Top