• The Roadster Factory Recovery Fund - Friends, as you may have heard, The Roadster Factory, a respected British Car Parts business in PA, suffered a total loss in a fire on Christmas Day. Read about it, discuss or ask questions >> HERE. The Triumph Register of America is sponsoring a fund raiser to help TRF get back on their feet. If you can help, vist >> their GoFundMe page.
  • Hey there Guest!
    If you enjoy BCF and find our forum a useful resource, if you appreciate not having ads pop up all over the place and you want to ensure we can stay online - Please consider supporting with an "optional" low-cost annual subscription.
    **Upgrade Now**
    (PS: Subscribers don't see this UGLY banner)
Tips
Tips

TR2/3/3A Rebuilding a cylinder head

sp53

Yoda
Country flag
Offline
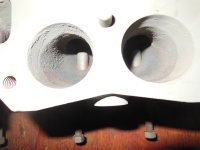
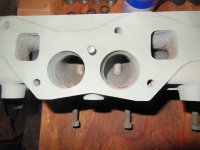
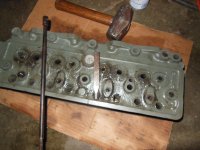
Rebuilding a cylinder head. I am working on a head that I bought off Craigslist many years ago and have had it under my work bench since. The guy was cool, and said he had the head checked for cracks at a shop and I think he said new valve guides. He only charged me 50.00 bucks.

I took some pictures to see if people thought the valve guides look new. Can I get some opinions of the conditions of the guides by these pictures or would a different angle of picture be better? I have never rebuilt a head before so any ideas are very welcome

Thanks steve
 

Attachments

  • DSCN1734.JPG
    DSCN1734.JPG
    3 MB · Views: 18
  • DSCN1733.JPG
    DSCN1733.JPG
    3.4 MB · Views: 20

CJD

Yoda
Country flag
Offline
+1...you can't tell anything by just looking at the guides. Place a new valve in a clean guide and check for rock in the same plane as the rocker arm. Iron guides can be as little as .0025 rock...bronze guides (which yours are not), have to be closer to .005" rock. Of course, repeat with every guide to be sure. Also, I would emphasize "clean" guide, as it looks like the head was sand blasted, and every last spec of sand must be removed from the guides!
 

bobhustead

Senior Member
Gold
Country flag
Offline
When I have a head to put together, it always goes to a machine shop for crack check, flatness check, guide assessment and valve grind.
Bob
 

mctriumph

Jedi Warrior
Silver
Country flag
Offline
My favorite trick is to install new guides then have them knurled to make up for stem wear.
It acts like an oil seal and greatly reduces oil consumption .Assuming the old valves are
in good kit of course.
Mad dog
 
OP
S

sp53

Yoda
Country flag
Offline
I tried a couple of my old valves from different heads. The valves are a looser than .0025 which is 1/400 of an inch. My measuring skills stop at about 1/64 because I am old carpenter. I could probably deal with .025 which is a 1/40 of an inch. I wanted to do this work at home and thought perhaps if I get some new intake valves and guides I can feel the amount of play and then get a feel for it.

Looking at prices I should get some new 5/16 intake valves and see how the fit in the head. The exhaust valve guides in the head are the larger 3/8 and more money.

The last time I had a head rebuilt it was $$$$. The shop used 5/16 guides and valves for intake and exhaust. They also did away with the 3rd spring on the exhaust-- plus-- put in some seats which I still cannot still wrap my mind around. How can you put a new steal ring into cast iron?

Anyways, whoever cleaned the head from carbon did a poor job there are little piles of carbon everywhere. Can I take a ½ drill and wirer wheel and clean the area in the combustion chamber where the valves sit down in that bevel seat? I do not want to damage anything and do not know how aggressive I can be cleaning. Any ideas welcome and thanks guys.

Steve
 

CJD

Yoda
Country flag
Offline
.0025 is about enough that you can feel there is looseness, but you cannot hear any clicking as you wiggle. At .005" you start to hear the valve click as you wiggle it back and forth...not a scientific check, but a quick one to use at a swap meet for head condition. Installing seats amazes me too. In cast iron it is an easy machine shop job that rarely goes wrong. Because aluminum expands more than steel, installing steel seats in an aluminum head can cause serious trouble if the machine shop screws it up!
 

mctriumph

Jedi Warrior
Silver
Country flag
Offline
I know it is that knurling the new guides to account for the .0025 is not completely
Kosher , but when the engine burns less than a Qt every 1500miles because of this
acting as a seal, I am all in. Try it!
Seats only on the exhausts, as the run hotter. intakes dont need it.
Mad dog
 
OP
S

sp53

Yoda
Country flag
Offline
It seems to me the difficult part with rebuilding a head is getting the valve guides in place. How would a DYI person do something like that? The rest of the rebuilding looks like work with grit gridding compounds on the edge of the seat and valve. I do not how long something like that should take, but the area looks small. They used to charge 35.00 bucks when I was a kid and it did not look like rocket science at least now it does not.

I do not know anything about valve knurling MD. I always like to hear about a plan MD. I can always pay to have it done by an expert, well if I have resources and can find an expert. Anyways I enjoy leaning about different ways to do stuff.

Steve
 

CJD

Yoda
Country flag
Offline
Knurling was a way to displace the metal inside the guide to extend the life of a worn valve guide. You insert a tool that rolls around the inside of the guide, making metal burr edges that stick up. Then, you come back with a hone and bring the edges back down to the desired clearance. Since there is less material actually touching the valve stem, a knurled guide will wear faster than a new guide.

The guides are actually pretty easy to change. I made a tool from an old valve stem, and welded a steel sleeve to it. I then knock out the old guides using a BFH. I then use the same sleeve to drive in the new guides. The valve seats take more expensive tooling. They place a mandrel in the new guide and either cut or grind the new 3 angle seat, so it is perfectly concentric with the guide centerline.

Lapping with compound is used after a new valve job to ensure the valve makes an air-tight seal when closed. It should not take much on a new valve job. Lapping can also be used on a valve that has some miles on it, but is a little rough at the seat...a "poor man's" valve job.
 

mctriumph

Jedi Warrior
Silver
Country flag
Offline
Think of knurling like rifling the barrel of a gun. Tiny ridges of metal in a spiral , tighten the clearances
and capture oil in the guide instead of letting it slip past to be burned. Motors I have built this way burn a lot
less oil than new valves & guides.The plus is saving slightly worn valves that have lots of life left in them.
New guides are dirt cheap.
Mad dog
 
Similar threads
Thread starter Title Forum Replies Date
I TR6 TR6 cylinder head rebuilding advice Triumph 15
Lin Rebuilding a master cylinder for BT7 Austin Healey 3
P Rebuilding Brake Master Cylinder an Impossibility? MG 5
J Master Cylinder Rebuilding Question Spridgets 3
S TR2/3/3A Rebuilding a tr3 transmission and second gear, Triumph 57
S TR2/3/3A when rebuilding a differential Triumph 9
M TR2/3/3A Rebuilding suspension Triumph 29
G Rebuilding Front Seats Austin Healey 4
E TR6 Rebuilding Distributor Triumph 2
JMACENGINESHOP BJ7 Engine Rebuilding Austin Healey 23
S TR2/3/3A Engine Rebuilding. Triumph 14
L MGB Rebuilding a 1977 MGB MG 1
S TR2/3/3A Rebuilding the early tr3 starter Triumph 5
Joel Lester TR2/3/3A What type of valve to use when rebuilding the head? Triumph 10
KVH General Tech Rebuilding the Engine Triumph 5
K TR2/3/3A Rebuilding an Engine?..New Cam Sprocket & Gear...1/2 Price Triumph 0
drooartz Rebuilding rear axle Spridgets 19
T Rebuilding a 1275 for a BE Spridgets 8
pkmh Rebuilding Armstrong Lever Shocks on a BJ8 Austin Healey 28
steveg Steering rocker shaft - chemical rebuilding Austin Healey 3
steveg Rebuilding roadster windshield Austin Healey 24
A Rebuilding Tiger window regulator question Sunbeam (Rootes) 3
S TR2/3/3A Rebuilding Dr2 Lucas wiper motor Triumph 16
S TR2/3/3A rebuilding bomb nose starter Triumph 9
W Looking for engine rebuilding 100-6 Austin Healey 12
KVH General Tech Rebuilding the Engine--a few practice pointers [for me] Triumph 11
R TR2/3/3A Rebuilding H4 carbs Triumph 8
S TR2/3/3A rebuilding door panels Triumph 15
Rut TR4/4A Seat rebuilding Triumph 3
steveg Rebuilding the Dip Switch Austin Healey 9
Tinkerman TR2/3/3A Rebuilding SU carbs 1960 TR3A Triumph 3
Rut TR4/4A Seat rebuilding Triumph 6
CZ_Dave MGB Is it worth doing the Shock Conversion Kit or Rebuilding Exsisting shocks? MG 16
JFeher TR2/3/3A Rebuilding A type OD I Need advise / measurements Triumph 14
KVH TR4/4A Engine rebuilding Triumph 17
gbtr6 TR6 Rebuilding TR6 Engine, Tips? Triumph 7
pbraun Anyone have a 1275 core for rebuilding? Spridgets 8
Got_All_4 TR2/3/3A Continually Rebuilding of my J Type Gear Box Triumph 2
drooartz MGB-GT Rebuilding the seats MG 28
Gray_Cat MGB Rebuilding MGB Overdrive MG 4
S TR2/3/3A rebuilding a tr3 water pump Triumph 22
PatGalvin TR2/3/3A Guide for SU Rebuilding Triumph 8
H TR4/4A 4A convertible top rebuilding sequence Triumph 8
sim Rebuilding Front Suspension 58 sprite spring question Spridgets 6
Lukens TR2/3/3A More questions about rebuilding my steering box Triumph 20
charleyf TR4/4A Hs6 carb rebuilding Triumph 8
S TR2/3/3A Transmission Rebuilding Triumph 29
L 1966 BJ8 frame rebuilding questions Austin Healey 1
djackson Rebuilding 100/6 Transmission Austin Healey 6
bighealeysource Rebuilding BN2 generator Austin Healey 5

Similar threads

Top