
-
 Hey Guest!
British Car Forum has been supporting enthusiasts for over 25 years by providing a great place to share our love for British cars. You can support our efforts by upgrading your membership for less than the dues of most car clubs. There are some perks with a member upgrade!**Upgrade Now**
(PS: Upgraded members don't see this banner, nor will you see the Google ads that appear on the site.)

Tips
- We have a special forum called "Member Articles" where you can submit actual articles for consideration for publication. Learn More
- Don't have an Avatar? If not, your avatar will default to the 1st character in your username. Go into "Account Details" to change your Avatar.
- Some basic forum navigation info: click
 Hey - did you know if you click on the title of a thread it will take you to the first unread post since you last visited that thread?
- Hey Guest - Is your British Car Club in our Clubs database? If not, send me a PM - Basil

- Looking for a local club? Click the "Clubs" tab above and browse hundreds of clubs world-wide.
- Add Android or iPhone APP: click
- Did you know - any picture or video you add in your posts in any marque-specific forum will also get added to the Media Gallery automatically.
- A few more tips about posting and replying: click
- Hey there Guest - be sure to keep your profile page up to date with interesting info about yourself: learn more
- More tips and tricks on Posting and Replying: click
 but were afraid to ask:
  STOP!! Never post your email address in open forums. Bots can "harvest" your email! If you must share your email use a Private Message or use the
  smilie in place of the real @
- Want to mention another member in a post & get their attention? WATCH THIS

- So, you created a "Group" here at BCF and would like to invite other members to join? Watch this!
- Hey Guest - A post a day keeps Basil from visiting you in the small hours and putting a bat up your nightdress!
- Hey Guest - do you know of an upcoming British car event?
 Pretty Please - add it to our Events forum(s) and add to the calendar! >> Here's How <<
- Hey Guest - you be stylin' Change the look and feel of the forum to fit your taste. Check it out
- If you run across an inappropriate post, for example a post that breaks our rules or looks like it might be spam, you can report the post to the moderators: Learn More
- If you would like to try some different "looks" or styles for the site, scroll to the very bottom, on the left and click the Style Selector.
You are using an out of date browser. It may not display this or other websites correctly.
You should upgrade or use an alternative browser.
You should upgrade or use an alternative browser.
Progress-new thread Monday
- Thread starter jlaird
- Start date
startech47
Jedi Knight
Offline
I would try loosening the 3 screws until they clear the threaded holes in the block and sliding the metal plate along with the screws from underneath the crankshaft flange as a unit. You may have to break the plate loose to get it moving. Sorry, I do not know if this is possible, as I haven't done it in 30 years. I would give it a try before removing the crankshaft. Sounds like the hot tank destroyed the gasket. Keep up the spirits there are not too many places left where the leak could be.
Hap Waldrop
Yoda
Offline
I fitted a the eyebrow Jack without removing the crank. Check it with the feeler guages like I described in the earlier post.
I'll throw this out there for what it's worth, they make rear seal kits for A-series engines, we tried them on the race 1275 motors and not had alot of success with them, I believe with the ultra compression ratios we're running may be the reason why, other people with the street applications have success with them. I believe the 948/1098 Mini Maina rear seal kit works better than the 1275, because of how the rear hub of the crank is made on the 948/1098 small journal motors. It a direct bolt on kit, it kinda expensive at $250.00, but it may be something to think about, go to https://www.minimania.com, go to classic Mini part of the site, do a advances search for part number RIC775, and you'll find what I'm talking about.
The only time, I had any experience with a rear seal kit on a 948 was in a race motor with a dry sump oiling system, but I can say firsthand it was dry as a bone at the rear.
OP
jlaird
Great Pumpkin
Offline
Thanks guys, engine about a third out and I done for the evening, old eyes and it is getting dark.
I don't care if it is dry as a bone I just don't want it running like a facet part open.
Yep Hap, printed out your instructions so I could follow them very very carefully.
One thing I do know at this point is that I have great oil pressure, top of the acceptable range at all RPM cold as well as hot. That's without driveing it mind you. Also know that the tranny is not leaking and it was for sure.
Surely looks to me like my guys caustic cooker ate the gasket out of the eyebrow scroll cover, can not tell without removeing it but that would be my guess.
Hap do you safety wire those bolts in or?????
Hap Waldrop
Yoda
Offline
jlaird said:Hap do you safety wire those bolts in or?????
No, I use locktite and split washers, I never saw one come loose either.
startech47
Jedi Knight
Offline
The other thing to check is to make sure that the oil drain back hole in the rear main cap that routes the oil back to the pan is open.
racingenglishcars
Darth Vader
Offline
Hap Waldrop
Yoda
Offline
racingenglishcars said:In case anyone wants the oil seal crank kit link from Mini Mania, it's here .
Hap, they don't mention the 1098 big crank.
Yeah I guess it is so rare no one bothered to make one for it. The crank flywheel hubs are simular looking, but i'm sure they are different, or atleast that's what I heard.
PHerder
Jedi Hopeful
Offline
Hap Waldrop said:racingenglishcars said:In case anyone wants the oil seal crank kit link from Mini Mania, it's here .
Hap, they don't mention the 1098 big crank.
Yeah I guess it is so rare no one bothered to make one for it. The crank flywheel hubs are simular looking, but i'm sure they are different, or atleast that's what I heard.
Yes they do! It is the bottom listed kit (2" mains) unless I am missing something here ... /bcforum/images/%%GRAEMLIN_URL%%/confused.gif
OP
jlaird
Great Pumpkin
Offline
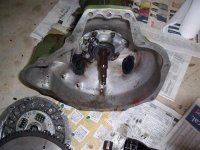
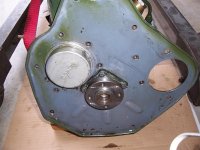
Engine out tranny split. Here is what I found.
No oil in bell housing behind the drain hole. Rubber dust covers and all dry this time so guess that leak was stoped for sure.
Will take a few pics but difficult as oil is so clean. Oil found on bottom half of rear engine plate from the scroll seal down and on the bottom part of the bell housing back to the drain hole.
Have not pulled the plate yet as wife wants floors done. Look good to me. sigh. She will absolutely not allow me to hirer maids and when I do she fires them.
My god look at the prices on those rear seal kits.
More to follow.
OP
jlaird
Great Pumpkin
Offline
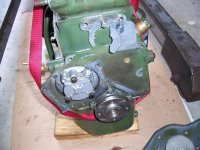
Here is a pic or two, note that there was no gasket between the eyebrow, top of scroll seal and the block. Also no RTV it just kind of fell out although the bolts were tight.
There are four pics here. Note no oil behind the drain hole in the bell housing, no oil on the oil pan nor rear of back plate.
Scroll seal was tight to crank can not even see a bit of gap either bottom or top.
Comment??
There are four pics here. Note no oil behind the drain hole in the bell housing, no oil on the oil pan nor rear of back plate.
Scroll seal was tight to crank can not even see a bit of gap either bottom or top.
Comment??
Attachments
OP
jlaird
Great Pumpkin
Offline
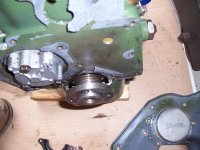
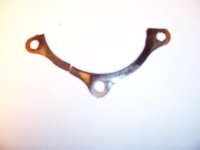
Oh lookie what I found but no goop on it at all. Wonder where that went between the last rebuild and dip and now?
Don't thnk you can see it well or at all but the gasket is on one side oil soaked. This is the side toward the block from about the 5:30 position to the 3;30 position is glossy with fresh oil as I pulled it. Hard to see how as much leakage as I was getting was comming out of that small place.
Don't thnk you can see it well or at all but the gasket is on one side oil soaked. This is the side toward the block from about the 5:30 position to the 3;30 position is glossy with fresh oil as I pulled it. Hard to see how as much leakage as I was getting was comming out of that small place.
Attachments
startech47
Jedi Knight
Offline
Was everything above the scroll dry?
You have to remove the oil pan to check if the oil drain back hole in the rear main bearing cap is open.
I would use a thin coating of RTV between the scroll seal and the block and the scroll seal and the rear main bearing cap. You may want to put it on a little thicker to seal the junction where all three pieces meet. Make sure the RTV is heat and oil resistant, buy the best you only need a little, and let it cure at least overnight. Push the scroll seal tightly against the rear main bearing cap as you tighten the fasteners.
Have a great Thanksgiving. Phil