• Hi Guest!
    You can help ensure that British Car Forum (BCF) continues to provide a great place to engage in the British car hobby! If you find BCF a beneficial community, please consider supporting our efforts with a subscription.

    There are some perks with a member upgrade!
    **Upgrade Now**
    (PS: Subscribers don't see this gawd-aweful banner
Tips
Tips

TR2/3/3A Novice TR3 Engine Rebuild

I've been trying to figure out a way to get the engine on a stand without a hoist, so, in the meantime, I thought I would make it lighter by continuing the tear down. First off was rocker cover, then rocker arm, 4 nuts, easy enough, wrapped it up and set it aside, locked two nuts together to release the stubborn rocker cover bolt. There were a couple of pushrods that were different thicknesses - maybe not the first full or partial rebuild (?) and impact wrenched the head nuts off. Lots of oil around, but its black. A fair bit of rust dropped out of the head as it came off and it took a fair bit of side to side prying to release (I didn't crank on it). BTW, I know, cheaper to rent or buy a hoist than a foot or a new engine, will try and find one tomorrow...
Also tomorrow - the manual says using a valve spring compressor, remove split collets, inner and outer auxillary springs - don't have a valve spring compressor - do I need one or is there a work around with clamps? And while I am on tools, any specialized puller, mandrels or anything else I should plan on buying?
 

Attachments

  • IMG_20160901_203044.jpg
    IMG_20160901_203044.jpg
    35.3 KB · Views: 115
  • IMG_20160901_203501.jpg
    IMG_20160901_203501.jpg
    39.5 KB · Views: 110
  • IMG_20160901_210010.jpg
    IMG_20160901_210010.jpg
    28.4 KB · Views: 109
  • IMG_20160901_210028.jpg
    IMG_20160901_210028.jpg
    41 KB · Views: 109
  • IMG_20160901_210048.jpg
    IMG_20160901_210048.jpg
    33.4 KB · Views: 109
  • IMG_20160901_195330.jpg
    IMG_20160901_195330.jpg
    43.6 KB · Views: 108
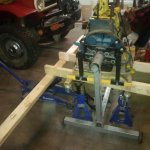
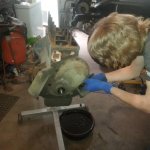
I could share my shade-tree hoist method (although I didn't have a stand either); but maybe I'd better not :smile: Definitely on the risky side!

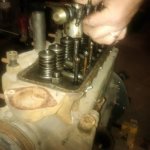
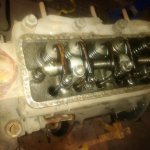
Even with a purpose-made valve spring compressor, I find it helps to loosen the keepers first. Lay a big nut (or equivalent) on the bench, then set the head down so the valve head in question is on top of the nut. Then set a short length of pipe on top of the retainer, and give it a sharp rap with a BFH. Usually one is all it takes, but you can tap it a second time to feel that they came loose.

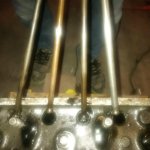
The tool I prefer for removing them is a length of heavy flat iron (originally sold as a stake for retaining concrete forms at the local "big box" store), with one end slotted to fit under a rocker shaft nut and a strategically located hole big enough to remove the keepers through. Sorry, don't have a photo, tho I might be able to take one tomorrow if my description isn't clear.

The washers I mentioned are Moss 324-825. You'll need 10 of them.

New parts are frequently problematic, so I lean towards not replacing anything that doesn't need to be replaced (ain't broke means don't fix it). So for example I have almost always reused all of the clutch components. The stock clutch is huge compared to the engine output, friction plate seems to last forever (at least for me). The only time I had a subsequent problem, it turned out I had installed the wrong TOB; the one I took out was still laying on the bench!

If cost is an issue and you have some retirement money to invest, you might want to look into TRF's Customer Investment Program. You make a personal loan to Charles (ISTR $5K is the minimum) and get back a pretty good rate of interest each month, plus 30% off list price on almost all parts. After 5 years, you get your original investment back.

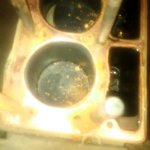
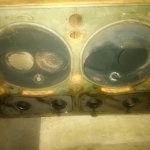
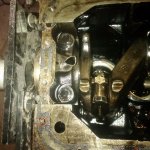
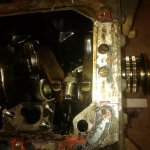
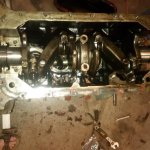
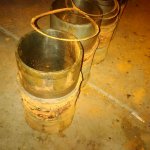
Definitely pull the liners out, even if you plan to reuse them. The amount of crud that accumulates, especially behind #4, is just incredible.

Timing sprockets are Moss 838-000 and 837-040

If you are changing valves & guides anyway, you might want to consider using the TR4A exhaust valves with the 5/16" stem and conversion guides.

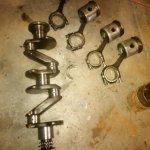
Replacing the wrist pin bushings is a machine shop job, and usually not necessary in my experience. I also don't bother to have the rods checked for straightness, unless the engine blew up or there are signs they aren't straight (like uneven wear on rod bearings or wear on the fore/aft side of the pistons).

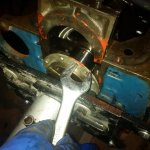
Usually a good idea to chase the threads on the manifold studs IMO. You might want to pick up a set of rethreading dies. https://www.mcmaster.com/?m=true#2667a11/=13zm5wg
I also find it helps to add a thick flat washer (aka setup washer) to the outermost exhaust manifold studs (the ones without bridge pieces).

Oh yeah, also good to replace the studs & nuts at the bottom of the exhaust manifold, with plenty of anti-seize on the threads.

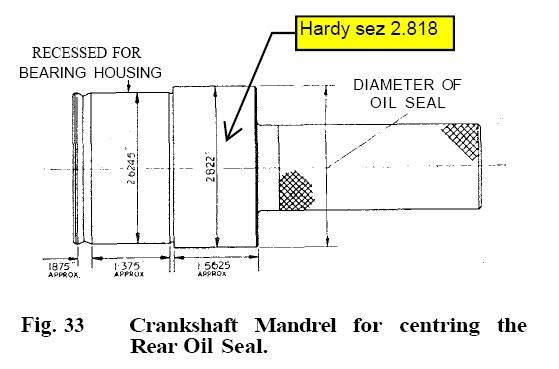
I don't see a rear main seal on your list. (thot you mentioned it before, tho). I definitely prefer the "Mad Marx" viton seal, but it isn't available through Moss. If you prefer to use the stock type seal, you should still get the corrected mandrel for setting it (the one Moss sells was still wrong, last I heard). The dimensions in the manual are wrong
Rearsealmandrel.jpg~original
 
Last edited:
I see the Mad Marx seal on E bay from time to time. Also I think TRF has it in stock.

David
 
Last edited:
Also tomorrow - the manual says using a valve spring compressor, remove split collets, inner and outer auxillary springs - don't have a valve spring compressor - do I need one or is there a work around with clamps?

I once did it with a 1x4 board with a Âľ" hole in it. Not really an approach I would recommend.

But down here in Baja Canada most auto parts chains like O'Reilly's and AutoZone have a loaner tool program wherein you can borrow the tool for free - you leave a credit card deposit for the price of the tool and get a full refund when you bring it back. For example:

https://www.oreillyauto.com/site/c/RentalTools.oap

They will also have some tools you will need later for piston installation, etc.
 
Valves are out - checked a couple of you tube videos, made a version of Randall's tool, which will be very helpful for reinstallation (note I offset the holes deliberately to be able to flip the tool and compress one springs set at a time), but I found that if I first put a rag under the valves, tap with a 10 mm socket and then medium with BFH (small hammer is in pic. for first keeper tap) with a larger socket, the keepers just fell out... onward...
(BTW - it was always the plan to replace pistons and liners with 87s)
 

Attachments

  • IMG_20160902_101330.jpg
    IMG_20160902_101330.jpg
    48.4 KB · Views: 105
  • IMG_20160902_101713.jpg
    IMG_20160902_101713.jpg
    45.7 KB · Views: 109
Some more progress...
Removed Dogbolt - a bugger until I used a ratcheting strap wrapped around the fan belt pully and cinched it to the cart the motor was on... and then wrench and BFH then slid off fan extension
Removed timing chain cover (well, my son did), removed tensioner cotter pin, tensioner bolt, removed 2 bolts on camshaft sprocket (remembered to remove tappets), removed 2 bolts on camshaft and slid it out -
Drained and then dropped oil pan
Flipped engine over and removed oil pump - took a bit of persuasion, learned to check first and remove washers so as not to have to search block for dropped ones...

Next:
Engine plate and then according to the manual:

"Remove the bearing caps, bottom halves of the shell bearings and thrust washers by releasing the tabs of the locking plates and withdrawing the bolts.
Remove also the big end bearing caps and bottom halves of the shell bearings by releasing the locking plates and withdrawing the bolts"

I foresee a challenge unscrewing the slotted bolts or maybe I just need a BF screwdriver..

Also included for your amusement is my sketchy lift of the engine - I steadied, my son used the jack...
 

Attachments

  • IMG_20160902_144553.jpg
    IMG_20160902_144553.jpg
    69 KB · Views: 112
  • IMG_20160902_132751.jpg
    IMG_20160902_132751.jpg
    42.1 KB · Views: 108
  • IMG_20160902_144543.jpg
    IMG_20160902_144543.jpg
    55.4 KB · Views: 109
  • IMG_20160902_143622.jpg
    IMG_20160902_143622.jpg
    61.6 KB · Views: 104
  • IMG_20160902_135454.jpg
    IMG_20160902_135454.jpg
    46.8 KB · Views: 113
  • IMG_20160902_134124.jpg
    IMG_20160902_134124.jpg
    39.4 KB · Views: 108
Thanks Randall, I just got them off, just took some patience and my biggest screwdriver...

I removed two caps over the main bearing front and back. The back was challenging, I was really trying to avoid pivoting it too much for fear of damaging the shaft, I eventually used a wrench as a lever against the engine stand and went side to side until released.

How do I remove the middle one? No space for me to pivot it. Also, should I now be removing the connecting rods?

I love how the manual says, "just remove X"
 

Attachments

  • IMG_20160902_155307.jpg
    IMG_20160902_155307.jpg
    51.2 KB · Views: 103
  • IMG_20160902_155720.jpg
    IMG_20160902_155720.jpg
    52.5 KB · Views: 102
It's usually not as tight as the other two. I usually just put the two bolts back in partway into the cap (not into the block at all); grab them both with one hand and wiggle/pull.

All 3 books say something different; I learned from the Haynes manual (only one I had back then) so I do it their way. Undo each con rod cap and then tap that piston & con rod out of the liner. That gives you a chance to double-check that the caps & rods are marked with the cylinder number (it's important not to mix them up, but I have sometimes found the marks missing, or once I found two #2 rods & caps but no #3 rod & cap). It also gets the rods out of the way when you turn the crank to access the other pair of caps.

There's a more-or-less legible copy of the Haynes at https://drive.google.com/open?id=0B2H2NJt34OffYTA1NTNmMGUtMTVjMy00NDEzLWJjN2YtNTc1OWRkNjE4MjY4

Someday, maybe, I'll get some better scans, but not this year.


Thanks Randall,
Connecting rods are numbered 1-4 and are now removed. Aside from cam shaft bearings/races and the head stud/bolts, we are disassembled. I am sure it will go back together just as fast... I wont be able to get to the machine shop until later next week, but will update after that. Here is a question in the meantime, can they harden the valve seats without the new valves? I expect they can use the old ones to check the valve guides, but I am unclear if they need the valves first... Still not convinced I need them, but it's one of those, while I am here, I may as well...of course pulling the head is easier than the block, so I could do it later if needed...

To those others who have PM'd me, this was, with the above help relatively straight forward. Although my wife just told me a story of their small engine mechanic teacher who drops the engine in the middle of the room, allows the kids to take it apart in a day, and then tells them it will take the rest of the semester to put it back together...

BTW, I appreciate the TRF investment idea, if I had 5K floating around though, I'd have been able to get to this project a year earlier :smile:

On a side note, the weather has improved and if I can rent a trailer tomorrow, I'll be off to the sandblaster tomorrow with the frame and shell...
 

Attachments

  • IMG_20160902_204823.jpg
    IMG_20160902_204823.jpg
    42.3 KB · Views: 88
  • IMG_20160902_204830.jpg
    IMG_20160902_204830.jpg
    52.8 KB · Views: 91
The hardened seats can be installed without the new valves; but they'll want the valves to complete the valve job.

I've had very mixed experiences with the original seats; sometimes they last just fine on unleaded fuel. But when I got TS13571L (which was a "barn find" last run in 1975 or so) running in 2008, it obviously had a severe problem with valve recession. All 4 exhaust valves were tighter than spec after just a few hundred miles of ordinary driving (mixed in-town and freeway). So I started using Redline Lead substitute, which seemed to work for awhile. But evidently I didn't use enough (or it may have been the few times where I forgot to add it), as the exhaust valves eventually started leaking badly enough to affect idle. When I got them out, it was obvious that there was severe recession but only on part of each seat.

So as a workaround, I dropped on a spare head that still had original seats. It seems to be holding up just fine with the same fuel, same driving style, etc. Valve lash has been fine each time I've checked it. IIRC that was 2013 and it's still working. My plan is still to rebuild a head and engine with hardened seats, etc. RealSoonNow. (Knowing me, it won't happen at all unless the current setup quits. And even then I'll probably just patch it up again and go on driving it :smile: )

But, pulling the head later is no big deal. With practice, you can have it off in an hour or two. (Flat rate manual gives 2 hours for the entire R&R)
 
So I found a shop with some experience with TR3s in town (I asked if they had experience with wet-lined engines, they asked what year of Triumph...) and dropped off the engine today.

They advised against lightening the flywheel, saying unless I was racing it, and then only in certain circumstances would it help. He also looked at the clutch and thought I was at 80% and recommeded going with the one I have.

He also seemed to suggest that they usually install the liners, I don't really have a problem with it, he started to talk about how they suck them down or something and then use a lathe to ensure they are proud by 3 thou.. since along the way I stopped understanding what he was talking about, I figured I'll probably have them do that.

We discussed and decided on the hardened valve seats.

He asked about the pushrods, I told him I was going with new since the old ones were mismatched.

I did not bring with me the bearing caps, but will on next visit after he evaluates the crankshaft and advises re bearing size, I will then order parts and bring over.

Also, he said they usually clean up and replace the brass bearings bits on the rockers - ummm sure, sounds good...

I left them with the camshaft as well, but i think they will just clean it up - I understand that I can (relatively) easily replace this later if I want to move to a more performance oriented camshaft.

Lastly, he mentioned that they also glass bead blast the internals of the block - I assume some sort of soak is also involved - they will then check over everything...

Back to the bodywork...

Cheers,
Kerry
 
Hello Kerry

They will probable put the block in a costic bath to clean everything off it. The bead blasting is to get any remaining rust/scale out of the block.

When I got mine back I primed it with high temp primer then painted with high temp black paint.

David

Primed block.jpgPainted block.jpg
 
Interesting comment on the flywheel. IMO it makes a big difference on the street, every time you pull away from a stop light. Although it obviously does not increase actual power, it certainly feels like more power in the lower gears as less inertia means more power available to accelerate the wheels. Make the car seem much more nimble. I'm actually running an aluminum alloy unit from Fidanza, which certainly isn't for everyone. But when the car I originally put it on got wrecked, there was no doubt in my mind that I wanted it on the replacement.

Changing the camshaft later is more of a hassle than you might think. Got to pull the front apron, which is a PITA itself, plus the head and lifters etc. Still, the stock camshaft is a good choice, if it is in good condition.

If the rocker bushings need replaced, chances are good that the shaft also needs to be replaced. The tips of the rockers should be reground as well. I had these folks do mine https://www.rockerarms.com/ and I've been very happy with the result. And the cost was about the same as what just the parts would have cost me. Just send them the entire assembly, and it comes back looking like new (except for the pedestals and end caps, which are cleaned but still show their age).
 
So, it has been a while since I posted on this, since September the engine has been in the shop. The guys knows Triumphs, but is not what you would call the speediest as it is not a main line of business, and, to be fair, I wasn't in a rush.

What has been done though includes:
Block was in the tank and bead blasted (internals)
Crank polished
rods sized
con rods honed
remove and reinstall pistons
hone mains (can't really read the writing on this one on the receipt)
install cam bushings and plugs
recondition the head
hardened valve seats
valves reinstalled

There is other stuff on the list, but the hand writing is pretty illegible - no matter, I basically asked him to do the stuff that was needed that required specialized tools (We actually discussed each step, but he was in the drivers seats as this is all new to me - $2000 CAD and I able to continue in the garage)

He also pre-fit and checked clearances on the sleeves - gave them back numbered and ready to install - same with the bearings.

The block is now on the stand and i will start the bolt up process once I learn a bit more, for now, here are some shinny metal bits :smile:


IMG_20170210_173922.jpgIMG_20170210_173931.jpgIMG_20170210_173959.jpgIMG_20170210_174024.jpg

By the way, I am finding what is left daunting, so I have posted the 3 for sale - So many projects I want to do and although the 3s are my favorite, I am not sure i will see the end of this for at least 4 years... If I can get to the roller stage before it sells, perhaps I will continue... a little torn up about it, but we will see... (link to ad in classified)

Cheers
 
Kinda off topic, who did your engine rebuild machining in yyc? I'm hoping to be doing that in the fall if I can swing the money aspect.
 
Pretty! If you ask your machinist, he should be able to lead you to a local balancer. Balancing the internals usually runs about $150...And while not mandatory in a stock rebuild, it truly is worth the money. You will need the following parts :

Crank, Pistons, rods, rod bearings, rings, flywheel, clutch, and front fan extension.

It usually only takes a day or 2.
 
Back
Top