-
 Hi Guest!
If you appreciate British Car Forum and our 25 years of supporting British car enthusiasts with technical and anicdotal information, collected from our thousands of great members, please support us with a low-cost subscription. You can become a supporting member for less than the dues of most car clubs.
There are some perks with a member upgrade!**Upgrade Now**
(PS: Subscribers don't see this gawd-aweful banner

Tips
- We have a special forum called "Member Articles" where you can submit actual articles for consideration for publication. Learn More
- Don't have an Avatar? If not, your avatar will default to the 1st character in your username. Go into "Account Details" to change your Avatar.
- Some basic forum navigation info: click
Hey - did you know if you click on the title of a thread it will take you to the first unread post since you last visited that thread?
- Hey Guest - Is your British Car Club in our Clubs database? If not, send me a PM - Basil

- Looking for a local club? Click the "Clubs" tab above and browse hundreds of clubs world-wide.
- Add Android or iPhone APP: click
- Did you know - any picture or video you add in your posts in any marque-specific forum will also get added to the Media Gallery automatically.
- A few more tips about posting and replying: click
- Hey there Guest - be sure to keep your profile page up to date with interesting info about yourself: learn more
- More tips and tricks on Posting and Replying: click
 STOP!! Never post your email address in open forums. Bots can "harvest" your email! If you must share your email use a Private Message or use the
  smilie in place of the real @
- Want to mention another member in a post & get their attention? WATCH THIS

- So, you created a "Group" here at BCF and would like to invite other members to join? Watch this!
- Hey Guest - A post a day keeps Basil from visiting you in the small hours and putting a bat up your nightdress!
- Hey Guest - do you know of an upcoming British car event?
 Pretty Please - add it to our Events forum(s) and add to the calendar! >> Here's How <<
- Hey Guest - you be stylin'
Change the look and feel of the forum to fit your taste. Check it out
- If you run across an inappropriate post, for example a post that breaks our rules or looks like it might be spam, you can report the post to the moderators: Learn More
- If you would like to try some different "looks" or styles for the site, scroll to the very bottom, on the left and click the Style Selector.
You are using an out of date browser. It may not display this or other websites correctly.
You should upgrade or use an alternative browser.
You should upgrade or use an alternative browser.
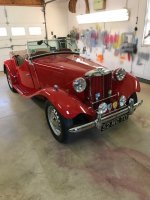
T-Series New Project, '52 TD
- Thread starter vette
- Start date
Brinkerhoff
Jedi Knight
Offline
There's an access panel on the side of the pedal box on the frame. You may have to pull the gearbox to pull the shaft out toward the center of the car, I can't remember off hand.
Offline
Yes, I have had the side cover off that access box for a few days now. But it doesn't give much accessibility. Looks to me like you might have to do some work from the top. I did notice a zerk fitting on the outside of the frame rail that looks like it is the outside end of the pivot assembly. It might also have a boss and nut arrangement there that loosens things. I'll be looking at it closer, it sure looks like it needs rebuilt. I sure wish now that i would have put this thing on my lift. I didn't want to tie my lift up for an unspecified amount of time. But doing this clutch and pedal work off of jack stands is a pain.
Dave - I'll send you my TD article. I sent a copy to Tom Morehouse. I warned him about that clutch-brake problem. Dirt & road skirm gets in there and both pedals move. That's why Jim Pauley switched to a hydraulic clutch, using another TD master cylinder. As for the brake drum, unless I'm confusing it with another car, as I recall from many years ago, the TD had 2 leading brake shoes with adjustors. Make sure they're both backed off. Be careful and don't overtighten the brass radiator cap. The tach reduction gear has a half-life of about 8 months. My tool compartment in the firewall had 3 of them - all inoperative.
Offline
Thanks for the tip Tom. I do not have that. Since I have never worked on a "t" series before I don't have any books for it. I do have a lot of literature on MGAs but I know not a lot of similarities except the "A" has similar front bearings.
I was able to download a PDF file on the TD. Here is a link to it if it comes thru. It hasn't been too bad in keeping me straight. But it is minimal. https://www.ttalk.info/MG-TD-TF-WM.pdf
Can that book be bought? Thanks.
I was able to download a PDF file on the TD. Here is a link to it if it comes thru. It hasn't been too bad in keeping me straight. But it is minimal. https://www.ttalk.info/MG-TD-TF-WM.pdf
Can that book be bought? Thanks.
Offline
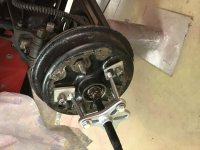
Couldn’t resist working on it this morning. Got it done just before the start of the 24 hours of Daytona. Here’s a pic of my modified puller. The drum came off. I went down to NAPA this morning they had one from OTC it was universal for any pattern of lug bolts. But at $150 I baulked. Plus it would take them a week to get it. I came home determined to make something work even if I had to weld up every piece. Thanks everyone.
Attachments
I used the W.E. Blower (waht a name) book when I bought my first TD in 1954 and kept it as a reference until I sold my restored TD around 1980. It went with the car as I swore I'd never have another TD. Working on the clutch/brake assembly was like crawling into your own coffin and performing brain surgery. When I traded my 2nd TD for a new TR3, I couldn't believe it - the pedals were suspended and you could actually work on the brake and clutch MCs standing up. But even the Blower book omitted several important points - like when dissembling the gearbox, there are 24 steel balls that come out. What the book didn't say is that were spring-loaded and when you get at them, they will fly out - all over the garage floor. Thank God they were steel and not brass or that gearbox would never have been rebuilt. My magnetic tool saved the day.
Brinkerhoff
Jedi Knight
Offline
The picture in the clutch/ gearbox section of the factory manual of the pedal box and assy. is misleading, the Moss blowup of the same is better : The clutch pedal is keyed to the shaft so all rotates when the pedal is pushed. The brake pedal just idles on the shaft. The shaft is removed from the inboard side of the box when the clutch pedal clamp bolt is removed along with an outside snap ring. There are two bushings in the chassis for the pedal shaft to rotate on. When assembled with the actuating rods adjusted you can see that the pivot on the engine sump starts to move at 6 o'clock and moves backward toward 5 o'clock when the clutch pedal is depressed. A much better way to go is to lengthen the larger rod by 1" in the center ( cut the rod in half and thread in a 5/16" stud ) by doing so , it gives a 7 o'clock starting position which allows much better leverage through the release travel since you are pulling "over center"and the rod has to travel slightly further to disengage the clutch. The end result is you'll have a much smoother engagement of the clutch . I think Moss mentions that in their notes. Good Luck !
Offline
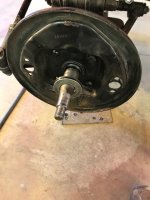
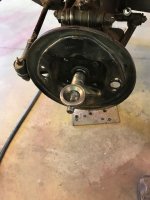
Hello Everyone, I have a minor question today but 1st I'll give a little update. I believe the clutch itself is ok and that the issue with it is in the adjustment. This car has the factory original upper rod and then also the lower adjustable rod. With only adjusting the lower rod I have gotten the clutch and trans to work smoothly. Even tho I can't take it outside right now because of the snow and the fact that I have removed the brakes, I have run it on the jackstands and I can shift it smoothly into all gears including the non-syncro 1st and also into reverse with no grinding. Only a drive alittle later on will tell for sure. The pedal pivot bushings are not as bad as I feared. It seems that a very stiff gator or rubber boot around the pedals was causing the pedals to affect each other. Tomorrow I will start to put the brakes back together but here is my question, when I removed the inner spacer that sits behind the inner bearing I forgot to observe it well. I don't know which way it goes back on, either the tapered camfered side towards the swivel pin or the flat side??? I suppose if I dug out the distance piece it might appear obvious but I have it tucked away somewhere and I forgot to look at it also.
Here are 2 pics of the piece I am talking about. Which way does it go on??
The biggest problem with the brakes is that the left side wheel cylinders were completely frozen up. But the brake assemblies on each wheel looked really clean. Haven said that the right side wheel cylinders had a lot of oxidation on the aluminum bits. The shoes were at half life and the wheel adjusters looked to me to be worn down. So I am replacing everything in the brake system including the MC because it leaked.
This car is a conundrum to me because it is in really, really Great Shape yet it has these issues. I am guessing it is a not too old complete restoration by a competent shop but has been sitting for a few years. Anyway, making progress if but slowly.
Oh yeh, just thought of another question. I thought whitworth hardware had the original whitworth threads but had standard metric wrench sizes? I have found many of the bolts on this car to fit metric wrenches but I don't have a tap and die set that matches the threads. But on a occasion I have come across a bolt or nut that doesn't seem to be metric or SAE.
Attachments
Offline
The spacer goes with the flat side facing out so that the inner bearing has a smooth surface to ride on. The taper side should fit against the spindle where it meets the inner hub.
There are people who are experts in Whitworth but from working on my friends 100-4 they are slightly different from what became UNF. As mentioned before "some" bolts on the T series had metric thread/Whitworth heads. However, other true Whitworth have Whitworth thread and heads.
There are people who are experts in Whitworth but from working on my friends 100-4 they are slightly different from what became UNF. As mentioned before "some" bolts on the T series had metric thread/Whitworth heads. However, other true Whitworth have Whitworth thread and heads.
Offline
If you're completely replacing the brake system, give a call to Abingdon Spares here in Connecticut. Those guys talked me through my TD work live on the phone - and have a huge warehouse full of new and NOS parts.
https://abingdonspares.com/
Tom M.
https://abingdonspares.com/
Tom M.


