• Hi Guest!
    You can help ensure that British Car Forum (BCF) continues to provide a great place to engage in the British car hobby! If you find BCF a beneficial community, please consider supporting our efforts with a subscription.

    There are some perks with a member upgrade!
    **Upgrade Now**
    (PS: Subscribers don't see this gawd-aweful banner
Tips
Tips

My Toyota - replacing the head gaskets...

Offline
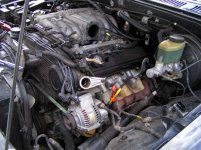
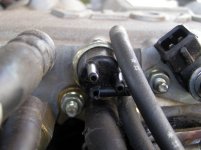
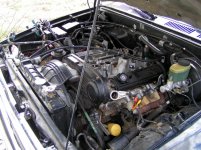
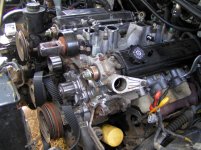
Well, I got started today... I hate it when you hit a point that you need a tool you don't have right away. I need a couple large size wrenches to unhook the EGR valve. Or even a crescent wrnech. /ubbthreads/images/graemlins/rolleyes.gif

I have the upper intake manifold loose, and tried sliding it off of the valve, but man that thing is long.

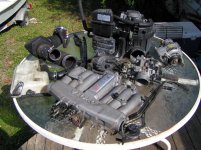
Anyway's here's where I stand so far... Lots farther to go
192057-Enginebay.jpg

I'll have to go buy more wrenches tomorrow.
 

Attachments

  • 192057-Enginebay.jpg
    192057-Enginebay.jpg
    83.7 KB · Views: 117
And already I broke some *&#% plastic vacuum sensor - *&%# it! And lost one of the washers to the banjo fitting on the cold start injector... frickafrack
192070-Broken.jpg
 

Attachments

  • 192070-Broken.jpg
    192070-Broken.jpg
    71.1 KB · Views: 103
This is why anytime I have a big project, I take it to my friends (professional mechanics) to do it. That way, if something breaks while being removed (which happens much less when they do it than when I do it,) they can replace it.
 
I can't afford a mechanic... Head gasket replacement on this thing runs a little over $3000-4000. It's a PITA, but it's got to be done. I can do it!

Well, I looked all over and found my crescent wrench /ubbthreads/images/graemlins/thumbsup.gif, so now it looks like the truck puked on my porch table...
192082-parts.jpg
 

Attachments

  • 192082-parts.jpg
    192082-parts.jpg
    116.7 KB · Views: 106
Glad I'm not involved... all the parts on yer table there look positively PREDATORY.

I'm gonna have baaad dreams.
 
Amen brother - sometimes you just gotta do what you gotta do to get by. 4k for something I could do myself is incentive enough.

Now that you can actually SEE the cylinder head, half the battle is over. /ubbthreads/images/graemlins/smile.gif
 
Hope you're usin' plenty of maskin' tape and a Sharpie to I.D. those octopus tenticles they call vacuum lines an' such, too. I'd rather rebuild Diesela's engine than have YOUR job. Press on: there is an end... Somewhere. /ubbthreads/images/graemlins/devilgrin.gif

Ten-to-four... gotta run... b'bye! /ubbthreads/images/graemlins/thirsty.gif
 
Nope, can't see the heads yet... there's a bottom to that intake. Just finished getting the fuel rails off, and breaking another plastic vacuum fitting. /ubbthreads/images/graemlins/rolleyes.gif I hope whatever these things I keep breaking are not expensive...

But the farther I get in, the more stuff I see that needs replacing anyway - the seals on the injectors were shot - lotsa cracks and such. I can also see that I'm not the first to go in this far. a couple bolts were not tight, and one connector still had a remnant of someone elses labeling effort.

Yup, I've got the marker and tape going too. Also taking pictures of the stuff I'm not labelling. Most of the vacuum lines have a distinct number on them, so the pictures will help there.

Predatory is right... I've already got a couple cuts that'll leave permanant scars.
 
Slow an' easy... you'll likely find a whole bunch of things to renew, and this'll actually be the best preventive it's seen. YOU will actually FIX things you find marginal. Sounds like ther was a "jackleg" PO involved... or a hasty wrench in it previously.
 
OOOHHH!!! MY BAD!!!! Would the fuel pressure regulator on the Tay-oatee look anythin' like the one onna Alfa?!?!

Nevermind...
 
I've been at it since around 11:30 thismorning, and it looks like I just started... Here's what it looks like now:
192102-Enginebay2.jpg

Now, it's down to looking like a real engine /ubbthreads/images/graemlins/smirk.gif

Now all I have to do is remove the radiator, the front of the engine, the rest of the intake manifold, the exhaust manifolds, the cam covers, the cams, then I can get the heads off /ubbthreads/images/graemlins/rolleyes.gif
 

Attachments

  • 192102-Enginebay2.jpg
    192102-Enginebay2.jpg
    104.9 KB · Views: 116
Nope the one on the yota does dual purpose - it is the banjo bolt that holds the fuel line onto the rail as well as the regulator.... And I haven't seen a return line yet - interesting.
 
Kenny, ya gotta add, remove the AC compressor to get to the timing belt tensioner to remove the timing belt to be able to remove the cams to get to the head bolts. Also unhook the exhaust down pipe, and all the tin on the front of the motor, plus peel back all the emissions piping on the passenger side head.
When you get to the head bolts I think they are 12 point, and don't forget the 6 point ones hiding in the passenger side rear corner and the driver side front corner outside of the valve covers.
It took me the better part of a week at the dealership to do the last one (a month or so ago)
Good luck.
Send me an email if'in ya need to
 
Aha! I got one on ya... You DON'T have to remove the A/C compressor to get the belt tensioner off (maybe one bolt). I replaced the timing belt and water pump a few months ago. Just take it off with the aluminum front bit that the fan mounts to... Then you can recompress the tensioner in a vice, put a pin in it before you reinstall... then pull the pin and turn the motor over to let the belt tighten up... No problems. /ubbthreads/images/graemlins/grin.gif The power steering pump will have to me moved though.
 
Good. any shortcuts help!
 
Yep. They do! On the timing belt replacement, another 2 steps I didn't do - remove the radiator, and remove the bottom engine cover.

I just went out and removed the fan and fan cover. That's it for me today - it's getting cold and windy - brrrr.

I still wish I had a heated garage with lots of light... I'd have her all torn down by morning. hehehe.

Time to sit back and enjoy a cold brew.
 
When I get it all off, only thing left will be a little bitty v-6 block... and the A/C compressor. I'm phsycing myself up to go start removing more parts here in a few minutes /ubbthreads/images/graemlins/smirk.gif
 
Ok, I can now sortof see the heads... Still alot to do though...
192470-Enginebay3.jpg
 

Attachments

  • 192470-Enginebay3.jpg
    192470-Enginebay3.jpg
    94.1 KB · Views: 119
And so far in one hour today, I've only sliced my finger (real close to needing stitches - but the bandaid is holding it together real good), and put a pinhole in the radiator /ubbthreads/images/graemlins/rolleyes.gif
192471-leakrad.jpg

Honest I was only gonna fix the broken engine! Not restore the danged thing.
 

Attachments

  • 192471-leakrad.jpg
    192471-leakrad.jpg
    112.1 KB · Views: 113
Back
Top