• Hi Guest!
    You can help ensure that British Car Forum (BCF) continues to provide a great place to engage in the British car hobby! If you find BCF a beneficial community, please consider supporting our efforts with a subscription.

    There are some perks with a member upgrade!
    **Upgrade Now**
    (PS: Subscribers don't see this gawd-aweful banner
Tips
Tips

Half way?

Tex,

That does look good. I am just doing the same thing this weekend to mine. That little dogleg panel is hard to form I found. How did you manage it?

Cheers,
David
 
I cheated. I purchased a complete dog leg (quarter panel) from Moss. The new ones are for post 60k cars, so are not close to fitting, but great to cut a patch like I needed. It still needed reformed and cut a little, but I haven't the skills to make such a complex panel from sheet metal.
 
I was consdering cheating as well. :smile: Haven't quite broken down yet....

Hopefully, I will share some pics of my patches over the weekend.

Cheers,
David
 
CJD said:
Hey...great to see you're back at work! Do you have the welder warmed up yet?

Funny, the only time I can work on it is when I'm not working. The only thing warming up in my garage today is a yardful of plants. If I didn't know better, I'd think I was looking for reasons to not be able to work on the TR3. Winter never lasts long here in Spring...
 
I’m working backwards in that I started by fitting the outer rocker panels and dog leg patches, (after fitting the doors and fenders) then fitted a patch for the outside of the inner sill. Today I made the inside of the inner sill patch and finally an inside fender well patch including the rear fender lower captive nut. They will have to be welded in place by a different order. My welding lessons haven’t started yet, but I want to have as much ready as possible before welding begins.
 

Attachments

  • 27538.jpg
    27538.jpg
    115.4 KB · Views: 639
  • 27539.jpg
    27539.jpg
    82.8 KB · Views: 638
  • 27540.jpg
    27540.jpg
    88.2 KB · Views: 641
  • 27541.jpg
    27541.jpg
    114.6 KB · Views: 658
And though the holes were small, I saw no need to count them all. The ‘double dimples’ in the front of the floor pan were pressed into it when it was stamped out. They allow the pan to be bolted to the inner sills just above the frame rail. As my 2nd picture shows, I didn’t have much metal left in this area. I also don’t have a 10 ton press in my garage, but I do have a 10lb hammer and can cut plywood into a die set that might work to make some patches. My neighbor loaned me his hand brake that bends a little welding lip onto the edge and also helps keep the metal straight. I drilled 3 small holes for #6 screws and nuts, just to be sure it stays in position when I pull off the tub and weld it from the bottom side. Even without welding, the 18 gauge patch makes for a much more solid floor than I had.
 

Attachments

  • 27633.jpg
    27633.jpg
    84.3 KB · Views: 574
  • 27636.jpg
    27636.jpg
    88.9 KB · Views: 571
  • 27637.jpg
    27637.jpg
    65 KB · Views: 573
  • 27638.jpg
    27638.jpg
    102 KB · Views: 571
Very Nice

Cheers,
M. Pied Lourd
 
Hi Mr Texas,

Excellent fabrication!

How did you form the "dimple" in the floor patch? Was it just by hammring on the wood form until you got the shape?

In this pic:

https://www.britishcarforum.com/bcforum/u...utCagePatch.jpg

it looks like you might need to cut back the metal a bit further above the patch, otherwise when you are welding you will just be burning through the metal/rust. When you are welding you want to weld to solid metal.

Cheers
 
rooster said:
How did you form the "dimple" in the floor patch? Was it just by hammring on the wood form until you got the shape?

Pretty much. I thought I'd be able to hammer on the wooden insert with the metal atop the wooden cut-out, but it turned out to be simplier to just use body hammers with the cut-out under it. I also flipped it over and hammered from the bottom side with the insert laying under the forming dimple. It took a few strikes, but it came out OK. It's functional, and not normal for anyone to look at the pans. The wooden cut-out was larger than than the insert by about half an inch with all edges beveled.

Thanks for the note on the rust. I think I'm back far into good metal, but I'll check it again when I clean it up prior to welding. -That was one of the simplier patches.
 

Attachments

  • 27652.jpg
    27652.jpg
    57.3 KB · Views: 585
A previous owner used an arrangement of U-bolts through the floor boards and around the frame to fasten the seat belts. The u-bolts required several additional holes to be drilled in the floor, and when tightened, bent the floor. It was bent enough that the seat rails popped up and down regularly, evetually causing stress fractures spidering out from the front and rear floor mounting holes. Yesterday, I cut out the section and made more patches to be welded.
 

Attachments

  • 27695.jpg
    27695.jpg
    76.8 KB · Views: 535
  • 27696.jpg
    27696.jpg
    75.7 KB · Views: 532
Hey time to get welding! Get the beer ready, roadtrip! By the way, I thought welding was still taught in elementary school in Houston...!?!

John
 
Tex
You are doing great work. I have been doing metal work for 34 years and have seen some "experinced" tinner's that can't do what you do. Very nice work Tex!
 
I thought they taught doggie punching, but I went to school in Pennsylvania. I have welded in the past, but it has been a very distant past. I have never done body work (or a frame off restoration) so I appreciate the feedback. I'm doing the best I can. It takes a lot of time.

My plan is to finish cutting and fitting patches with them held in exact position by temporary screws, before welding. My practice welds will be (in order) the floor boards (never seen), then trunk and fender wells (rarely seen), battery box (seen at shows and when broke down) and finally the body patches that will be exposed. The flat stuff is straight forward, it's the multiple curves that are impossible.
 
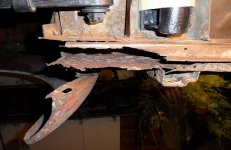
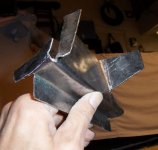
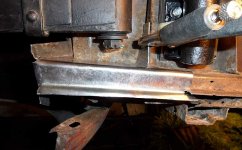
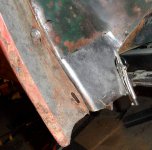
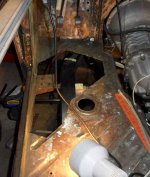
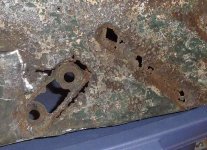
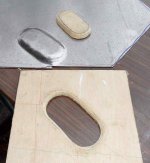
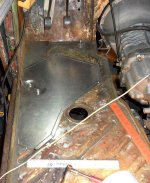
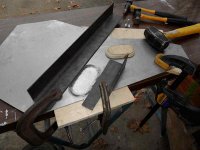
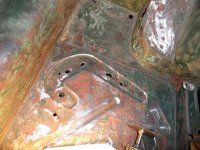
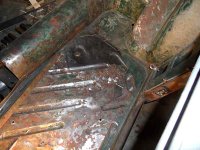
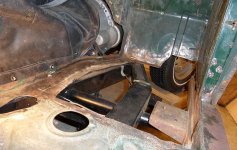
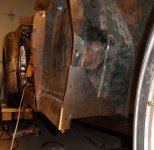
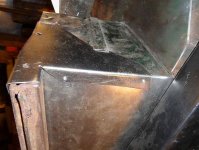
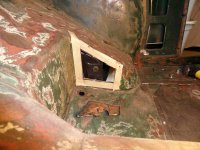
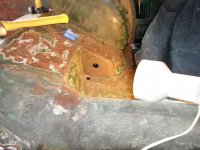
I know it's been a month since I've updated this thread, but I started another thread regarding some issues I have with the rear apron -which I need to update as well. But today I worked on the floor on the passenger side. The patch in the wheel well was almost finished but while hammering I found more rust in the seam, and had to make the patch over (larger). The floor on this side was wearing a flat patch that was spot welded on top the old floor. It wasn't rusted so bad, but the metal under it was falling apart. Along the inner sill, the tub had rusted loose from the patch, and the recessed portion (for the bolts to the outrigger) was held together by seam sealer. So, it all had to come off and be replaced. I wasn't looking forward to it, but I'm happy with how it looks now. I still have to make patches for some rust in the trunk, but I'm itching to start welding.
 

Attachments

  • 27926.jpg
    27926.jpg
    92 KB · Views: 402
  • 27927.jpg
    27927.jpg
    87.9 KB · Views: 401
  • 27928.jpg
    27928.jpg
    96.9 KB · Views: 399
  • 27929.jpg
    27929.jpg
    91.6 KB · Views: 400
Tex, I am really impressed with your metal forming. Looks great. Keep up the great work.

Cheers,
David
 
Without trying to explain "how or why", this access hole for the shock on earlier cars is obviously in the wrong place. I know I can make a mountain out of a mole hill, but sometimes Mohammid must go to the mountain. In this case, I just wanted to move the hole. -It may not seem like much progress, but if I ever need to remove that shock, this was required or the body would have to come off in order to remove that bolt...
 

Attachments

  • 27951.jpg
    27951.jpg
    116.5 KB · Views: 345
  • 27952.jpg
    27952.jpg
    89.8 KB · Views: 337
  • 27953.jpg
    27953.jpg
    88.8 KB · Views: 338
Back
Top