• The Roadster Factory Recovery Fund - Friends, as you may have heard, The Roadster Factory, a respected British Car Parts business in PA, suffered a total loss in a fire on Christmas Day. Read about it, discuss or ask questions >> HERE. The Triumph Register of America is sponsoring a fund raiser to help TRF get back on their feet. If you can help, vist >> their GoFundMe page.
  • Hey there Guest!
    If you enjoy BCF and find our forum a useful resource, if you appreciate not having ads pop up all over the place and you want to ensure we can stay online - Please consider supporting with an "optional" low-cost annual subscription.
    **Upgrade Now**
    (PS: Subscribers don't see this UGLY banner)
Tips
Tips

TR2/3/3A Finally found and fitted paper carb air filters on my TR3

TuffTR250

Jedi Warrior
Country flag
Offline
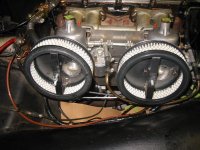
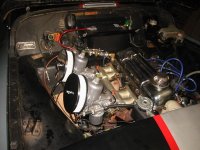
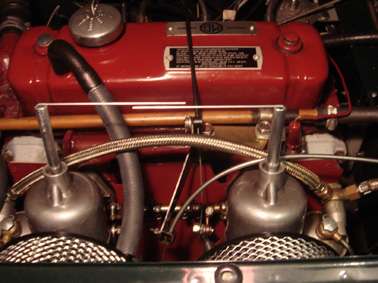
I finally found some paper carb air filters that would fit on my TR3. I had to fabricate the backing plate that bolts to the carbs since the mounting must be offset just as the stock TR3 metal mesh air filters are offset. I bought the Mr Gasket kits, number 1486 at O'Reilly's. The kit comes with a nice "blingy" chrome cover plate that fits the 6-1/2 inch diameter filter. The 1486 kit is for a 1-1/2 inch thick filter and cover plate. The 1-1/2" filter alone is number 1486A. With the offset backing plate I fabricated, there is plenty of clearance of the inner fender and of the bonnet (hood). Since I only have a saber saw to work with for cutting the metal it was a somewhat big job to fabricate the mounting plates. Would be a lot easier with a good flexible band saw. I used 16 gauge sheet metal for fabricating the mounting plate. That seems to be heavy enough. I have attached a few pictures of the mounting plate and the completed installation.
Regards,
Bob
 

Attachments

  • IMG_5871.jpg
    IMG_5871.jpg
    47.5 KB · Views: 295
  • IMG_5875.jpg
    IMG_5875.jpg
    76.1 KB · Views: 280
  • IMG_5877.jpg
    IMG_5877.jpg
    79.9 KB · Views: 295
  • IMG_5882.jpg
    IMG_5882.jpg
    69.5 KB · Views: 398

TomMull

Darth Vader
Silver
Country flag
Offline
Nicely done. Tom
 

TR3driver

Great Pumpkin - R.I.P
Offline
Nice work! How did you get the outside edge so smooth with just a saber saw?

Thanks for posting the info, got to build me some of those!
 
OP
T

TuffTR250

Jedi Warrior
Country flag
Offline
Thanks Tom and Randall! Here's how I cut it. I scribed the outline onto sheet metal using a cardboard template. I measured and trial fitted the cardboard template several times before cutting the metal. I drilled and cut the carb inlet holes first while my sheet metal was still a good size so I could clamp it to a long wooden box. Then I cut around the outside perimeter leaving it just slightly outside my scribe line. I then used my stand grinder to smooth the outside edge holding it perpendicular to the stone and turning it quickly so as to not take off to much in any one area. Then I clamped into my vise using a 1x4 on each side and filed the edges with a coarse file. Then finally I filed the outer edge with a real fine file. It is important to clamp the sheet metal tightly to the wooden box very closely to where you'll be cutting since the saber saw will make a mess and not cut good if it is not clamped down firmly. Takes many moves of the metal to get all the way around the circle since only short sections can be cut before the clamps get in the way of the saber saw.
Regards,
Bob
 

TRMark

Jedi Knight
Bronze
Country flag
Offline
Looks great, gonna add to my winter project list.
 

GTP1960

Jedi Knight
Offline
Impressive: Time for a patent Bob!

a different question(s):
how does your heater valve work?
what's going on with the electrical works on the bulkhead?
and lastly, what is that long heavy gauge wire that runs along the front wheel well( brownish orange)?
 
OP
T

TuffTR250

Jedi Warrior
Country flag
Offline
Guy, That heater valve is from an old International pickup truck. I found it on the internet. There are also some that are very similar but in plastic I chose this one because it is all metal. It works very well. I used an old TR250/TR6 hard wire choke cable and cut one wire off of it. I had to fabricate a small "connector" that slips on a peg on the valve for the choke cable wire to go through and threaded a screw in it to hold the cable wire. I had an old heater control knob from my TR250 so I used that on the inside of the car. It fit perfectly on the inside end of the old choke cable. I fabricated a small bracket that I bolted to the dash with the original dash mount bracket, so no new holes.

On the wiring on the bulkhead, I installed a GM alternator using the McMasters instructions. So I disconnected all the wires except the ground from the old fuse box. The heavy brownish wire is to bypass the main wiring harness for the alternator charging since I have not replaced the old 50 plus year old wiring harness. Unfortunately this also bypasses the ammeter. I also have a bright orange label up on bulkhead to identify that the car was converted to negative ground. I wanted to make sure that was very clearly noted and visible near the battery. Note, this in not a show car. I have several labels and green tape stuck in various places that make it easy for me to remember things.
Regards,
Bob
 

GTP1960

Jedi Knight
Offline
I've done a lot of the same electrical conversions on mine, though I required complete "kits" for my conversions, as I couldn't figure it out otherwise.

what about the orange bolt covers(?) on the carb insulators?

Thanks Bob.

best regards,

Guy
 

poolboy

Yoda
Country flag
Offline
I'm pretty sure Bob (TuffTR250) meant Dan Masters, not McMasters when he referred to the alternator swap: Right ?
 
OP
T

TuffTR250

Jedi Warrior
Country flag
Offline
Yes, I meant Dan Masters. Thanks!

Guy, the orange silicon covers on the carb insulators are covering some small brass hose barbs I installed in the carb insulators in order to connect a vacuum gauge to the intake manifold. I saw that on some forum some time back. It works fairly good. I connect both barbs to one vacuum gauge assuming that will give me a correct vacuum reading across the entire intake manifold.
Regards,
Bob
 

GTP1960

Jedi Knight
Offline
Porting the insulators is a very good idea, for your vacuum check.
no permanent alteration to the intake manifold either.

i wonder if you could get an accurate airflow vacuum reading from each carb. From those ports?
or would the cross link from the intake manifold influence it.
it would be handy, not to have to remove the air filters to ck & compare airflow.

(my hearing isn't good enough, to judge flow by ear alone)

thx
 

TFB

Jedi Knight
Country flag
Offline
Porting the insulators is a very good idea, for your vacuum check.
no permanent alteration to the intake manifold either.

i wonder if you could get an accurate airflow vacuum reading from each carb. From those ports?
or would the cross link from the intake manifold influence it.
it would be handy, not to have to remove the air filters to ck & compare airflow.

(my hearing isn't good enough, to judge flow by ear alone)

thx

You couldn't measure air flow but I think you maybe could use those ports to balance or sync the carbs.
I have several instruments to measure differential pressure,a Veloci-calc digital and the analog Magnehelic.These gauges have a + and -port,that you hook up,one to each port,doesnt matter which,and you would want a 0 reading,no pressure difference.But I don't have the ports so haven't tried it,and the location might not be the best.
I used the velocicalc with cardboard tubes mounted to front of carbs to measure air flow into the carbs but after playing around I don't think its any more accurate than the sound method.
Tom
 

TR3driver

Great Pumpkin - R.I.P
Offline
(my hearing isn't good enough, to judge flow by ear alone)
For the TR3, IMO the "SU Tool Kit" has the hot setup for balancing the carbs. No need to remove the air filters or guess at how loud the noise is. Plus, you can watch how well they stay synchronized as you open the throttle. Any lag caused by deflection in the link between the carbs is obvious (and can actually be adjusted out, if you want).
 

Geo Hahn

Yoda
Country flag
Offline
For the TR3, IMO the "SU Tool Kit" has the hot setup for balancing the carbs...

I assume you're referring to those bent wire thingies that replace the dampers and rise with the piston showing relative height of the pair?

Bit of a run-on sentence there.

Photos borrowed from an MG site:

su8.jpg


su9.jpg
 

GTP1960

Jedi Knight
Offline
I assume you're referring to those bent wire thingies that replace the dampers and rise with the piston showing relative height of the pair?

Thanks for showing that mg pic. I never bothered to read the directions before I lost them.

now it makes sense.
 

TR3driver

Great Pumpkin - R.I.P
Offline
Yup, that's them. Used to be just $7 @ JC Whitney, now like $20 @ Moss.
 

GTP1960

Jedi Knight
Offline
I assume you're referring to those bent wire thingies that replace the dampers and rise with the piston showing relative height of the pair?

Bit of a run-on sentence there.

Photos borrowed from an MG site:

su8.jpg


su9.jpg

I tried this SU tool kit (air flow) on my TR3A.
seemed to do what it is supposed to do.
but I'm wondering how close is close enough?
carb one would raise about a rod width (1-2mm) above carb two.
then #2 would catch up, and they would remain level.
this senerio was consistant at all rpm's.

Any pearls of wisdom?

Thanks.

Guy
 

TR3driver

Great Pumpkin - R.I.P
Offline
Honestly, I think carb synchronization is over-rated. Even with it pretty badly off, all you get is a bit more vibration because some cylinder are pulling harder than they would if all 4 were pulling evenly.
 
Similar threads
Thread starter Title Forum Replies Date
Rob Glasgow Finally Found It (Original License Plate Number) Austin Healey 3
drooartz Finally found one Spridgets 8
Steve P. Finally found a RWA Midget Spridgets 1
D TR6 Think I finally found a TR6! Triumph 4
Lukens TR2/3/3A Finally found the TR3 I've dreamed about Triumph 16
RickB I think my Bugeye Sprite has finally found me Spridgets 36
sqbsprite I finally found my side curtains.. Spridgets 14
B Finally found my Bugeye - Pics Posted! Spridgets 14
D Finally found one - bought it! MG 8
mctriumph TR2/3/3A Finally painted the 63 3b Triumph 14
J TR2/3/3A TR3A Finally on the Road! Triumph 6
AngliaGT Finally - A (Mostly) True craigslist Ad Other Cars 0
Grantura_MKI Pre-War Finally arrived. MG 7
J Finally getting (re) started on the Bugeye Spridgets 27
HealeyPassion Finally, paint on chassis Austin Healey 17
Lou E Finally a Bugeye of my very own Spridgets 41
AngliaGT RB Midget - Finally tracked it Down! Spotted 3
Bayless A Sprite gets some paint finally Spridgets 2
EricJNewman MGB Weird Brake issue finally solved. MG 1
J Shroud Painting ["Finally done with these"] Austin Healey 3
Rhodyspit75 Finally on the road Spridgets 7
AngliaGT MGB FINALLY Got the Engine Out MG 5
Gliderman8 TR6 It finally HAPPENED... Hood cable broke but HAPPY ending. Triumph 44
Tr3aguy TR2/3/3A Tr3 frame work finally Triumph 93
Jim_Stevens TR2/3/3A Finally- the color coat! Triumph 12
Basil I finally joined Jaguar 4
J General TR Finally on the road Triumph 1
Bayless More Sprite progress finally Spridgets 23
SherpaPilot TR6 Stromberg War, Finally Success Triumph 2
Bayless Progress finally begins Spridgets 5
tinman58 General TR Finally almost Triumph 7
J TR2/3/3A Finally getting started Triumph 20
Elva164 Finally did another onboard video! Racing 4
J It is driveable! Finally. Morris 8 Other British Cars 8
M Finally Joining the Bugeye club! Spridgets 20
simon1966 Rain cleared up so finally got out. Austin Healey 31
tomshobby TR6 Finally finished my custom steering wheel. Triumph 12
B The Prince of Darkness on the dash board finally conquered Austin Healey 10
vickxxx T-Series Finally MG 3
Sarastro TR4/4A My TR4A finally arrived! Triumph 11
B Scuttle shake finally sorted Austin Healey 23
B Finally - BJ7 painted Austin Healey 3
Jer when something doesnt make sense... and you finally figure out why ! Spridgets 4
Basil Back to the EType finally Jaguar 5
Marvin Gruber Three rebuilt BJ8 engine- FINALLY! Austin Healey 17
J TR2/3/3A Finally started 17 year old rebuilt motor! Triumph 3
L Are 100's finally eclipsing the 6 cylinder cars Austin Healey 6
trrdster2000 GT6 Finally got a photo of some of our work on the Spit 6 Triumph 2
CJD TR2/3/3A TR4 Gearbox in the TR3...Finally! Triumph 3
R GT6 Finally Finishing Triumph 19

Similar threads

Top