
-
 Hey Guest!
British Car Forum has been supporting enthusiasts for over 25 years by providing a great place to share our love for British cars. You can support our efforts by upgrading your membership for less than the dues of most car clubs. There are some perks with a member upgrade!**Upgrade Now**
(PS: Upgraded members don't see this banner, nor will you see the Google ads that appear on the site.)

Tips
- We have a special forum called "Member Articles" where you can submit actual articles for consideration for publication. Learn More
- Don't have an Avatar? If not, your avatar will default to the 1st character in your username. Go into "Account Details" to change your Avatar.
- Some basic forum navigation info: click
 Hey - did you know if you click on the title of a thread it will take you to the first unread post since you last visited that thread?
- Hey Guest - Is your British Car Club in our Clubs database? If not, send me a PM - Basil

- Looking for a local club? Click the "Clubs" tab above and browse hundreds of clubs world-wide.
- Add Android or iPhone APP: click
- Did you know - any picture or video you add in your posts in any marque-specific forum will also get added to the Media Gallery automatically.
- A few more tips about posting and replying: click
- Hey there Guest - be sure to keep your profile page up to date with interesting info about yourself: learn more
- More tips and tricks on Posting and Replying: click
 but were afraid to ask:
  STOP!! Never post your email address in open forums. Bots can "harvest" your email! If you must share your email use a Private Message or use the
  smilie in place of the real @
- Want to mention another member in a post & get their attention? WATCH THIS

- So, you created a "Group" here at BCF and would like to invite other members to join? Watch this!
- Hey Guest - A post a day keeps Basil from visiting you in the small hours and putting a bat up your nightdress!
- Hey Guest - do you know of an upcoming British car event?
 Pretty Please - add it to our Events forum(s) and add to the calendar! >> Here's How <<
- Hey Guest - you be stylin' Change the look and feel of the forum to fit your taste. Check it out
- If you run across an inappropriate post, for example a post that breaks our rules or looks like it might be spam, you can report the post to the moderators: Learn More
- If you would like to try some different "looks" or styles for the site, scroll to the very bottom, on the left and click the Style Selector.
You are using an out of date browser. It may not display this or other websites correctly.
You should upgrade or use an alternative browser.
You should upgrade or use an alternative browser.
Dash refurb
- Thread starter jvandyke
- Start date
scoutll
Jedi Knight
Offline
Dash Photos.
Top Photo shows the top aattachment point on the right end, and the lower support rod attachment.
Middle Photo shows one of the top center attachments above the switches.
Third photo shows the top end on the left side, above the fuel gauge.
Top Photo shows the top aattachment point on the right end, and the lower support rod attachment.
Middle Photo shows one of the top center attachments above the switches.
Third photo shows the top end on the left side, above the fuel gauge.
Attachments
scoutll
Jedi Knight
Offline
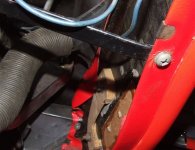
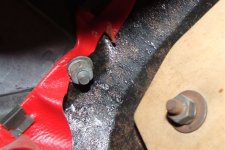
First photo shows how to access the two end attachment points. They are in the hollow gap at the end of the dash. You have to pull the door seal away to access them. The central ones are through supports and are harder to get to.
Second Photo is a close up of the upper right end.
Third photo shows an overall view of lower support rods. You can also see the upper right attachment point in this photo.
Second Photo is a close up of the upper right end.
Third photo shows an overall view of lower support rods. You can also see the upper right attachment point in this photo.
Attachments
Gundy
Luke Skywalker
Offline
jvandyke said:Got all old dash out and mocked up the new one. Looking nice to me so far. Not sure what I'll do with the hole for the windshield washer. What was that thing originally? What type of switch. I might just make it a pull switch set up for a washer motor, but I won't hook it up to anything. Or I could put my light there that I rigged up to come on when my electric fan kicks in....thoughts?
Perhaps an over ride for the electric fan? I have a pull switch which lights to indicate it is on for my fan manual switch.
Mostly it is off and I rely on the thermo switch but if
I'm say getting ready for some serious driving I just pull
the switch and the electric fan just runs till I push the switch closed. Kind of a security blanket for when I'm stressing the car.
I also had a "spare" hole in my dash. I just installed a
simple on/off switch to match the turn signal switch as a dummy switch.
It's there if I ever decide I need another switch for something.
OP
jvandyke
Luke Skywalker
Offline
scoutll said:First photo shows how to access the two end attachment points. They are in the hollow gap at the end of the dash. You have to pull the door seal away to access them. The central ones are through supports and are harder to get to.
Second Photo is a close up of the upper right end.
Third photo shows an overall view of lower support rods. You can also see the upper right attachment point in this photo.
Wow Bryan, that is indescribably helpful! You must have really had a problem with my
Chris Craft dash, eh?
I don't have those support bars at the bottom but I can probably make some, unless some out there has some spares they could part with.
My old wooden dash just had two PO screws in the upper corner, it wiggled going down the road and once the nut worked loose and dash fell in my lap....nice, it was sorta pretty though.
BTW what is that auxiliary pull you have mounted under the dash?
OP
jvandyke
Luke Skywalker
Offline
Gundy said:Perhaps an over ride for the electric fan? I have a pull switch which lights to indicate it is on for my fan manual switch.
Mostly it is off and I rely on the thermo switch but if
I'm say getting ready for some serious driving I just pull
the switch and the electric fan just runs till I push the switch closed. Kind of a security blanket for when I'm stressing the car.
I also had a "spare" hole in my dash. I just installed a
simple on/off switch to match the turn signal switch as a dummy switch.
It's there if I ever decide I need another switch for something.
My electric fan has a three way toggle; sensor/on (over ride the sensor)/all off. I rigged a light so if it turns on, either by the sensor or manual, I know it. I also rarely need the fan.
That was my thought on the extra hole too; mount a switch for future use, some day I can reinstall the cheap electric windshield washer pump if ever get "bored" and am looking for something non critical to do on the car.....fat chance!
scoutll
Jedi Knight
Offline
The extra switch on the bottom is for the heater fan. The original started working dodgey, and since they have a bit of a rep for the hot wire breaking and shorting out, I deciced to bypass it and install my own switch. Works a lot better.
The lower supports are just flat pieces of steel stock, about 3/8 inch thick and about 1/2 inch wide. It should be pretty easy to work out the bends in them if no one has some spare ones. Try sending a PM to MightyMidget. He was parting out an early car a month or so ago.
I think there are only three attachments at the top. One each end and one center. I can't remember on for sure if they added an extra center one on the MK1, but I think they are the same as the bugeye.
If you want, I can try emailing the pdf for the body section out of the BMC manual.
Gundy
Luke Skywalker
Offline
jvandyke said:Gundy said:Perhaps an over ride for the electric fan? I have a pull switch which lights to indicate it is on for my fan manual switch.
Mostly it is off and I rely on the thermo switch but if
I'm say getting ready for some serious driving I just pull
the switch and the electric fan just runs till I push the switch closed. Kind of a security blanket for when I'm stressing the car.
I also had a "spare" hole in my dash. I just installed a
simple on/off switch to match the turn signal switch as a dummy switch.
It's there if I ever decide I need another switch for something.
My electric fan has a three way toggle; sensor/on (over ride the sensor)/all off. I rigged a light so if it turns on, either by the sensor or manual, I know it. I also rarely need the fan.
That was my thought on the extra hole too; mount a switch for future use, some day I can reinstall the cheap electric windshield washer pump if ever get "bored" and am looking for something non critical to do on the car.....fat chance!
Sweet! I like the indicator light functioning with "auto"
selected too.
One day I may do that to mine. I hope to find a use for that dang switch one day too.
OP
jvandyke
Luke Skywalker
Offline
scoutll said:If you want, I can try emailing the pdf for the body section out of the BMC manual.
I've got a Bentley. Never thought it would be that detailed but I'll look.
OP
jvandyke
Luke Skywalker
Offline
Gundy said:One day I may do that to mine. I hope to find a use for that dang switch one day too.
I have a momentary push that I could put there for the washer. If it doesn't look too funny.
OP
jvandyke
Luke Skywalker
Offline
How is the starter cable routed? I had mine where the choke knob should be, direct shot at the solenoid, if it's by the tach, how does it cross over to the solenoid? Wonder why they moved it there? Nervous passengers engaging the starter thinking S stood for Stop?
scoutll
Jedi Knight
Offline
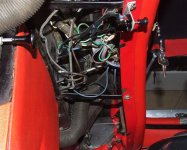
The starter pull issue was discussed in depth some time ago. It seems the bugeye had the starter pull on the right side of the car whether it was right or left drive. The Spridgets have it on the drivers side next to the tach. On the right had drive car, it is a direct pull and on the left hand car it snakes along the firewall, behind the battery tray then down to the solenoid.
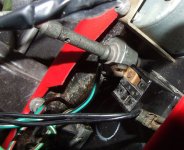
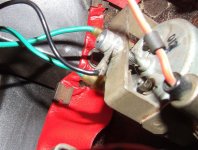
The cable is the one with the green wire ties on it in the photo. I put some vacuum hose on mine to make sure it never contacts anything electrical and shorts (lots of inprotected electrical connections in these cars). The choke cable is the one that comes through the right side firewall beside the battery and goes underneath the heater fan duct.
The cable is the one with the green wire ties on it in the photo. I put some vacuum hose on mine to make sure it never contacts anything electrical and shorts (lots of inprotected electrical connections in these cars). The choke cable is the one that comes through the right side firewall beside the battery and goes underneath the heater fan duct.
Attachments
OP
jvandyke
Luke Skywalker
Offline
electrical gauge choices
I'm wondering if I should have made a hole in my dash for a ammeter or voltmeter. I originally had an ammeter but it's needle got stuck pegged on 50 amps (during electrical work no doubt I did something silly) I replaced with a voltmeter that gives better info anyway. I just now "unstuck" the ammeter needle. Should I;
1) stop and drill a hole through the dash for either amp or volt meter
2) continue and mount either or both hanging below the dash or wherever
I was working off option 2 but now I'm worried I'd never find a good place to mount an auxiliary (is there one?). Hmmmmm
Gundy
Luke Skywalker
Offline
Re: electrical gauge choices
I'm leaning toward a dash charge warning light in my dummy switch location.
I couldn't find a good hanger spot under the BE dash.
Knees, line of sight,shifter etc. means that will not work for me.
Cutting the dash isn't a big deal. It has
extra holes now.
I'd like to use a warning light but I bet before it's over
another hole is going in the dash. I like gauges.
OP
jvandyke
Luke Skywalker
Offline
Re: electrical gauge choices
I'm thinking I'll proceed as is. When it's all back together I will decide where to put the voltmeter (with the original generator it's a must have, when I run at night I hover on the brink of discharge).
I can add an under dash holder or retro fit one in the dash then. If the dealers could do it in the day, I can too.
Today I tackled the lower pad rail. Tore off old red vinyl (very carefully) used that above mentioned spray adhesive to reattach black. I think it turned out very well, again, more puckers at the corners than I pro would get but I'm okay with it. Might try the top one yet tonight. I don't have an original top crash pad, P.O. had made one out of wood. I was going to use that for a base. Was going to glue down some foam pad but now I think I'll go right over the wood. Won't be soft but will look good....I think.
OP
jvandyke
Luke Skywalker
Offline
Re: electrical gauge choices
Hey, thanks, it's turning out really well.....so far.
Today I covered the wood top rail with vinyl. I did not add padding though. Looks good to me. Got the corners pretty good. Now I'm waiting on some funds to clear so I can order up from VB, hope their winter sale lasts another couple days. But the weather is turning here and I'm going to get caught with a decent day and an inoperable Midget, which is a sin in these parts. Might have to cobble together the bits and pieces just so I can get back on the road!
I did take apart the tach and speedo too add a second hole for another bulb each, cleaned the glass and chrome nice an purdy while I was at it. Pretty confident all will be well in another week or so. Time to start planning some serious road trips!!!!!!!! I might even take her to work a time or two this spring.