
-
 Hey Guest!
British Car Forum has been supporting enthusiasts for over 25 years by providing a great place to share our love for British cars. You can support our efforts by upgrading your membership for less than the dues of most car clubs. There are some perks with a member upgrade!**Upgrade Now**
(PS: Upgraded members don't see this banner, nor will you see the Google ads that appear on the site.)

Tips
- We have a special forum called "Member Articles" where you can submit actual articles for consideration for publication. Learn More
- Don't have an Avatar? If not, your avatar will default to the 1st character in your username. Go into "Account Details" to change your Avatar.
- Some basic forum navigation info: click
 Hey - did you know if you click on the title of a thread it will take you to the first unread post since you last visited that thread?
- Hey Guest - Is your British Car Club in our Clubs database? If not, send me a PM - Basil

- Looking for a local club? Click the "Clubs" tab above and browse hundreds of clubs world-wide.
- Add Android or iPhone APP: click
- Did you know - any picture or video you add in your posts in any marque-specific forum will also get added to the Media Gallery automatically.
- A few more tips about posting and replying: click
- Hey there Guest - be sure to keep your profile page up to date with interesting info about yourself: learn more
- More tips and tricks on Posting and Replying: click
 but were afraid to ask:
  STOP!! Never post your email address in open forums. Bots can "harvest" your email! If you must share your email use a Private Message or use the
  smilie in place of the real @
- Want to mention another member in a post & get their attention? WATCH THIS

- So, you created a "Group" here at BCF and would like to invite other members to join? Watch this!
- Hey Guest - A post a day keeps Basil from visiting you in the small hours and putting a bat up your nightdress!
- Hey Guest - do you know of an upcoming British car event?
 Pretty Please - add it to our Events forum(s) and add to the calendar! >> Here's How <<
- Hey Guest - you be stylin' Change the look and feel of the forum to fit your taste. Check it out
- If you run across an inappropriate post, for example a post that breaks our rules or looks like it might be spam, you can report the post to the moderators: Learn More
- If you would like to try some different "looks" or styles for the site, scroll to the very bottom, on the left and click the Style Selector.
You are using an out of date browser. It may not display this or other websites correctly.
You should upgrade or use an alternative browser.
You should upgrade or use an alternative browser.
OP
Tinster
Guest
Guest
Offline
More tomorrow PM
Harry_Ward
Jedi Knight
Offline
Dale,
That's great! Thanks for the update. Now I can get some sleep tonight!
/ubbthreads/images/graemlins/thumbsup.gif
That's great! Thanks for the update. Now I can get some sleep tonight!
/ubbthreads/images/graemlins/thumbsup.gif
Harry_Ward
Jedi Knight
Offline
Don,
I still have it open where is the title all I see is
From Tinster TR6
Engine Noises
catagory autos & vehicles
maybe you can copy and paste the link into your browser window and it will take you there.
https://www.youtube.com/watch?v=7_ISYaqITnY
I still have it open where is the title all I see is
From Tinster TR6
Engine Noises
catagory autos & vehicles
maybe you can copy and paste the link into your browser window and it will take you there.
https://www.youtube.com/watch?v=7_ISYaqITnY
OP
Guest
Guest
Guest
Offline
I hear a bad tappet.
Brosky
Great Pumpkin
Offline
Dale, the key here is the position of the distributor housing in the top pic in relation to the bottom pic. Note that the housing is much closer to the block in the bottom picture, so you have moved the cap and wire position, but not the rotor, since the rotor is connected to the shaft and is independent of the housing.
Start by getting the engine and distributor rotor to look just like it does in the bottom picture, aimed at the #1 tower wire.
Put a little mark or dab of paint (Wendy's nail polish will do nicely) on the housing at the bottom of the number one plug tower, or lining up close but not exactly, since you have the timing advanced, with the rotor at TDC in the bottom (now running position) picture.
Now loosen the distributor screw/square nut clamp and turn it to where the distributor/advance is in the same position as the top picture.
Now get the wires back to where they should be, by moving the wires on the cap to get you to the same position as if the rotor were moved clockwise the same amount as the housing has moved the cap, which I approximate to be one plug wire, as pointed out in a previous post.
When you take off the cap you will see the rotor now faces a different spot on the cap than before. Put the number one wire in that spot and move all of the wires over either one or two positions, depending on how much you moved the housing and you'll be back in business with the correct firing order and room to move the distributor for adjustment purposes.
JeffS
Jedi Trainee
Offline
Dale, I'm going to send you a good rotor! I thought I gave you one before? Its the type that says "remove to oil" on top. The car sounds good, but I agree that you have a tappet issue - probably just an adjustment. Good thing you ordered that spare gasket for the valve cover?
Congratulations! You'll be driving it this weekend!!!
Congratulations! You'll be driving it this weekend!!!
kc_doyle
Jedi Trainee
Offline
Dale, I've been just sitting quiet and reading the mail. You have impressed me so much with your "hang in there" attitude. I've really had nothing to offer to the "help." Some of the things that I know were expressed so much better by others. This is a great group. I'm so glad that Snake turned me on to it.
Harry_Ward
Jedi Knight
Offline
Paul,
I think it's because Dale just likes to keep us all in major suspense mode. Just when you think he's gonna give up and light it on fire he comes back with the magic. The once dead Crypt Car is laughing at that crusher now! Can't wait for the next episode either. Tappet adjustment 101 anyone?
/ubbthreads/images/graemlins/smile.gif /ubbthreads/images/graemlins/eek.gif /ubbthreads/images/graemlins/jester.gif
Brosky
Great Pumpkin
Offline
Harry, we all know that this stage it will never end because Dale has now been bitten by the same bug that got all of us. Once he gets it running and really starts to enjoy it, he'll start to find additional items to tweak or paint or whatever, but he'll keep busy.
Wait until he starts taking in shows and sees other cars with accessories on them or modified in a way that he wants to do his. All of these cars are a work in progress, whether they're a driver or a trailer queen and anything in between.
His blood is slowly changing from red to the nice yellow gold tint of Castrol GTX 20-50W.
OP
Tinster
Guest
Guest
Offline
I was actually 9 hrs billable today-Wendy happy.
Paul- if I rotate the vaccuum lines horizontal to
engine like yours; when I remove the cap, my rotor
is sitting almost directly beneath YOUR #3 wire.
Which puts MY #1 about 120* counterclockwise from YOUR #1 wire.
Paul- if I rotate the vaccuum lines horizontal to
engine like yours; when I remove the cap, my rotor
is sitting almost directly beneath YOUR #3 wire.
Which puts MY #1 about 120* counterclockwise from YOUR #1 wire.
OP
Tinster
Guest
Guest
Offline
Art- muchas gracias amigo!
I am not adverse to putting in long hours to
accomplish a given task. Before I begin your
task of statically re-timing the Crypt Car,
here is some data to review. Once you and anyone
else who cares to post an opinion has commented
upon this data---and agree I have not timed this
car properly......
then I will take everything apart and start over.
But please review the data presented.
Data: firing order 1,5,3,6,2,4
Data: engine idles at smooth 850 - 900 rpm
Data: Carbs new-never fine tuned to my car
Data: mixture is rich, I can smell it.
Data: mixture is rich- #6, 5, and 4 black plugs
Data: engine shuts down quickly with only one
backfire thru the carbs. No shudders or shakes.
data: when rotor arm is directly beneath #1 wire in
dizzy cap... the heavy etched line on my pulley
wheel is 1/8 inch PAST the marker arrow point.
Data: My new timing light has 0 to 60 on an adjustment
knob. Everything I am discussing here was with the timing
light set at -0- . I rotated the dizzy until the strobe
light showed the pointer arrow and etched heavy line exactly
together.
With all plugs pulled, rotor arm still on #1 wire,
and with the timing markers as above-- I view the
following when looking down into the plug holes
with a bright light:
cyl #1 -- piston appears at top, no valves seen.
cyl #2 -- no piston seen but a valve is extended downward.
cyl #3 -- No piston seen but a valve is extended downward.
cyl #4 -- nothing seen, black hole
cyl #5 -- nothing seen, black hole
cyl #6 -- piston appears at top, no valves seen.
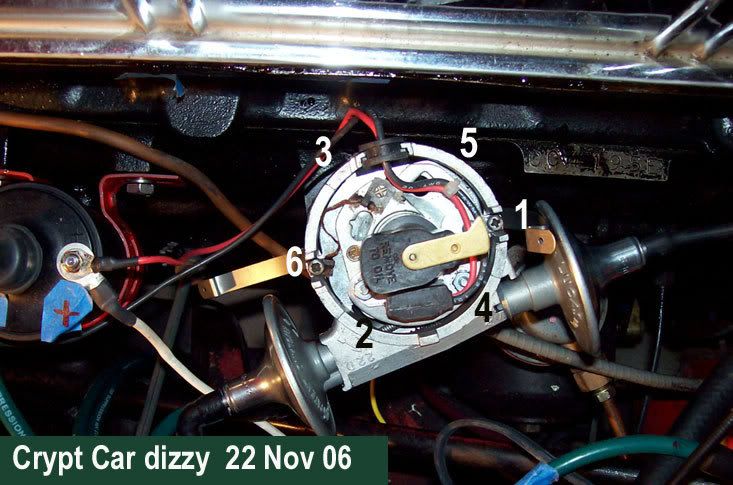
Photo of dizzy and firing order, as is, running condition.
Yes, there is a noisy valve I must deal with anyway.
I have often wondered why there is a TR250 block in
my car. Cylinder compression is 160 pounds. Could
this car have an aftermarket cam of some kind?
Finally, my goal is to be able to drive the Crypt
Car the 5 or 6 miles to a proper mechanic.
Thanks,
dale
I am not adverse to putting in long hours to
accomplish a given task. Before I begin your
task of statically re-timing the Crypt Car,
here is some data to review. Once you and anyone
else who cares to post an opinion has commented
upon this data---and agree I have not timed this
car properly......
then I will take everything apart and start over.
But please review the data presented.
Data: firing order 1,5,3,6,2,4
Data: engine idles at smooth 850 - 900 rpm
Data: Carbs new-never fine tuned to my car
Data: mixture is rich, I can smell it.
Data: mixture is rich- #6, 5, and 4 black plugs
Data: engine shuts down quickly with only one
backfire thru the carbs. No shudders or shakes.
data: when rotor arm is directly beneath #1 wire in
dizzy cap... the heavy etched line on my pulley
wheel is 1/8 inch PAST the marker arrow point.
Data: My new timing light has 0 to 60 on an adjustment
knob. Everything I am discussing here was with the timing
light set at -0- . I rotated the dizzy until the strobe
light showed the pointer arrow and etched heavy line exactly
together.
With all plugs pulled, rotor arm still on #1 wire,
and with the timing markers as above-- I view the
following when looking down into the plug holes
with a bright light:
cyl #1 -- piston appears at top, no valves seen.
cyl #2 -- no piston seen but a valve is extended downward.
cyl #3 -- No piston seen but a valve is extended downward.
cyl #4 -- nothing seen, black hole
cyl #5 -- nothing seen, black hole
cyl #6 -- piston appears at top, no valves seen.
Photo of dizzy and firing order, as is, running condition.
Yes, there is a noisy valve I must deal with anyway.
I have often wondered why there is a TR250 block in
my car. Cylinder compression is 160 pounds. Could
this car have an aftermarket cam of some kind?
Finally, my goal is to be able to drive the Crypt
Car the 5 or 6 miles to a proper mechanic.
Thanks,
dale
Brosky
Great Pumpkin
Offline
Dale, the 0-60 on your timing light may be for setting total advance and not what we need to explain here at this time. Keep it set at 0 zero for your work.
Next, if you rotate the distributor in a clockwise manner enough to get it away from the block, you can then move the wires on the cap to be at the original #1 postion which will probably be your #5. You will only want to move it enough to get the #5 where #1 is now. Then all of the wires can be moved over clockwise one position and then reset the timing with the light and lock it down.
Next, if you rotate the distributor in a clockwise manner enough to get it away from the block, you can then move the wires on the cap to be at the original #1 postion which will probably be your #5. You will only want to move it enough to get the #5 where #1 is now. Then all of the wires can be moved over clockwise one position and then reset the timing with the light and lock it down.
Harry_Ward
Jedi Knight
Offline
Dale,
The way the timing is set up for now is fine in my opinion based on the info so far. As paul said you can parallel the distributor so your vacuum advance is not so close to the block and move the wires over but if that's not a problem with you leave it where it is (it runs). If it were me I would then check the valve(s) then lean out the rear carb if the plugs still turn black after the valve adjustment. Nothing worse than going through this and bending a pushrod because it is not adjusted correctly. After that I would think you would be good to go to the beach (if it's close by) for that thru the windshield shot and then get the 5-6 miles to see the mechanic. Oh, and it didn't sound like it had a trick cam to me but then again little speakers poor quality.
Enjoy the ride! And don't forget to /ubbthreads/images/graemlins/smile.gif