• The Roadster Factory Recovery Fund - Friends, as you may have heard, The Roadster Factory, a respected British Car Parts business in PA, suffered a total loss in a fire on Christmas Day. Read about it, discuss or ask questions >> HERE. The Triumph Register of America is sponsoring a fund raiser to help TRF get back on their feet. If you can help, vist >> their GoFundMe page.
  • Hey there Guest!
    If you enjoy BCF and find our forum a useful resource, if you appreciate not having ads pop up all over the place and you want to ensure we can stay online - Please consider supporting with an "optional" low-cost annual subscription.
    **Upgrade Now**
    (PS: Subscribers don't see this UGLY banner)
Tips
Tips

Bondo, where to start

TexasKnucklehead

Jedi Knight
Country flag
Offline
I'm as ready as I can be. Aside from time and warmer temperatures, all I lack is experience and know-how. My neighbor has been a great adviser, but we can't seem to get a day to actually put on some bondo. Where do I start?

My tub and all the panels have been primed with epoxy primer and "bumped" as well as I can expect. I have a gallon of Rage Gold, some hardener, red scotch brites, sanding blocks and paper, paint thinner, lacquer thinner, grease and wax remover, high-build primer, hardener, mixing cups, HLVP gun with 1.8mm tip...

I've been reading on the web and see a number of different preferences. A consensus is not possible, but since I had the tub epoxy primed about 6 months ago, I plan to 'rough the surface' with the scotch brites before applying filler. When do I wipe down with wax remover or thinner? Before sanding, or after? I'd like an outline of the steps to take and any insight that might help with my first attempt at body work. The directions on the Evercoat can specify drying time from 75 to 80 degrees, what if I'm outside that temperature range? I'd really not like any of the filler to fall off while I'm on my first test drive.

Suggestions welcome.
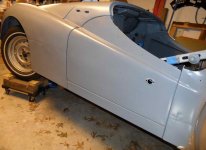
pre_bondo.jpg
 
D

DougF

Guest
Guest
Offline
How bad are the areas you are working with? What type of blocks are you working with, ie. length, hard, soft, etc.?

Only mix up as much filler as you feel you can spread within a minute or so. Does Rage Gold use a hardener or a catalyst? Hardeners allow for a longer spreading time while catalysts set up pretty quickly. Catalysts also get very hard to sand if left to sit for a few days. Probably best to start with a smaller amount to get a feel for it. When spreading, you want to lay a smooth layer. Don't worry about getting it perfect, just try to avoid leaving low spots.

Cooler temps. will take longer to set up while hotter temps will make you have to work fast.
 

jsfbond

Jedi Warrior
Country flag
Offline
Always wipe before sanding, or you risk burying small amounts of contaminants in the scratch. The amounts are small, but when it comes to painting, the small amounts can leach up into the surface, disrupting the color coat and possibly the clear as well.
 

bobhustead

Senior Member
Gold
Country flag
Offline
Various fillers are suited to various purposes. For general filling in the field of a panel, I like a product called Dolphin Glaze. Comes in a bag and goes on soft, a bit like toothpaste. Self levelling and sands easily. Defects that run into panel edges or which will flex in use (e.g. spare tire door on a TR3) work well with a fibre filled product like Tiger Hair or Kitty Hair. Make sure to thoroughly mix all fillers with hardeners to avoid that little soft spot in the middle of your work, which you discover on final sand when you think you're ready for paint. As for tools, use sticky back sandpaper strips that adhere to shaping tools. 120 grit or 80 grit are ok for fast initial shaping. A long flexible steel faced plastic block with removable stiffener rods, available from outfits like Eastwood, will be good for insuring flatness on filled flat panels and uniform shape on outside curves. For inside curves, numerous shapes in semi-flexible plastics are available, but look as well at things like pool noodles and thin wood dowels that are of appropriate diameter to your shape. Small rectangles of camping sleep pad or plywood wrapped in wet or dry paper are also useful.
Bob
 

CJD

Yoda
Country flag
Offline
1) Start with hammer and dolly. You need to be sure you will not need more than 3/8" filler, or you have metal work to do to get it closer.

Then, roughen the surface at and around where you plan to fill. I use 60 grit, but even scotchbrite is fine.

2) Mix the filler on a flat board. Note how much hardener you use. Mix thoroughly, but do not introduce bubbles by mixing too fast. If you use to little hardener, or it is to cold out, you will end up with a gooey mess that takes days to harden. To much hardener, or to hot, and it will light off before you finish spreading. Of the too options, to much hardener is preferred!

3) Spread smoothly over the surface, and past where you think you need it. You picked the best filler for smoothness in spreading. Once the filler lights off (told by when it clumps instead of spreading smoothly), stop and wait.

4) When the filler is firm, but prior to being hard, take the high spots off using a cheese grader...infinitely faster than sanding! Follow up with 60 grit paper on a block.

5) Repeat. It is best to use several thin coats rather than one messy thick one!

6) When completely satisfied, apply a thin topcoat of glaze, like Bob recommended. It spreads very smoothly...much more so than the bulk filler, and fills all the sanding scratches. Sand with 100 grit.

7) Prime with a good high-solids primer to fill any sanding scratches and seal the filler, which is actually very porous.

John

And oh yeah...do not even think about using polyester products, like body filler, below 60 degrees. Been there, done that , but never again for me!!!
 

PatGalvin

Jedi Warrior
Country flag
Offline
Tex, I can lend you some DVDs that walk you through the process if you want. They are very helpful to kick start the fun. I've gone through 3 gallons of filler on my car (most of it ends up on the floor) and so I feel like I've got some good experience in this area. First, you should clean your panel. Soap and water (Dawn detergent). Then, wax and grease remover for final clean wipe (not paint thinner). Then, put some moderate grit paper on a long hard sanding block and sand in an X pattern along the panel, to expose the low spots. You don't need to fill the entire panel, I assume. Let the sand paper expose the low areas, unless you have a very experienced hand and can feel them.

Polyester Filler (Bondo) likes deep scratches as it's a mechanical adhesion. So, use 40 or 80 grit and scratch the low areas real well so the filler will bite. Mix your filler and press it hard and well into the scratches. Slightly overfill those areas.
2012-06-10122946Large_zps852358b9.jpg


P1220007.jpg


When nearly hardened, either use cheese grater (from body store) or use 40 grit sand paper, again, sand in X pattern. You are now shaping, not smoothing. Get your shape in 40 or 80 grit until you are satisfied. If you use finer grits, you will be smoothing and not shaping. And you will be working way too hard!

002Large.jpg


027Large_zpsa10cfa8d.jpg


Then, either go back with a skim coat of filler or use Dolphin Glaze (or any two-part) glazing putty, to fill all the sand scratches that you made with your coarse grit paper. Sand that with around 80 or 120 grit. At that point, your panel should look pretty good, but still with scratches. Then, scuff the parts of the panel that you didn't previously sand. If you have bare metal showing (and you probably have some burn thru spots), you should prime with a "direct to metal, DTM" primer, or with epoxy primer (my favorite).

frontapronprepaint_zps3c2db99b.jpg


Then, apply your high build primer. High build polyester primers are like sprayable bondo and you can really load those up on the panel. Slick Sand and Feather Fill are high build poly primers. High build urethane primers don't build as fast and shrink more (so take longer to cure out completely). I would use a high build polyester primer on a panel that required significant filler. Three coats of that and block it out with 180 grit paper using guide coat.

PA140006Large_zps129b78bd.jpg


After 180 grit, you can hit it with two coats of urethane primer, apply guide coat, block sand with 400 or 600, and apply your finish (sealer, color, clear).
PM me if you want to chat about this stuff. I've taken the last year to study and practice body work and can give you lots of tips. Also, check out "Autobodystore.com" where they have a fantastic forum and fair prices with excellent customer service. I hope it's OK to mention this vendor, as they don't compete with the vendors on this site.

Have fun. You'll learn a lot on your first few panels.

Pat
 

CJD

Yoda
Country flag
Offline
oh no...been blinded by the bondo!
You guys know that English sheet metal is some of the best to work back to smooth!
sorry i can't help it but if you have worked on various old cars you learn to reshape good steel, cut out and replace the rusted. I love working with English metal!

So, is it English, or German they found laying around??

John
 

PatGalvin

Jedi Warrior
Country flag
Offline
I've taken two metal working classes from a master metal worker - (tinmantech.com). Kent White used to rebuild Ferrari bodies and other classics for Harrah's Auto Museum. I learned to shrink, stretch, and shape metal. I spent 1.5 days with a pick and file, reshaping the spare tire cover on my TR3. And, it still needed a skim coat of filler. It really takes a master craftsman to weld in patch panels and planish the area, requiring just primer and sanding prior to paint. That's not amateur hour. Those are serious metalworking skills. I am nothing short of in awe of guys that can deliver that kind of work. But for me, I'll try and keep the bondo to 1/8 inch or less and live with the consequences.....

oh no...been blinded by the bondo!
You guys know that English sheet metal is some of the best to work back to smooth!
sorry i can't help it but if you have worked on various old cars you learn to reshape good steel, cut out and replace the rusted. I love working with English metal!
 

M_Pied_Lourd

Darth Vader
Country flag
Offline
Well said Pat and I totally agree.

Cheers
Tush
 

M_Pied_Lourd

Darth Vader
Country flag
Offline
Pat, quick question.

My route is as follows.

2 Part Etch Primer on Bare Metal
Epoxy Primer over that
Filler Applied over expoxy where required
Polyester (Slick Sand) over epoxy
Sealer
Base
Clear

Is it a requirement to do a 2K Urethane Primer after the Polyester? Hadn't planned on it....

Cheers
Tush
 

CJD

Yoda
Country flag
Offline
All filler is porous. You will need some kind of sealer/primer over the polyester, or the filler will soak up the base coat of paint.

I go the primer route, and wet sand with 400 grit and a long block to remove any waviness whatsoever. When you can sand the entire surface using the block and have no low spots that the paper doesn't reach, or high spots that sand through to metal, then you are ready for the base coat.

I often have to spray 3 or 4 times with sanding between before I am satisfied that the surface is wave free. A trick is to use different color primer for the first coat, so that as the subsequent layers are sanded you can see when the top layer is getting thin...it starts to show the "base" primer before you go all the way to bare metal. The bottom coat is off color...and subsequent layers are closer to the color the car will be painted. (for example, on my silver car I used black for the bottom primer and grey for the subsequent coats...the silver covers the grey easier than it covers black)

For a decent paint job you cannot short cut the primer preparation! Before the 2 part primers, I would wait a month between coats to make sure the primer was totally dry before sanding. If it continued to cure after sanding, you would get waviness.

The 2 parts are grossly expensive, but well worth it in prep time to do a first rate paint job.

John

Oh, just thought of something else. I know the paint shops now recommend priming before applying the filler...but I just can't bring myself to do it in that order. My reasoning is that I want to speed the filler/glaze, so I use very coarse, 60 grit paper. There is no way to feather the sanding on the filler so as not to go completely through the primer around the edges. So my view is, why bother using the primer under since I am going to sand it completely off around the edges?

Anyway, that's just me.
 

pdplot

Yoda
Country flag
Offline
My wife and I once spent hours preparing a Corvair convertible for painting. Bondo, filing, sanding, more sanding until it was a smooth as a baby's tush - I even checked the panels with a straightedge. Then off to the paint shop (Maaco) for black enamel paint. Result? Horrible. It looked wavy like it had been in an accident. I was told that "black is merciless" but this was ridiculous. Every little imperfection showed. Remember this - paint will not hide imperfections. And black paint is the worst.
 
OP
T

TexasKnucklehead

Jedi Knight
Country flag
Offline
Thanks for all the suggestions. It looks like I'm on hold for some warm weather.

In line with what Pat said, my metal working skills are far better than when I started, but still far from exceptional. I am happy with the work and confident that less than 1/8" of bondo will make it look even better. Knowing how thick the bondo was before I stripped it off, I'm sure to have less. I am not a professional body man, but would like my car to look less like it was done by a novice (that I am).

I don't see the need for significant 'shaping', but much hiding of welding scars, low places, dimples where a dolly can't be used (like above welded channels) etc. I spent hours getting the hood flat, but there's still a few low spots. I've been using a 24" steel ruler to slide up, down and across each panel to see how much filler will be required to make it smooth. I am at the point where the car looks much better in pictures than in person, especially with good light. My goal is to make the car better than when I got it, and I'm sure it will be.

I'm not sure I understand the need for glazing (polyester?) after the filler. I understand that the epoxy primer is not sand-able so feathering the filler edges will be difficult, but can that not be accomplished with the high build primer? Also, the paint shop told me all primer is grey, is there a difference between 'primer' and 2K primer, or colored primer?
 

Bob Claffie

Jedi Knight
Country flag
Offline
Your paint shop is off base. There are many colors of primer and most primers can be tinted. Besides light and dark grey my personal favorite is "buff" (near tan). When you have your body parts near perfect, when they feel reallly smooth when you run your hand over the surface, slip an old t-shirt between your hand and the finish. That is the acid test. Parts that feel PERFECT to the naked hand surprisingly turn bumpy and wavy under the t-shirt. Bob
 

PatGalvin

Jedi Warrior
Country flag
Offline
Thanks for all the suggestions. It looks like I'm on hold for some warm weather.

In line with what Pat said, my metal working skills are far better than when I started, but still far from exceptional. I am happy with the work and confident that less than 1/8" of bondo will make it look even better. Knowing how thick the bondo was before I stripped it off, I'm sure to have less. I am not a professional body man, but would like my car to look less like it was done by a novice (that I am).

I don't see the need for significant 'shaping', but much hiding of welding scars, low places, dimples where a dolly can't be used (like above welded channels) etc. I spent hours getting the hood flat, but there's still a few low spots. I've been using a 24" steel ruler to slide up, down and across each panel to see how much filler will be required to make it smooth. I am at the point where the car looks much better in pictures than in person, especially with good light. My goal is to make the car better than when I got it, and I'm sure it will be.

I'm not sure I understand the need for glazing (polyester?) after the filler. I understand that the epoxy primer is not sand-able so feathering the filler edges will be difficult, but can that not be accomplished with the high build primer? Also, the paint shop told me all primer is grey, is there a difference between 'primer' and 2K primer, or colored primer?

Glazing putty is very thin (not viscous), and easy to apply a thin coat for filling pinholes and scratches and other minor surface imperfections. Most regular filler is more full bodied and goes on pretty thick. Pinholes are almost unavoidable in my work. Glazing putty is easy to sand too. Epoxy is definitely sandable, but some easier than others. And requires up to a few days (more if cold) before sanding or will just load up on your paper. 2K primer is a term that is typically used for urethane-based primer. Easy to apply and sand - don't use this for heavy filling as it typically can shrink, exposing sand scratches weeks after you finish sanding. Typically is final primer before paint. Not always. Polyester primer is sprayable bondo (feather fill, slick sand). Fills great and shrinks very little. The color of the primer means nothing. You can buy many primers in black, gray, buff, white, red oxide, etc. Finally, if you are using a sealer, you can paint right over the polyester primer and you don't have to use urethane or other primer. However, in my amateur experience, I always need to but a coat of epoxy (the easy sanding kind) or urethane primer to get my final sanding perfect. Hope this helps.
 

M_Pied_Lourd

Darth Vader
Country flag
Offline
Thanks for the answers Pat. Look forward to seeing more pics of your car soon.

Cheers
Tush
 

PatGalvin

Jedi Warrior
Country flag
Offline
Great advice John. Using a long block and guide coat tells me where the peaks and valleys are. Sometimes I have to primer and sand 3-4 times. That's just what it takes to get it flat. Just so Jerry understands, when you say 2-part primers, you mean primer plus hardener (activator, catalyst, etc.). In contrast to an air dry primer (laquer, enamel, etc.). There are urethane primers that are activated and there are polyester primers that are activated. Both take hardener. But when we say 2-part, we typically mean urethane.

There is a long running controversy that one needs to prime before placing filler. Half of the body men say yes, and the other half say no. Bondo makers say you can apply to bare metal (recommended). Epoxy primer makers say that applying their product will seal the metal before applying filler, and make filler stick better. Either should be fine and our cars and paint jobs will likely out live us!

I hope this helps. After reading the body repair forums for a couple years, I'm getting the lingo down pat (hah, I made a funny).

Pat
 

PatGalvin

Jedi Warrior
Country flag
Offline
Tush, you typically use epoxy or 2-part Etch primer on bare metal but not both. Epoxy is great on bare metal. It is super hard and sticks like glue. If you are within the open window for the epoxy, you can apply filler over this without sanding or scratching. Some epoxy paints contain an acid solution and CANNOT be sprayed on etch primer. They will peel. Others are safe for application on etch primer. Need to check your epoxy product info sheet. I really don't think you need etch primer at all for your panels, if you are using epoxy. Definitely check on this. The rest of your sequence looks great. You don't need to use urethane primer if your polyester primer/slick sand finish is acceptable and you are using a sealer before basecoat. You'll know after you paint your first panel if your fine scratches are adequately filled by this process. I suggest you shoot a test fender or panel and confirm that you are happy with the final finish. I just shot a fender and spare tire cover with basecoat and I could see scratches through the basecoat. So, I'm going to sand and use a sealer in front of the basecoat, to fill fine scratches.
 

CJD

Yoda
Country flag
Offline
The 2 part epoxy primer I have been using lately is PPG DPLF:

DPLF Epoxy Primer mixed 2:1 with
DP401LF or DP402LF Catalyst provides
an excellent corrosion–resistant primer.
This primer provides excellent adhesion to
many types of properly prepared metal,
fiberglass and aluminum substrates, as well
as plastic fillers. DPLF Epoxy Primer may
also be used as a sealer and topcoated with
most PPG Refinish products.
DPLF Epoxy Primer comes in 6 colors;
DP40LF (Gray–Green), DP48LF (White),
DP50LF (Gray), DP60LF (Blue), DP74LF
(Red Oxide), and DP90LF (Black).


Price is criminally high, but it works for everything...priming, sealing, undercoat, fill coat. I even use it as the top coat for many parts, like the frame, as it dries semi-gloss.

John
 
Similar threads
Thread starter Title Forum Replies Date
S TR2/3/3A Anyone care to share their bondo applying techniques Triumph 28
UltimateQuestion GT6 Lots of Bondo Triumph 2
D General Tech Bondo Triumph 25
D After bondo??? Spridgets 6
D Keeping Bondo cool - Texas style Spridgets 1
D bondo, bondo, bondo Spridgets 5
T Skim coat of bondo? Triumph 6
scoutll Anyone notice a Bondo shortage?? Spridgets 11
M Why you don't use bondo over metal Spridgets 23
zimmy Bondo valance to fenders? Spridgets 7
rlandrum TR2/3/3A TR3A Spare Tire Well Bondo-fest Triumph 5
T Can this gas tank be saved? OR - bondo fest! Triumph 18
PATR8 Body Bondo find Triumph 13
Baz Lost my Bondo virginity. Spridgets 12
T Bondo Triumph 4
Trevor Jessie Bondo gone wrong Spridgets 17
drooartz Now I know why there was bondo Spridgets 11
jjbunn Puzzled by Bondo MG 20
B What Lurks Beneath the Bondo MG 38
beaulieu best tool to remove old bondo ? Restoration & Tools 14
Popeye Method to remove Bondo Triumph 2
TR4nut Speaking of bondo Triumph 3
Darwin Can you say BONDO??!! Triumph 16
B MGA Where to Buy, What to Buy? Axle Nut MG 8
1 TR2/3/3A TR2/3 Oil Leak Where Oil Sending Pipe Connects to the Block Triumph 4
Scotsman TR4/4A Chimney nuts, where do they go Triumph 5
jehuie Where to post for parts that fit many cars? FORUM Navigation Questions 1
Pythias Where to post FOR SALE Spridgets 1
A Where to get key blanks for SD1 in the U.S.? Rover / Land Rover 5
F Off Topic Personal update/ Where is Frank? Triumph 4
Basil Where's Walter? Spotted 8
Q TR2/3/3A Where to start?! Triumph 13
jlaird MGB Up date. Where to begin? MG 7
B Windshield glass, where to buy Restoration & Tools 4
steveg TR6 '74 - Where is the Starter Relay located? Triumph 1
C MGA Where to tap into 12v for a power outlet MG 2
S TR2/3/3A I have this miss where the car will start and kinda idle Triumph 23
C Anyone know where to get one of these? Austin Healey 6
P Area where pillar, shroud, and drainage channel meet. Austin Healey 3
P Drainage Channel Where It Meets The Shroud Austin Healey 6
M TR4/4A Where to buy a new crown wheel & pinion for TR4A Triumph 5
PAUL161 T-Series Where My TF Came From MG 1
FlyingCat Spitfire What hoses go where... Triumph 6
A Phase 1, Phase 2, Where's Phase 3 Austin Healey 14
Got_All_4 General TR Someone asked where to get DOT5 silicon brake fluid a while back Triumph 4
Got_All_4 TR6 triumph tr6 wrist pins where to get them Triumph 5
T TR2/3/3A Where is best spot to check temp with infrared thermometer? Triumph 17
Got_All_4 General TR Anyone know where to get one of these? Triumph 5
R J-H Stromberg carb connections? Where do they go? Other British Cars 2
Paulus General TR Where to get HVDA parts and vibration when engaging clutch. Triumph 13

Similar threads

Top