• Hi Guest!
    You can help ensure that British Car Forum (BCF) continues to provide a great place to engage in the British car hobby! If you find BCF a beneficial community, please consider supporting our efforts with a subscription.

    There are some perks with a member upgrade!
    **Upgrade Now**
    (PS: Subscribers don't see this gawd-aweful banner
Tips
Tips

BN4 Longbridge interior

Hello everybody


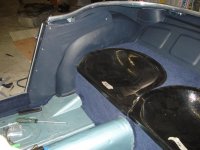
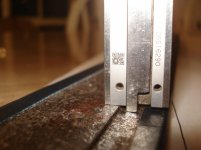
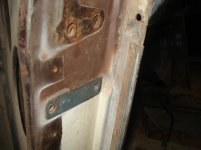
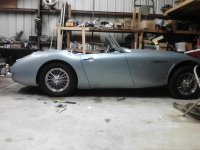
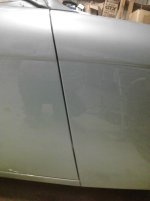
Now I have another two good question. The wheelarch panels are screwed only on the top. How are the fixed on the lower part?


Regards Christian

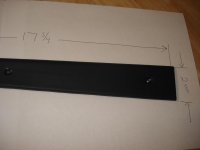
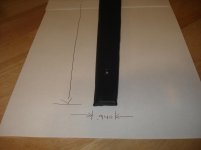
The panels have 4 screws total running down the front edge. The side that goes over the arch is just held in by pressure (and seems quite secure as is). Hopefully this picture will help.
 

Attachments

  • 2012-12-20 004.jpg
    2012-12-20 004.jpg
    93.9 KB · Views: 134
ONE NEW QUERY on Longbridge cars TOP FRAME
This is the frame TOP end, on HANS car (photo from ChrisBN4) probably a unmolested car
https://picasaweb.google.com/lh/photo/BXpChlsVvKTWL0p_7mKW4NMTjNZETYmyPJy0liipFm0?feat=directlink
NOTE:the screw that stop the sliding on back position
This is the same piece on my car, placed before Chris photos publication (without any photo suggestion)
https://picasaweb.google.com/lh/photo/ixHDBbGU0C4IygTvvqqtd9MTjNZETYmyPJy0liipFm0?feat=directlink
NOTE:the screw that stop the sliding on forward position
My opinion when I placed this piece on the car
is that frame must be stopped in forward sliding to avoid the way-out from the rail when top is erected:confuse:
Please see also other photos on my Google album dedicated to the AH Longbrige -SOFT TOP and frame
https://picasaweb.google.com/112770819864514987162/AHSOFTTOP?authuser=0&feat=directlink
Comments and suggestions are demanded
Cheers:cheers:
 
ONE NEW QUERY on Longbridge cars TOP FRAME
This is the frame TOP end, on HANS car (photo from ChrisBN4) probably a unmolested car
https://picasaweb.google.com/lh/photo/BXpChlsVvKTWL0p_7mKW4NMTjNZETYmyPJy0liipFm0?feat=directlink
.........
Comments and suggestions are demanded
Cheers:cheers:

QUERY solved my self
Simply observing with more attention my car :stupid:-
The TOP frame sliding rail, on forward direction, is stopped by one body welded step -
so the TOP frame is automatically stopped in the correct position when the TOP came in erected position-
and can't sliding off -OK LESSON LEARNED !
HANS car photo by ChrisBN4, show the correct, STOP screw position, on TOP frame rail, for Longbridge cars
https://picasaweb.google.com/lh/photo/BXpChlsVvKTWL0p_7mKW4NMTjNZETYmyPJy0liipFm0?feat=directlink
function of this screw is prevent the REAR sliding of the TOP frame, from the rail
Tanks to Chris, that take this unique specific photo- and a lot of useful others
Cheers:cheers:
 
Last edited:
Yes, if the bent loop is in the proper position, when the top is up it should rest in the rubber block on the left side bracket preventing the top frame from going any farther forward. The stop screw should be at the rear of the car to prevent the top frame from accidentally sliding off the rails when it is stowed behind the seat. However if you think you would rather have the top completely removeable and not bother with storing it behind the rear seat back, then you could swap the rail brackets side to side and then you could remove and install the top frame quickly without any disassembling required.

JIM
 
I'm still not sure about the shut pillar wood. It seems that there's a wooden piece that is flush with the surrounding metal. This is probably screwed in place from the outside through the metal. So far so good, but how is this vinyl covering done? Is there another wooden piece which is vinyl covered and screwed to the other one? Does anyone have dimensions or detailed pictures?

JIM - Are you 100% sure about these 4 screws holding the wheelarch panels in place? I can't see the lower screws on my friends original BN4.
 
JIM - Are you 100% sure about these 4 screws holding the wheelarch panels in place? I can't see the lower screws on my friends original BN4.

I confirm Chris -on basis of HANS car photos
https://picasaweb.google.com/lh/photo/fN-JVBcetMiedLFizaingdMTjNZETYmyPJy0liipFm0?feat=directlink
and zoomed 80% other side photo(but screw can be under the carpet,in the lower side)
https://picasaweb.google.com/lh/photo/jYfuo3OBRS0YSvv3Zf64_NMTjNZETYmyPJy0liipFm0?feat=directlink
this is the wheel arch on BN4 concurs cars
https://picasaweb.google.com/lh/photo/Hibwyo1Ll8Z1TeFhqehWedMTjNZETYmyPJy0liipFm0?feat=directlink
https://picasaweb.google.com/lh/photo/wWpjlW_RoZsgdhg6beMTldMTjNZETYmyPJy0liipFm0?feat=directlink
in the photo of one Unmolested car, my opinion is that in the low part (the only visible)there seems appear a screw
https://picasaweb.google.com/lh/photo/F_FEM7iHUsBsDqvwSkc8lNMTjNZETYmyPJy0liipFm0?feat=directlink
Cheers
 
I'm still not sure about the shut pillar wood. It seems that there's a wooden piece that is flush with the surrounding metal. This is probably screwed in place from the outside through the metal. So far so good, but how is this vinyl covering done? Is there another wooden piece which is vinyl covered and screwed to the other one? Does anyone have dimensions or detailed pictures?

JIM - Are you 100% sure about these 4 screws holding the wheelarch panels in place? I can't see the lower screws on my friends original BN4.

I'm not 100% sure about the panels and screws. The only way I can think the screws could be hidden (my new panels had pre-drilled holes down the front.) is to screw them down first before you finish the vinyl. My panels came with the vinyl not glued around the front edge. I could have put the panel on with the screws under the vinyl and then wrapped the vinyl around the front edge and glue it to the front side of the shut pillar. Then when I put on the front wood covered wedge piece it would have hidden the glued down vinyl. That seemed like a lot of work to just hide 3 of the 4 screws. I'm not saying they didn't do it that way but it doesn't seem to make as much sense that way. I don't know what other wood piece there would need to be? All the pieces that should be there are in my pictures.
 
I'm still fighting with these shut wood pieces. I still think there must be 2 pieces per door. One that is completely hidden and flush with the metal according this picture:
100-1Six.JPG
This would correspond with the pdf drawing of 57_BN4.

I think there is now a second piece of wood which is vinyl covered according Jim's pictures. It is screwed to the wodden piece behind. and runs from the inner sill up to the aluminum cover.
IMGP9872.JPG

The wheelarch panel is only screwed with one screw at the upper most position. I think on the other positions the vinyl of the wheelarch panel is loose and just clamped between these 2 wood blocks of the door shut.

Any comments about that?
 
That looks about right although it is possible that the long skinny trim strip is cardboard-covered vinyl instead of wood. The ones supplied with the Heritage trim kit are done that way.

The interior that came out of my car was a diy job done back in the 70s and has a flap as part of the main side panel which folds outward to cover the forward face but I don't think this is right.
 
My posts #28 and 29 show that long trim strip (original and wood) prior to the vinyl being attached and in place. The wheel house covers supplied from moss had a long enough flap that was not wrapped around it yet or glued down which I suppose they expect you to glue on that forward face also. I had the original wood pieces so I did not go that route. I guess if I was to do it again I would have glued and wrapped that flap onto the face after I screwed it in place, and then put the wood closing panel over that flap (as I expect that is how it was done originally because you cannot see those bottom 3 screws on original cars). But I already have it in place with the screws through the vinyl on the wheel house panels so there is no going back (it will make removal of those panels easier in the future anyways).
 
Healeyblue- could you please take some measurements off your wood strips so I can make some here? I spent a day trying to get all the various bits aligned for the shut pillar and can only come to the conclusion that it is a very complex way of achieving something that should be fairly simple! The vinyl-covered board strips supplied from Heritage are completely wrong as they are less than 1/8" thick and the wood looks more like 1/4".

An interesting aspect of the Heritage inner-side trim is that there is a metal stiffeneing strip under the vinyl running forward from the single dome nut that holds the rear end in place. It keeps that slight outward curve often seen on restored cars
longbridgeint.jpg


and which appears to be absent from original ones
qtrpanel.jpg


Chris- thanks again for the interior detail pics, they are very useful.

Andy.
 
OK Andy I went out and pulled one side off and here are some pics and measurements for you.

The boards themselves over all are 17 and 3/4 inch long. The top width is 2 inches across, and the bottom width is .940 across. Now take in account that these panels are already covered in the vinyl which itself is about .030 thick.
 

Attachments

  • 2013-02-02 001.jpg
    2013-02-02 001.jpg
    86.5 KB · Views: 86
  • 2013-02-02 002.jpg
    2013-02-02 002.jpg
    79.5 KB · Views: 91
Now for the width it is a little tricky because you must remember the edge that faces the interior of the car must be rounded over with a router for a smooth edge on the vinyl, not a sharp 90 degree edge. The back side also has a routed relief area so it does not interfere with the aluminum shutface trim. So over all the boards are about .310 thick with the routed relief area cut to a depth of .063 inches.
 

Attachments

  • 2013-02-02 004.jpg
    2013-02-02 004.jpg
    78.8 KB · Views: 91
  • 2013-02-02 005.jpg
    2013-02-02 005.jpg
    87.3 KB · Views: 88
  • 2013-02-02 006.jpg
    2013-02-02 006.jpg
    86.8 KB · Views: 84
Now that relief cut is about .570 wide and runs the entire length of the backside and is opposite the edge that is rounded over on the front. Hope these measurements help. I will put this back on the car tomorrow so if you need more dimensions hopefully you will catch me before I put it back on. The side panels on this car are from Moss and they do not have the metal stiffening edge under the vinyl, yet they do hold an arc once attached. I can see how it could be an improvement for supporting that edge and will prevent it from being easily damaged on that edge.
 

Attachments

  • 2013-02-03 003.jpg
    2013-02-03 003.jpg
    77.3 KB · Views: 89
  • 2013-02-02 007.jpg
    2013-02-02 007.jpg
    89.2 KB · Views: 87
Thanks for the pics and dimensions Jim. I made a drawing here based on them and may have to adjust a few dims to consider the vinyl thickness. Took a guess at the hole locations from some pics I have here.

Another issue I have is how to secure the hinge pillar weather seal track. If the screws went in from the outside they'd go into the side footwell trim and if they went from the inside outward they'd catch the door trim when it closes. Any ideas on how they were originally held on? Pop rivets maybe?

Hopefully tomorrow I'll be able to slam the RH door for the first time in 16 years. Progress!!

Cheers,
Andy.
 
Andy,
Ask and ye shall receive. Yes they are held in by rivets, except the very bottom which has a short screw into the inner rocker. They are installed from the kick panel side outward and once installed I would hammer and dolly them a little tighter and it will give them a little more of a lower profile.
JIM
 

Attachments

  • healey 034.jpg
    healey 034.jpg
    89.9 KB · Views: 120
Andy
Its neat how so many of us with the lingbridge cars are at similar places in the restoration. I too just closed the passengers door for the first time last Wednesday. I had trouble with the aluminum shut panels not fitting tightly against the inner rockers. I had to use a little persuasion with a block of wood and hammer to force it tight against the inner rocker and then tighten the seal channel screw to hold it tight. I also assumed wrong in the direction of the seal instalation. I had them backward causing more tension on the door. Good luck in closing them. My tip is to try the door with no seals and no latch to check gaps and clearance first and once gaps are set then start introducing the latch and then the seals one at a time. If any gaps or closing problems arise, then you can deal with them one at a time.
 

Attachments

  • Photo01291659_1.jpg
    Photo01291659_1.jpg
    87.4 KB · Views: 104
  • Photo01291658.jpg
    Photo01291658.jpg
    93.6 KB · Views: 97
  • Photo01291657_1.jpg
    Photo01291657_1.jpg
    89.5 KB · Views: 100
Back
Top