• Hi Guest!
    You can help ensure that British Car Forum (BCF) continues to provide a great place to engage in the British car hobby! If you find BCF a beneficial community, please consider supporting our efforts with a subscription.

    There are some perks with a member upgrade!
    **Upgrade Now**
    (PS: Subscribers don't see this gawd-aweful banner
Tips
Tips

BN4 Longbridge interior

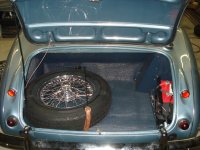
I now uploaded Jim's BN4 pictures to SkyDrive. Here's the link: https://sdrv.ms/SGpWMJ
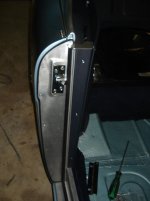
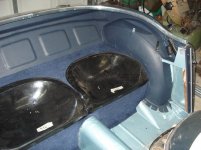
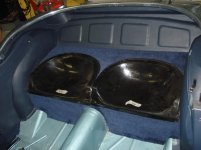
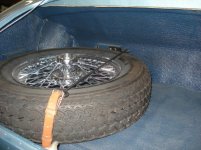
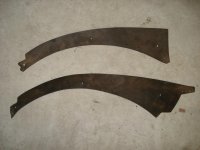
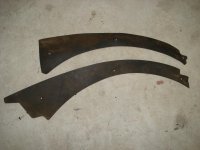
Unfortunately Jim made a mistake when he made new wheelarch panels. He took a left one and mirrored it for the right one although they are different.

I also took pictures of an original BN4 of a friend: https://sdrv.ms/SBiWSQ

For me the vinyl parts are pretty much clear how they have to be. I'm still trying to get the pattern for these wheelarch panels.

Regards Christian
 
I also took pictures of an original BN4 of a friend: https://sdrv.ms/SBiWSQ

Regards Christian

Hi Chris,

Wow, thanks for sharing the great pics. It is rare to find pics that are clear, focussed, well lit, high-res and relevant so congratulations on your photography skills. I hope you don't mind me saving a few for reference as I'm currently redoing my BN4 interior.

Interesting that this fairly original appearing car has the parcel shelf fully trimmed on the underside. Do you know if this is original or has been re-covered? There is good evidence on my parcel shelf that it wasn't trimmed underneath except for the material around the front edge where it is glued to the underside. My car is April 57, could you tell me please the month of manufacture of this one?

Cheers,
Andy.
 
Hi Andy

I tried really hard to find pictures on the internet for getting the knowledge how things should look like for my BN4. It really was impossible. So I'm very happy that I found this BN4 only a few km away from my home. I don't know the month of build of this car but it's #34906.
I don't think that the parcel shelf was ever retrimmed, but I don't know for sure. On my BN4 #59699 the parcel shelf was trimmed on the underside too. Didn't look like it ever was retrimmed. Also the retrim kit of John Skinner has vinyl for the underside.

At the moment I am making my own new wheel arch covers because it seems that no one in the world is able to make them the original way. Andrea: The kit from ahead4healeys didn't make me very happy...

Regards Christian
 
Hi Chris
I agree with you for poor coherency with oldest trim--I have added a tick layer of felt under it - can be the right solution - I have finished my rear wheel trim during the fall of BCForum period so I have put the sewing side immediately up the bracket, but my car is not a concurs car - BUT I agree with you and andy and healy blue- sewing line of original car was immediately under the bracket Tanks for the photos this a very helpful for make a copy of wheel arch panels (I am working on it) I shall revert with
designs when they are ready- I agree with you the rear part of the two panels are different

Parcel self -I have retrimmed it -in two pieces sewed toghether underside and upper border- the sticked with clear Bostik
https://picasaweb.google.com/lh/photo/6g4gDxPHCLQtxsfV3DECStMTjNZETYmyPJy0liipFm0?feat=directlink
https://picasaweb.google.com/lh/photo/makKhI-08HKIhGau0BpCv9MTjNZETYmyPJy0liipFm0?feat=directlink
bottle now upgraded
https://picasaweb.google.com/lh/photo/C-8R_JjoKtnolXIdWCLkZdMTjNZETYmyPJy0liipFm0?feat=directlink
Cheers
 
Hi Chris,

Thanks for the info. 34906 would make it a late 56 car, mine is 40559. I got a Heritage interior kit and it has the fully trimmed parcel shelf like in your pic, seems mine is an oddball for some reason.

DSC07515.JPG


That is my parcel shelf, you can see the original glue and where the vinyl was trimmed by pressing down onto the metal with a knife, the cut lines were etched into the steel by rust. There is also a red crayon scribble that would almost certainly been original. Maybe the factory ran out of vinyl for this one and just made do. And now the dilemma... to do it original or 'correct'.

Andy.
 
Hi Andy

I think I would do it the way it was meant to be, without these cuts, because it looks much better. Maybe you vinyl cover was somehow damaged and when they wanted to glue it they just removed the damaged are instead of making a new cover.

Regards Christian
 
I don't know if the detail for the rear vertical panels by the door opening has ever been discussed before so I thought I would share the details as I have just finished this portion. So far all the other areas of the rear upholstery has been correct but I have not seen this mentioned yet. I think this thread will be invaluable to others in the future so I would like for all the "longbridge" features be discused and located here in one place.

The vertical panel is made of a hard wood and router-ed on the back side to clear where it overlaps the aluminum door finisher flange. The front side is also rounded over on the edge that faces the interior to give a smooth transition to the corner where it meets the side panel. It is held on with 3 chrome head philips screws with finish washers. The upholstery is glued on the front side and wraps around the back and is held in place with 4 small tack nails. One on each side in the center. The pictures should help to visualize how they are made.
 

Attachments

  • Photo12201028.jpg
    Photo12201028.jpg
    83.5 KB · Views: 114
  • Photo12201028_1.jpg
    Photo12201028_1.jpg
    88.2 KB · Views: 110
  • Photo12201029_1.jpg
    Photo12201029_1.jpg
    85.2 KB · Views: 108
  • Photo12201029.jpg
    Photo12201029.jpg
    86.9 KB · Views: 113
Thought I might post another picture of some of the progress, it might help others visualize the layout of the vinyl.
 

Attachments

  • 2012-12-20 002.jpg
    2012-12-20 002.jpg
    93.3 KB · Views: 133
  • 2012-12-20 005.jpg
    2012-12-20 005.jpg
    91.7 KB · Views: 121
Another thing I found is the Longbridge cars had a matching color armacord for the trunk liners. The only color currently available is obviously black. My interior is the dark blue so I decided to try a vinyl paint and found the SEM brand smokey blue to be an exact match. So for anyone doing a "longbridge with blue interior this is an option to have the trunk match the interior. My original armacord was originally dark blue but at one point painted black, but under the screw heads and in the corners I could still see it was definitely dark blue and not black.

JIM
 

Attachments

  • 2012-09-13 september 2012 012.jpg
    2012-09-13 september 2012 012.jpg
    96.8 KB · Views: 103
  • 2012-09-13 september 2012 013.jpg
    2012-09-13 september 2012 013.jpg
    95 KB · Views: 93
  • 2012-12-27 002.jpg
    2012-12-27 002.jpg
    86.9 KB · Views: 88
Here is a couple photos of the original wheel arch panels. They are a heavy cardboard type material. They are smooth on one side and have a pebble grain finish on the other side. Moss motors sells these of the correct shape in their interior kits.
JIM
 

Attachments

  • 2012-12-27 006.jpg
    2012-12-27 006.jpg
    94.6 KB · Views: 109
  • 2012-12-27 007.jpg
    2012-12-27 007.jpg
    97.4 KB · Views: 112
Andy, your washer bottle cutout is in the middle of the parcel tray? ALL the ones I've ever seen have the cutout in the back corner.

Jim: good job!
 
I don't know if the detail for the rear vertical panels by the door opening has ever been discussed before so I thought I would share the details as I have just finished this portion. So far all the other areas of the rear upholstery has been correct but I have not seen this mentioned yet. I think this thread will be invaluable to others in the future so I would like for all the "longbridge" features be discused and located here in one place.

The vertical panel is made of a hard wood and router-ed on the back side to clear where it overlaps the aluminum door finisher flange. The front side is also rounded over on the edge that faces the interior to give a smooth transition to the corner where it meets the side panel. It is held on with 3 chrome head philips screws with finish washers. The upholstery is glued on the front side and wraps around the back and is held in place with 4 small tack nails. One on each side in the center. The pictures should help to visualize how they are made.
Hi Jim
I suppose that you have the luck to find on your car the original hard wood pieces- I have only few photos of this pieces and a lot of fantasy, here the photos of my own self pieces
https://picasaweb.google.com/lh/photo/8iHPSQgopoVltYIDGU3yENMTjNZETYmyPJy0liipFm0?feat=directlink
https://picasaweb.google.com/lh/photo/5bNyLGtLdotiBy4QWOKHetMTjNZETYmyPJy0liipFm0?feat=directlink
https://picasaweb.google.com/lh/photo/FKnt6jIBRdvGJ-LGwLCSWNMTjNZETYmyPJy0liipFm0?feat=directlink
I have make it in marine play wood titch 4mm
my pieces are total 45,0 cm long -but I have supposed from photos
https://picasaweb.google.com/lh/photo/fMEG72qsouV0W5fXUIif3NMTjNZETYmyPJy0liipFm0?feat=directlink
that the lower part is only 3,3 cm wide - from this I go up for cm 32,5 to 5,3cm wide
from this quote for the late 12,5 cm I go to 5,6 cm wide (sorry my scanner is out of order otherwise a sketch can be easy)
Now I see (tanks to you) for the first time the original pieces, of mahogany? and they appear have a linear trend- but I haven't any measurement to reproduce it -- Jim please, make one effort to take and tell us the exactly measurements (if possible in cm-- as usual I ask too much):friendly_wink:
Cheers
 
Randy- I'm fairly sure the central bottle is a RHD feature since the wiper motor is in the way to have it all the way over to the left to mirror the LHD location.

Andrea- I have a couple of thick plywood reproductions that arrived with the Heritage interior kit, if you get stuck I could make a drawing of them although I wouldn't be 100% sure they are identical shape to the original. The reproduction forward-face cappings are trimmed cardboard rather than the wood sticks in Jim's pics above.

Jim- blue armacord is available, I got a full set for my car as a pre-made kit.

Andy.
 
Hello everybody

The parcel shelf for right hand cars has the washer bottle in the middle.

I would also be very interested in exact dimensions of these door wood pieces. There's not much left of my old ones. It would be great if Andy or JIM could make some drawings.

Now I have another two good question. The wheelarch panels are screwed only on the top. How are the fixed on the lower part?

Does anyone know a reason why Skinner sent me the kick panels and the wheelarch panels the way it is on the photo? Why are the left unfinished?

IMG_9894.jpgIMG_0790.jpg

Regards Christian
 
Tanks Andy
Design are welcom, my car is not a concurs car so some approximation NOT compromise the result -and we can make some confront with Jim
Dont forghet to trasmit it To Derek 100 six-site
Cheers
Andrea
 
ChrisBN4

Does anyone know a reason why Skinner sent me the kick panels and the wheelarch panels the way it is on the photo? Why are the left unfinished?

View attachment 24991View attachment 24992
Christian[/QUOTE]
Chris I have the same panels from a different suppliers -they are completely finished, ...a week end skedaddle??
Cheers
 
Back
Top