
-
 Hey Guest!
British Car Forum has been supporting enthusiasts for over 25 years by providing a great place to share our love for British cars. You can support our efforts by upgrading your membership for less than the dues of most car clubs. There are some perks with a member upgrade!**Upgrade Now**
(PS: Upgraded members don't see this banner, nor will you see the Google ads that appear on the site.)

Tips
- We have a special forum called "Member Articles" where you can submit actual articles for consideration for publication. Learn More
- Don't have an Avatar? If not, your avatar will default to the 1st character in your username. Go into "Account Details" to change your Avatar.
- Some basic forum navigation info: click
 Hey - did you know if you click on the title of a thread it will take you to the first unread post since you last visited that thread?
- Hey Guest - Is your British Car Club in our Clubs database? If not, send me a PM - Basil

- Looking for a local club? Click the "Clubs" tab above and browse hundreds of clubs world-wide.
- Add Android or iPhone APP: click
- Did you know - any picture or video you add in your posts in any marque-specific forum will also get added to the Media Gallery automatically.
- A few more tips about posting and replying: click
- Hey there Guest - be sure to keep your profile page up to date with interesting info about yourself: learn more
- More tips and tricks on Posting and Replying: click
 but were afraid to ask:
  STOP!! Never post your email address in open forums. Bots can "harvest" your email! If you must share your email use a Private Message or use the
  smilie in place of the real @
- Want to mention another member in a post & get their attention? WATCH THIS

- So, you created a "Group" here at BCF and would like to invite other members to join? Watch this!
- Hey Guest - A post a day keeps Basil from visiting you in the small hours and putting a bat up your nightdress!
- Hey Guest - do you know of an upcoming British car event?
 Pretty Please - add it to our Events forum(s) and add to the calendar! >> Here's How <<
- Hey Guest - you be stylin' Change the look and feel of the forum to fit your taste. Check it out
- If you run across an inappropriate post, for example a post that breaks our rules or looks like it might be spam, you can report the post to the moderators: Learn More
- If you would like to try some different "looks" or styles for the site, scroll to the very bottom, on the left and click the Style Selector.
You are using an out of date browser. It may not display this or other websites correctly.
You should upgrade or use an alternative browser.
You should upgrade or use an alternative browser.
TR6 1974 TR6: Ballast vs Non-ballast system. A look at the wiring.
- Thread starter 2wrench
- Start date
OP
2wrench
Luke Skywalker
Offline
To your question: "Did you get it running to start the New Year right?"
Sorry, Jeff. I have not had the time to look at the car again. The mechanic who replaced the coil thinks the points are somehow not working as they should. I will be looking for spark as has been recommended. You have to know, it is kind of killing me. We, here, in California, have been enjoying unusually warm weather; 65 degrees in northern California is pretty nice for this time of year. Thanks for your interest. Best wishes to you and all members of the Forum for a Happy New Year.
Sorry, Jeff. I have not had the time to look at the car again. The mechanic who replaced the coil thinks the points are somehow not working as they should. I will be looking for spark as has been recommended. You have to know, it is kind of killing me. We, here, in California, have been enjoying unusually warm weather; 65 degrees in northern California is pretty nice for this time of year. Thanks for your interest. Best wishes to you and all members of the Forum for a Happy New Year.
OP
2wrench
Luke Skywalker
Offline
Success, at last! So my conclusion: Hot wire to the coil had been on a wrong connector on the fuse box. I replaced my battery after I left the key on and she went belly up. Lastly, in search of spark, I pulled the first spark plug out, hooked it back into the spark plug wire, held it close to a ground source, had the wife turn the car over, and it started and ran rough on five cylinders. Shut it off, re-installed the spark plug I removed and she fired and ran fine. Seems that first spark plug was probably in the rubber boot but not seated (connected to the wire) appropriately....I guess. Weird, but I'm happy she's running.
Last edited:
OP
2wrench
Luke Skywalker
Offline
You probably should ditch the mechanic that rigged up the coil like that and follow the advice given here....In fact that would make a good New Year's Resolution.
I am going to be looking to change over to electronic ignition and get rid of the points. I don't know the cost, and I will probably have to wait to do it, but I think this is where I am going. I am mindful of your suggestion to bypass the ballast resistor by removing the white/yellow wire from the starter relay going directly to power on the fuse box. I am speaking from memory, so I hope I have it right. I figure I will need to do this with the electronic ignition upgrade. I think it takes the 3ohm coil with that upgrade. I'll probably revisit that with a new thread at a later date, if need be. Thanks again to everybody for their help. You've been great, as usual.
TRopic6
Jedi Warrior
Offline
Great that you got it running again - looks like Randall called it right in Post #6. I'd wait until you get the wiring sorted out before changing to electronic ignition though. Did you ever find evidence of the resistor wire that comes out of the large bundle by the alternator? Maybe it's bent down or something. In your original post, the horn & starter relays at the right edge of your picture seemed to be adrift; there are several hot wires there you don't want to short out.
Jeff
Jeff
dklawson
Yoda
Offline
I am going to be looking to change over to electronic ignition and get rid of the points.
I am mindful of your suggestion to bypass the ballast resistor by removing the white/yellow wire from the starter relay going directly to power on the fuse box. I am speaking from memory, so I hope I have it right. I figure I will need to do this with the electronic ignition upgrade. I think it takes the 3ohm coil with that upgrade.
Not exactly. The bypass wire from the solenoid to coil (+) could be left in place forever. It does no harm no matter what. It is the main power supply to the coil (+) terminal that you may want to revisit in the future. Where you must be careful is matching the coil type to the power you are supplying to the coil. At the moment you have a ballast type coil with an external ballast resistor. That is good and functional. I suggest leaving it alone.
When/if you change to using an electronic ignition you CAN still safely use the coil and external ballast resistor you have now. What you MUST do is run the power wire (typically "red") from the electronic ignition module to a switched terminal on the fuse box so the electronics are supplied with a full 12V supply... not the reduced voltage an externally ballasted coil has. The electronic ignition module's switch wire (typically "black") still goes to coil (-). This connection would be unchanged regardless of whether you wish to use a ballast or standard ignition coil.
When you make the decision about the electronic ignition do start another thread and one of us can walk you through your options and the wiring. When making the decision, be sure to shop around for the best price. At one time the "retrorockets" (https://www.vintageperformance.com/retrorockets/) web site had the best online prices for Pertronix kits.
OP
2wrench
Luke Skywalker
Offline
Sorry Dennis, I didn't mean to confuse you with my comments about the pink wire. They were more for background information.
What I really should have stressed is that on cars with Lucas ballast ignition systems the pink wire is a potential problem area. Most people either convert to use an external ballast resistor (as you have done) or switch to a standard ignition system as Poolboy suggests.
Your voltages sound appropriate to me and therefore it sounds like the point and condenser should be OK. I know you are not getting spark. Therefore, make the following test. Turn the engine over by hand until you see the points are open. Remove the coil wire from the center of the distributor cap. Place the disconnected plug wire end close to the engine block but with a small gap to anything metal. Switch on the ignition and insert the tip of a flat bladed screwdriver between the points gap. Now remove the screwdriver quickly. Repeat the insertion and removal several times. Each time you remove the screwdriver from the points you should see a spark jump from the coil wire to the engine block. Let us know if you find you have spark using this test.
It's back to the drawing board, gentlemen. The TR would not start again this morning. Doug, I have performed the test as you have suggested above and I do find spark to the coil wire. My problem seems to be intermittent. For all I have learned about my car, what I have yet to do is a simple tune-up from start to finish. I did not know how to turn my car over "by hand." What I did do was to put the car in third gear and rolled her while watching the points hitting the highest point on the lobe and visually looking for the opening in the gap. I did see a gap opening, and notwithstanding my limited exposure to working with points, that darned gap looks tight. I had to manually push the points open in order to stick a small computer-sized screwdriver into the gap. I took a picture of the spark plug I removed yesterday. I will post it, for what it is worth. I don't know if I can get a decent picture of the points' gap, but I will try.

dklawson
Yoda
Offline
Do not despair. It will all get worked out.
First a question. Where did the chunk of black bakelite on the breaker plate come from? (See the points picture you posted).
It is difficult to tell from the picture how wide the points gap is. My suggestion is to temporarily open them WAY up just to perform the screwdriver test I mentioned earlier. Then, reset the gap after dressing the points to be flat. Since you and the mechanic recently fitted the ballast resistor, the points could have been running for a while without the ballast resistor but with the ballast coil. That can/will cause the points to burn. Dress the points flat and try setting the gap again.
The plug looks OK to me but check their gaps. With points I would make sure the plug gap is around 0.025" (or so).
For you TR6 guys out there, I am confused and I hope you can provide some clarification and information I cannot supply. Looking at Dennis' picture of the points, that appears to be a Lucas dizzy, not Delco. I was unaware that TR6's ever came with Lucas distributors. What I also notice looking at the picture of the points is that this model distributor uses nylon spacer washers on the points spring (like the much earlier 25D4 distributor used on BMC 4-cylinder engines). If I am seeing that right, it is also important to get those nylon washers back in the correct location or the ignition will not fire and/or you can be leaving the condenser out of the circuit. What Lucas dizzy is this and is there an online picture of the points it uses?
TR3driver
Great Pumpkin - R.I.P
Offline
Really tough to tell from a photo. Buy a set of feeler gauges (should be only a few bucks at any auto parts store) and check them. Pick up a plug gap gauge while you're there. According to their web site, you can get both at O'Reillys for under $7 for both (Ok, $7.13 with tax
TR3driver
Great Pumpkin - R.I.P
Offline
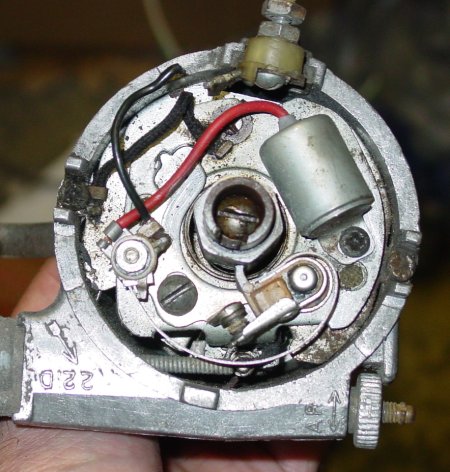
I'm not a "TR6 guy", but my TR6 workshop manual lists only a variety of Lucas 22D6 distributors for the TR6. ISTR that some GT6 had Delco, though.For you TR6 guys out there, I am confused and I hope you can provide some clarification and information I cannot supply. Looking at Dennis' picture of the points, that appears to be a Lucas dizzy, not Delco. I was unaware that TR6's ever came with Lucas distributors.
The wires and "top hat" look OK (top edge of the photo).
This photo is from an earlier Jag, but shows the points clearly: (A TR6 won't have the vernier thumbwheel in the lower RH corner).
OP
2wrench
Luke Skywalker
Offline
Doug, quoting and answering your first question you had: "First a question. Where did the chunk of black bakelite on the breaker plate come from? (See the points picture you posted)."
I really do not know where this Bakelite-looking material came from as I sit in my family room; but, tomorrow I'll see if I can identify its origin.
Also, gentlemen, tomorrow I shall address the condition of the points and the setting of the gaps each relative to points and plugs. Thanks for looking in on me. I will report.
OP
2wrench
Luke Skywalker
Offline
Great that you got it running again - looks like Randall called it right in Post #6. I'd wait until you get the wiring sorted out before changing to electronic ignition though. Did you ever find evidence of the resistor wire that comes out of the large bundle by the alternator? Maybe it's bent down or something. In your original post, the horn & starter relays at the right edge of your picture seemed to be adrift; there are several hot wires there you don't want to short out.
Jeff
No, Jeff, I have not seen the resistor wire (white with yellow stripe, right?) coming out of my wire harness anywhere near the alternator. That's why I have this funny-looking green with black stripe jumped over to the coil. Also, there appears to be a red wire that has been cut and is poking out of the harness just enough to see it. I do not have a clue what that wire is there for.
TRopic6
Jedi Warrior
Offline
Aloha Dennis. I bet a Mai Tai the cut wire is the ballast wire for the coil. Here's what one looks like after the insulation crumbles off. You can see how it runs parallel to the white/yellow wire that supplies 12V for starting. Test to see if has voltage with the ignition on. Maybe you can wire it back in, but it probably got cut for a reason...like all the insulation crumbled off! Is it taped over so it can't short against the block or something?
FYI - The ballast wire starts in the main harness under the dash against the firewall where the speedo cable comes into the cockpit. The white wire from the ignition switch is ganged with other white wires that go out to the rest of the car. Unlikely, but if this connection somehow gets loose or internal corrosion, weird intermittent problems can occur. As you can see, the nichrome ballast wire has woven reddish insulation. This is on my 74.5 project car; I've seen others with a thicker rubber-type insulation. I took the bundle from the clip and twisted it for this shot; otherwise its hidden in a rat's nest of wires.
I bet the Bakelite chip is from the distributor cap - it's easy to do, especially at the cutouts for the locating pegs. Don't want the chip to get flung around inside the spinning distributor. Murphy's Law says it will go where it will cause the most damage!
Jeff
Last edited:
dklawson
Yoda
Offline
I know Dan Masters shows some different use of the white/yellow or yellow/white wire than other (non-TR) cars. However, on my non-TRs and on my Spitfire, the white/yellow leaves the 4th terminal on the solenoid and goes to coil (+). It is a bypass wire to deliver full voltage to the coil during starting. It is not the resistor wire.
For whatever reason, some Lucas wired cars with ballast ignition systems use a "pink/white" resistance wire inside the harness as the ballast resistor. Over time the pink/white changes appearance. It can appear pink, pinky-beige, off-white... it really can varry quite a bit. I would not fret about it. The wiring you and your mechanic came up with will work. However, were this my car... I would change to more traditional colors for the ballast wiring just so a future owner is not confused. However, I would also put that off until later. Get the ignition sorted first, then worry about details like final wire colors.
For whatever reason, some Lucas wired cars with ballast ignition systems use a "pink/white" resistance wire inside the harness as the ballast resistor. Over time the pink/white changes appearance. It can appear pink, pinky-beige, off-white... it really can varry quite a bit. I would not fret about it. The wiring you and your mechanic came up with will work. However, were this my car... I would change to more traditional colors for the ballast wiring just so a future owner is not confused. However, I would also put that off until later. Get the ignition sorted first, then worry about details like final wire colors.
OP
2wrench
Luke Skywalker
Offline
Jeff, quoting you: "Aloha Dennis. I bet a Mai Tai the cut wire is the ballast wire for the coil. " I think I owe you a Mai Tai. I pulled the red wire from the harness and cleaned the end; attached my volt meter and, bang, got 12-plus volts with the key on. That is a hot wire from the ignition. Also, my red wire does look just like yours. Non-stranded wire. I can't quite tell where your wire is going. Seems it should be on the positive side of the coil, but doesn't look like it....or....maybe so.
Further, you are correct again: the Bakelite chip is from the distributor cap. I recall now when she didn't start, I did some "cleaning" of the distributor cap at its top in order to better expose contacts there for the rotor.
Here is a pic of the red wire poking out of the wire harness with its end cleaned, just before I checked for power there:
OP
2wrench
Luke Skywalker
Offline
Doug: In post 31 you mention the nylon washers and the points. Not sure I have it re-installed correctly. Need to cover this, as you mention its importance.
I have removed my points and "dressed" them. Wasn't sure what this meant, but I gleaned it meant to clean and "file" flat. Used my wife's emery board. Dressed them and got the points looking like this on Side A:
Opps.
I'll try that again. Dressed the points and Side A looks like this:
Side A seems to be somewhat crater-like in the middle. Didn't know how far to try to go with the filing.
This last photo shows the opposite side, labeled Side B. I think I had not done any filing or "dressing" on this side yet.
Lastly, I want you to see a pic of Side A untouched, just cleaned, after its removal from the car.
OP
2wrench
Luke Skywalker
Offline
Summation post with questions: Should something be done with this red hot ignition wire? Do these points look shot? Is it likely that ballast vs. non-ballast setup has caused damage to the points/coil/other ignition parts? If I need new points, must I only order from one of the specialty suppliers or can these parts be found at a local parts store?
Last question regarding nylon washer placements in points installation: I placed the red and white wires down first; then a large-hatted nylon washer, then the "points spring' on the post, then the top nylon washer turned down and the holding nut. Hope you can follow that. Did I get the install wrong?
Oh, and one more thing. I did not try to start the car. I figure I'll wait to hear from you after you take a look at where I am. Also, I will be installing new platinum plugs, only because if I'm going to remove them, might as well replace them. They seem to be set at .025 right out of the box.
Thanks,