
-
 Hey Guest!
British Car Forum has been supporting enthusiasts for over 25 years by providing a great place to share our love for British cars. You can support our efforts by upgrading your membership for less than the dues of most car clubs. There are some perks with a member upgrade!**Upgrade Now**
(PS: Upgraded members don't see this banner, nor will you see the Google ads that appear on the site.)

Tips
- We have a special forum called "Member Articles" where you can submit actual articles for consideration for publication. Learn More
- Don't have an Avatar? If not, your avatar will default to the 1st character in your username. Go into "Account Details" to change your Avatar.
- Some basic forum navigation info: click
 Hey - did you know if you click on the title of a thread it will take you to the first unread post since you last visited that thread?
- Hey Guest - Is your British Car Club in our Clubs database? If not, send me a PM - Basil

- Looking for a local club? Click the "Clubs" tab above and browse hundreds of clubs world-wide.
- Add Android or iPhone APP: click
- Did you know - any picture or video you add in your posts in any marque-specific forum will also get added to the Media Gallery automatically.
- A few more tips about posting and replying: click
- Hey there Guest - be sure to keep your profile page up to date with interesting info about yourself: learn more
- More tips and tricks on Posting and Replying: click
 but were afraid to ask:
  STOP!! Never post your email address in open forums. Bots can "harvest" your email! If you must share your email use a Private Message or use the
  smilie in place of the real @
- Want to mention another member in a post & get their attention? WATCH THIS

- So, you created a "Group" here at BCF and would like to invite other members to join? Watch this!
- Hey Guest - A post a day keeps Basil from visiting you in the small hours and putting a bat up your nightdress!
- Hey Guest - do you know of an upcoming British car event?
 Pretty Please - add it to our Events forum(s) and add to the calendar! >> Here's How <<
- Hey Guest - you be stylin' Change the look and feel of the forum to fit your taste. Check it out
- If you run across an inappropriate post, for example a post that breaks our rules or looks like it might be spam, you can report the post to the moderators: Learn More
- If you would like to try some different "looks" or styles for the site, scroll to the very bottom, on the left and click the Style Selector.
You are using an out of date browser. It may not display this or other websites correctly.
You should upgrade or use an alternative browser.
You should upgrade or use an alternative browser.
correct jack stand placement.
- Thread starter Roberte
- Start date
I'd use the axle for the rear and bottom suspension arms for the front. The handbook tells you to put the car jack under the rear spring under the axle at the rear and under the bottom suspension arm front.
The chassis isn't very strong and gets dented if you jack on it.
The chassis isn't very strong and gets dented if you jack on it.
Bob_Spidell
Yoda
Offline
I have a 2x4 just long enough to reach from chassis rail to chassis rail at the front crossmember (about 18"). I remove the cup/pan from a floor jack, put the 2x4 under the front crossmember and lift it with the flat top of the floor jack; the bulk of the weight of the car is supported by the frame rails, but the 2x4 bends just enough so the crossmember takes some of the load (most crossmembers are damaged from people putting jacks directly under them). Then, I put the pan back on the floor jack and place it under the differential from the passenger (right) side, coming in in front of the right rear wheel at an angle (the exhaust system is in the way on the driver side). Once lifted, I put jackstands under the front A-arms between the bottom trunnion and the spring pan, and under the rear springs on the flat area just behind the pan where the big U-bolts attach. Only some floor jacks are low enough for this--mine is from Harbor Freight many years ago--and I have to lift the front end a little by hand to load the shocks, and at that I can barely get the jack and 2x4 under the chassis. I leave the floor jack just slightly loaded under the diff for extra stability, and it's ready to go when I reverse the process.
Of course, this is on a flat, smooth concrete surface; the car once rode through a Richter 5 earthquake while on jackstands and stayed put.
Of course, this is on a flat, smooth concrete surface; the car once rode through a Richter 5 earthquake while on jackstands and stayed put.
Keoke
Great Pumpkin
Offline
When I want to lift the front end of the car to set Jack stands:
I get the rubber pads that are used on two post floor lifts and add one to the jack pad this allows me to jack the front cross member without damaging it . You must have a known good front cross member though.
I get the rubber pads that are used on two post floor lifts and add one to the jack pad this allows me to jack the front cross member without damaging it . You must have a known good front cross member though.
bighealeysource
Luke Skywalker
Offline
I do it like Bob and Keoke mentioned. I use a 2 x 6 about 2 feet wide under the rear frame cross member and same under the front cross member with a low profile floor jack and works perfect. The wood takes some of the stress off of the steel frame members plus spreads the lift over the 2 feet width.
Keith_M
Jedi Knight
Offline
I use almost exactly the same procedure as Bob described, and I have the same problem with the 2x4 barely clearing the frame. At some point, I would like to take a piece of steel plate about the same size as the 2x4 and weld it to a short piece of steel pipe that will fit in the cup of the jack. I think if I use 3/16 or 1/4 plate (maybe a little thicker?), it will have about the same flex at the 2x4 and distribute the load across the front cross member and the frame rails. The advantage of this would be that it would fit easily under the cross member without lifting the car up.
I sometimes position my front jack stands under the frame rails just about where the rear of the A-arm attaches. My frame is solid, and I wouldn't try this on a frame with significant rust. This also has the disadvantage of letting the front suspension hang, which is bad for the little rubber bumpers under the shock arms.
I sometimes position my front jack stands under the frame rails just about where the rear of the A-arm attaches. My frame is solid, and I wouldn't try this on a frame with significant rust. This also has the disadvantage of letting the front suspension hang, which is bad for the little rubber bumpers under the shock arms.

Offline
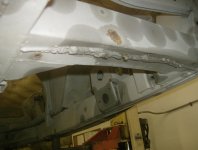
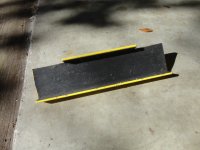
Photo of my orginal Front Cross Member before my new Jule Frame. I'm sure that the size of the weld made it hard to split again. Also probably the strogest part of the frame! A photo of my new "tool" for jacking under the Front cross member. It fits into a hydraulic jack and has a post to secure it from sliding or falling off. I have not had to use it yet.When I want to lift the front end of the car to set Jack stands:
I get the rubber pads that are used on two post floor lifts and add one to the jack pad this allows me to jack the front cross member without damaging it . You must have a known good front cross member though.
Attachments
Keoke
Great Pumpkin
Offline
why did you make it so elaborate? I'm thinking a simple steel plate would be sufficient, but maybe I'm wrong...-
YEP:KEITH
You must insure that if the jack walks or the car moves then the plate does not slide off the cross member.
Prolly should have a stop [ LIP ] in front too??---IT Has One!!
YEP:KEITH
You must insure that if the jack walks or the car moves then the plate does not slide off the cross member.
Prolly should have a stop [ LIP ] in front too??---IT Has One!!
Last edited:
Offline
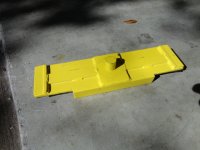
I purchsed mine from a guy who was selling all his left over Healey stuff(he was retiring). There's front AND rear lips to hold it in position plus the rubber liner(to keep it from damaging the paint) and the bottom has the round protrusion to keep it from sliding off the jack. Most jack pads are removable and this is supposed to fit in "that hole". I really didn't think it was elaborate when I purchased it but rather well thought out. I've been working on Healey's since 1970 and have seen plenty of accidents with "cheap jacks" so this seemed to address that plus safety issues. It's thick steel too.Patrick,
Your tool for lifting at the front cross-member is pretty similar to what I have been contemplating. Out of curiosity, why did you make it so elaborate? I'm thinking a simple steel plate would be sufficient, but maybe I'm wrong...
Offline
I have a similar jack saddle that I bought a number of years ago from a guy in Ohio--I think--who made them but is no longer doing so. A welder friend of mine was so enamored with the design that he has made some and offered them to the Healey community for a nominal sum. If anyone is interested send me an email and I will give you his contact info: michael.oritt(at)gmail.com.
tahoe healey
Yoda
Offline
I had a 12 inch long, 5 inch wide 1/4 inch thick piece of steel fabricated. There is a one inch high bend forming a "stop". I glued extra carpet to it and mounted it on a hockey puck that fits into the round disc on the HF low profile floor jack. It works well on the cross member on both the front and rear frame. Hockey pucks work well in the jack stands too. They are a very hard rubber that will not effect the paint or frame. You can get them at used sporting goods stores for a buck.
Offline
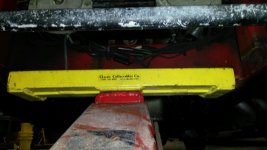
Here's a pretty crappy picture of the jack saddle I mentioned earlier. It was made by Lin Cline of Classic Collectibles--I bought it probably ten years ago. The nice thing about it is that it fits perfectly both the front and rear cross-members and once in place there is no chance of its sliding out of position, etc.
Though it does not show in the photo the saddle has a 1" OD "pin" welded to the bottom surface which fits into the hole in the floor jack when the stock jack saddle is removed. Again this locks everything together and makes it pretty nigh impossible for the car to fall off the jack as I am no longer relying upon friction and gravity to locate the jack under the cross member. The retainer lips along the front and back edges do increase the height of the jack by about 1" but I have no problem using it on my 100 with a standard floor jack.
BTW some time back I purchased a wonderful shop floor jack that has a super low profile and a long reach which I need for the Elva MK IV sportsracer which has ground clearance of only 3-1/2": Pittsburgh (Harbor Freight) two ton "Low Profile--High Lift. It would positively work on the lowest Healeys.
Attachments
tahoe healey
Yoda
Offline
On this subject, do not cover your floor with the rubber mat stuff that stores like Costco sells. Jacks wheels do not roll on it as the car raises and will pull the car off the jack. You do not need to ask how I know.
TH
TH
Offline
Can you get the sku number from the Harbor lift you bought and post it?Here's a pretty crappy picture of the jack saddle I mentioned earlier. It was made by Lin Cline of Classic Collectibles--I bought it probably ten years ago. The nice thing about it is that it fits perfectly both the front and rear cross-members and once in place there is no chance of its sliding out of position, etc.
Though it does not show in the photo the saddle has a 1" OD "pin" welded to the bottom surface which fits into the hole in the floor jack when the stock jack saddle is removed. Again this locks everything together and makes it pretty nigh impossible for the car to fall off the jack as I am no longer relying upon friction and gravity to locate the jack under the cross member. The retainer lips along the front and back edges do increase the height of the jack by about 1" but I have no problem using it on my 100 with a standard floor jack.
BTW some time back I purchased a wonderful shop floor jack that has a super low profile and a long reach which I need for the Elva MK IV sportsracer which has ground clearance of only 3-1/2": Pittsburgh (Harbor Freight) two ton "Low Profile--High Lift. It would positively work on the lowest Healeys.
Thanks
Keith_M
Jedi Knight
Offline
This is an old thread, but I finally got around to making a simple saddle that fits the front cross member. It's just a piece of 1/4 in steel plate with a lip on the front and back, and a piece of 1.25 in rod on the bottom to fit in the jack. Simple, cheap, easy, and it works fine.


bighealeysource
Luke Skywalker
Offline
Hey Keith,
Glad you posted this as after reading the entire thread again, think I will make up something like you did to put on my low profile HF jack ( like Michael Oritt has). Been using a 2 x6 but do have to make sure it is positioned right and the saddle would eliminate getting up and down on my creaky old knees so much.
Thanks
Mike
Keith_M
Jedi Knight
Offline
Hi Mike,Hey Keith,
Glad you posted this as after reading the entire thread again, think I will make up something like you did to put on my low profile HF jack ( like Michael Oritt has). Been using a 2 x6 but do have to make sure it is positioned right and the saddle would eliminate getting up and down on my creaky old knees so much.
Thanks
Mike
If you do make something like this, let me know how it turns out. I made mine just long enough to overlap the frame rails. On my car, the frame rails are a little lower than the crossmember (because of DPOs jacking the car using the crossmember) so the saddle flexes a little to contact both the crossmember and the framerails as you jack the car up. I view this as a positive because it distributes the weight, but I suppose it could be construed as a negative. The 1/4 plate "feels" strong enough to me, but I'm no engineer, and it wouldn't be too hard to add some extra bracing under the plate along the sides to keep it from flexing.
Keith
Last edited:

I just recently learned why the manual recommends placing the jack under the A arm (under the front coil spring). Typically, I lift the front with a piece of thick rubber industrial belting atop the jack's pan and a three or four-inch wide piece of wood between that and the frame. I do this on both sides, then add the jack stands. This, of course, allows the wheel spindles, etc., to hang, nicely crushing the rubber buffer rebound (Moss terminology for part 031-279). There is one of each on either side. I just did that, fortunately having ordered the two buffers required--one on either side--to replace the one's I damaged. And also, luckily, I ran across Steve G's neat technique for altering the buffers for installation. If you haven't done this, you will find that one of the two 7/16" bolts can be readily removed, but the second is basically captive unless you want to dismantle a the top A arm/shock. Steve suggests cutting out a segment of the hole on the captive bolt side, making it possible to slide that side onto the bolt without its removal. When the two bolts are snugged down, the buffer should stay in place. Another issue here is cutting away the buffer's sheet metal base plate at the captive bolt so the old one can be removed. I used a sharp chisel for that job. Once again Steve has anticipated what I didn't know. Also, Luke Skywalker says he uses a floor jack under the differential to lift the rear before installing jack stands, and I know I have seen it done, but is that a good idea? All of this tells us that working on Healeys can be challenging, and thank heaven for this Web site.