• Hi Guest!
    You can help ensure that British Car Forum (BCF) continues to provide a great place to engage in the British car hobby! If you find BCF a beneficial community, please consider supporting our efforts with a subscription.

    There are some perks with a member upgrade!
    **Upgrade Now**
    (PS: Subscribers don't see this gawd-aweful banner
Tips
Tips

Steering Box Replacement

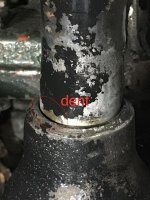
Here's a photo where I've circled where the dent is. See how the outer tube is not firmly attached, soldered, "sweated" to the steering box anymore. I can see a little oil there too. When turning the steering wheel, I can see the tube moves straight in and straight out, very little, but enough that I notice it. I don't think it's suppose to move, have any "free play" at all. The box is bolted firmly, the tube is bolted to the dash firmly. The tube has slight in/out movement where it enters the box. So, is this serious enough to remove the box and have this looked into?
fullsizeoutput_157c.jpeg
 
Here's a photo where I've circled where the dent is. See how the outer tube is not firmly attached, soldered, "sweated" to the steering box anymore. I can see a little oil there too. When turning the steering wheel, I can see the tube moves straight in and straight out, very little, but enough that I notice it. I don't think it's suppose to move, have any "free play" at all. The box is bolted firmly, the tube is bolted to the dash firmly. The tube has slight in/out movement where it enters the box. So, is this serious enough to remove the box and have this looked into?

View attachment 58722

I'd want to fix it.

You could probably buy a used box with column from British Car Specialists - they have lots of used parts. Or they may be able to re-solder the tube. Give them a call.
 
Tough call. If the tube is moving in and out, that sounds like too much end play at the worm; I think you can check this by checking if the wheel has end play (if you have an adjustable wheel you'll need to make sure the collar is tightened securely). I'm guessing the problem with end play is (even sloppier) steering, and possibly some extra wear on the worm and peg. If you need to drain the box to change the shim pack keep in mind the troubles several of us have had with the upper bearing falling down.

I don't see how that dent could have been made unless the tube was out of the box at some time, which might explain the lack of a solder bead and the oil leak. I don't think the oil leak is worth pulling the box, just don't overfill the box; when I worked on my BN2 I had the front up on jackstands, and I couldn't figure out why the box was taking so much oil until I realized I was trying to fill the tube! There is no seal except, maybe, the felt seal near the top of the tube.
 
...I couldn't figure out why the box was taking so much oil until I realized I was trying to fill the tube! There is no seal except, maybe, the felt seal near the top of the tube.

Good point about the lack of seal. Suggests why we just fill to the top of the filler port.

Looking at my own column...the splines are 7/8" diameter, you could pull the wheel all the way out, wrap the splines with some aluminum flashing or halves of 3/4" pvc pipe - and grip the splines tightly with a c-clamp or vise grips*. (I've never been able to get my adjustment collar to be tight enough to not slide on the splines.) Then you could jiggle the column in and out, independently of the outer tube, checking for any end play. If you have end play, you need to fix it with the shims. If no end play and the shaft turns easily, then maybe you could clean the joint with some brake cleaner and fix it with green wicking loctite.

If this is too intimidating, BCS is 1 hour away in Stockton.

*Addendum: forgot about the telescoping dust cover as I'm not using it. You might have to undo the steering wheel and pull it off, letting it hang by the wires, in order to grip the splines.
 
Last edited:
I think the tube was damaged during the engine removal or reinstallation. The solder joint is likely a low temp solder meant to provide a seal between the box and tube so a dent that large would likely cause that solder joint to fail. I believe that will need to be addressed by removing and servicing the box. A good metal fabricator might be able to rescue the tube and silver braze that joint.
 
I think the tube was damaged during the engine removal or reinstallation. The solder joint is likely a low temp solder meant to provide a seal between the box and tube so a dent that large would likely cause that solder joint to fail. I believe that will need to be addressed by removing and servicing the box. A good metal fabricator might be able to rescue the tube and silver braze that joint.

Well let's hope so Jeff, after all, this is your car we're talking about :D
 
Fortunately, the steering worm gear / rod and front and rear cage bearings cooperated and re-aligned in the box with a satisfying "clunk". Seals were pressed in and idler, arms and tie rods reattached. The box / steering gear now operates smoothly again with some fresh high-flow grease gooped in. It'll be filled completely when the trafficator is coupled back onto the stater tube. Any suggestions on how to accomplish this last task? I've managed this several times before and it always tries my patience. :livid: Thanks all for the help and support in getting me this far! GONZO
 
I don't think there's a magic technique to this (except patience). The leads--horn, turn signals, ground--should be trimmed to different lengths; I've had best results--read: least hassle and frustration--wrapping the end with mechanic's wire then fishing them through the tube(s) and box. Be careful not to pull the stator out of the box--can be done when the olive is off--because it can be a problem to insert it back into the box.
 
I've never had luck at pulling all 4 bullets through the stator tube. Have used two techniques:

1) Use soldered bullets. Unsolder bullets 2 - 4, wrap all but bullet 1 in heat shrink tube, and use a wire with a female connector to pull through the stator tube. Then remove shrink tube and resolder bullets 2 - 4 on the wires.

Note: crimp bullets can be drilled out with a 1/16" drill and converted to solder bullets.
StatorWirePull.jpg


2) Since I don't mind modifications, I prefer this technique: Cut the wires about a foot from the bullets; strip and tin the ends; connect both through a Molex connector. Pushing the wires through the stator becomes trivial. Leave the bullets permanently connected under the shroud. Molex connector can be painted black, then attached to car with super magnet.

TrafficatorMolex.jpg
 
Last edited:
I like that solution, Steve, but this is one of those situations where you say "I'll do it the hard/old-fashioned way this time, 'cause I'll never have to do this again in my lifetime." Then, a year later ...
 
Bob - when I overhauled my steering box and had the problems with the peg, I removed the column from the car at least 3 times. That's when I went from #1 to #2 solutions above.

I just assume at some point I'm going to have to disassemble whatever it is. :smile:

This panel hides the Molex terminal block:

screenshot.1695.jpg
 
Agreed. Never again going back into this steering box! Well, until next time. I'm really appreciating the ingenious solutions shared and specialty tools in the other post. Would converting bullet connectors to modern terminal pins and plugs work in the application? The terminal blades release / unlock from the plug housing when needed and could present a smaller wire bundle to pass up through the stator tube. The plug is waterproof too. I'll look into this further and report back.

I've had to remove the steering column twice in 30 years for re-bushing, re-sealing and re-adjusting etc. by professionals. The second time it was taken out was to correct the first job. The last mechanic (here in So.Cal) micro-polished the worm gear. I could give only a seat-of-the-pants impression, but the steering felt much smoother and precise after this was done. So, what is micro-polishing and what would it accomplish in the steering gear? Thanks, GONZO
 
OK, y'all go me to thinkin' ...

Wonder if there's a way to route the trafficator wiring out of the column and into, say, a Molex-type connector under the dash (sort of like the way more modern cars do it)? Since the trafficator is a known PITA and needs fixin' on a semi-regular basis that would make life easier. You'd still need the stator tube to hold the trafficator stationary, but if you didn't have to route the wiring through the stator you could pull the trafficator pretty easily. I'm trying to envision this; so far I've determined that a 3/4" hole in the outer tube, with a rubber grommet, would allow the wiring to be pulled from the column and, of course, you'd need to extend the harness from under the shroud into the cockpit. A pipe dream, to be sure, but I'd like to have a working, and cancelling trafficator at all times (the one in my BN2 works perfectly, the BJ8 has given me problems since I bought the car almost 35 years ago).
 
Agreed. Never again going back into this steering box! Well, until next time. I'm really appreciating the ingenious solutions shared and specialty tools in the other post. Would converting bullet connectors to modern terminal pins and plugs work in the application? The terminal blades release / unlock from the plug housing when needed and could present a smaller wire bundle to pass up through the stator tube. The plug is waterproof too. I'll look into this further and report back.

I've had to remove the steering column twice in 30 years for re-bushing, re-sealing and re-adjusting etc. by professionals. The second time it was taken out was to correct the first job. The last mechanic (here in So.Cal) micro-polished the worm gear. I could give only a seat-of-the-pants impression, but the steering felt much smoother and precise after this was done. So, what is micro-polishing and what would it accomplish in the steering gear? Thanks, GONZO

Gonzo - here's a 2.8mm male connector compared to a bullet. Looks like 4 in a row would pass easily through the stator tube.

Don't think your connector would have to be waterproof as long as you kept it up away from road splashing. You'd be removing the male connectors from the plug in order to pull them through the stator - easy enough on the off chance you'd have to do it at all. If you used a weatherproof connector such as a metripak or weatherpak, you'd have a hard time pulling it because of the rubber sealing elements above the connectors.

The screw-type Molex terminal block only requires unscrewing the wires.

screenshot.1696.jpg


This would be pretty easy:

screenshot.1697.jpg
 
Last edited:
Good point on the waterproofed plug. Just ordered a 4 pin connector and plan to use the smaller male pins to connect to the trafficator wires. This style I think should work. Once unplugged from the main socket the pins are easily removable by pushing inward on the barb and sliding out. GONZO
61stdGyVdnL._SL1001_.jpg
 
Gonzo - hopefully you've got some extra connectors to practice with and not just one with 4 M&F connectors.
I bought this kit on Amazon:

screenshot.1698.jpg


This crimper will do the small crimps:

screenshot.1699.jpg
 
Last edited:
Back
Top