but were afraid to ask:
Offline
So how are the shiny bits on the wall? Do they look as good on the back side as the front, or are they also full of filler?

 Hey Guest!

 Hey - did you know if you click on the title of a thread it will take you to the first unread post since you last visited that thread?
 STOP!! Never post your email address in open forums. Bots can "harvest" your email! If you must share your email use a Private Message or use the
  smilie in place of the real @
 Pretty Please - add it to our Events forum(s) and add to the calendar! >> Here's How <<
  Change the look and feel of the forum to fit your taste. Check it out
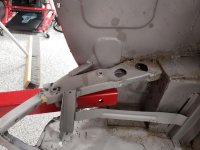
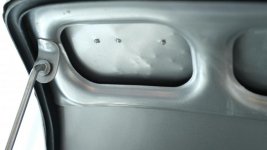
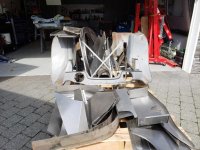
 I'm replacing rear shroud and rear fenders. In addition to alot of corrision on the rear shroud, it's been hit in the back and not repaired well. The doors, front shroud and front fenders I believe are all repairable, but will of course need them stripped down to know for sure.
You will probably spend as much time and money modifying new fenders and shrouds as you would just repairing what you have .
I made a List of stuff that you’ll need to do to rebuild your Healey with a Jule Frame. PM if you’re interested in it. I did mine and I wasn’t prepared proper for some of the things I had to do.Hi Everyone,
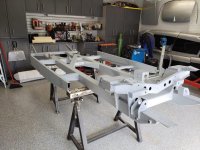
I did a new member intro a little while back and now plan to share the journey of restoring my 1967 BJ8. Thank you to every poster who has filled this forum with fantastic information. You know once you are re-reading threads for the third time it is time to get away from the computer and out into the shop....
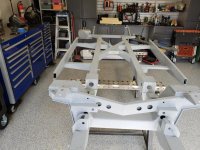
I began taking the car apart on June 1st and am now ready to begin building. My Jule frame will arrive in about a week!
Cheers
I made a List of stuff that you’ll need to do to rebuild your Healey with a Jule Frame. PM if you’re interested in it. I did mine and I wasn’t prepared proper for some of the things I had to do.
PM with your email. I just tapped my Frame where the trans installs and installed bolts and they have not come loose. I do wish that part had been done by Jule. I guess you also could drill through the frame and install long bolts too with nuts. There’s other areas that need captive nuts installed too.I would be interested in that list Patrick .
I have noted that I need to test fit the engine/ gearbox assy to be able to do the locations for the gearbox mounts and install threaded inserts for them .
PM sent - thanks!I made a List of stuff that you’ll need to do to rebuild your Healey with a Jule Frame. PM if you’re interested in it. I did mine and I wasn’t prepared proper for some of the things I had to do.
The short answer is no. I bought it at an auction as a bit of an impulse buy (sold as is where is - buyer beware). Based on the condition, I overpaid for it. I knew the car had some faults, but didn't realize the extent of it. I could have driven it for a summer and flipped it back through an auction, which probably would have been a smarter financial decision, but decided the project would be fun to do, and in the end it's really about enjoying the hobby.I am interested to know if you were aware of the extent of the poor condition and were able to acquire the vehicle at a reasonable price. It looks like a potentially fraudulent seller given all the coverup. I am very impressed with the task ahead of you and your willingness to take it on — you must have a lot of skill and experience!
I had a paint job done on my Healey back in 1976 and new aluminum panels I bought we’re not curved plus my frame had been in two wrecks. The body shop that did the work did a good job of fitting everything, but ALL of their work had to be redone when I received my Jule Frame. With the new correct curved rocker panels the rear fender doglegs stuck out about an inch and those had to be redone. I think I can say, that your body panels will need work because you now have a straight frame compared to the old original one.Thanks, I have heard horror stories about replacement fenders. I plan on keeping every peice until the car is completed, just in case. I don't expect the replacement fenders to fit perfectly but hopefully it will be easier to shape the new fenders then rebuild the old ones....fingers crossed.

Looks like it came from IKEA!
Hopefully it is easier to assemble than Ikea furniture.
.jpg")