• Hey there Guest!
    If you enjoy BCF and find our forum a useful resource, if you appreciate not having ads pop up all over the place and you want to ensure we can stay online - Please consider supporting with an "optional" low-cost annual subscription.
    **Upgrade Now**
    (PS: Subscribers don't see this UGLY banner)
Tips
Tips

TR2/3/3A Seal for TR3 Fuel Tap

mgedit

Jedi Knight
Country flag
Offline
I was looking at Moss UK site and noted that the seal for the fuel tap is listed as cork. Had assumed it would be rubber. Does this cork seal glue to the flat plunger in the tap, or does it go between the plunger and the casing? Anyone any advice on how this goes together? Cheers, Mike

FuelTapMedium.jpg
 

TRopic6

Jedi Warrior
Country flag
Offline
Hi Mike,

I rebuilt mine about 20 years ago, so can't describe it in detail. Unscrew the lock nut on top of the knob and remove the disc and rod. Use a really good quality cork (like from a good bourbon or champagne) sanded to the same diameter as the plunger and with a center hole so it fills the area where your arrow is.

Then you can refit it to the plunger and use the lock nut to pull the rod up to compress the cork. Hopefully somebody has done this recently and can comment on the effect of ethanol on cork glue. My car has been in mainland storage for 10 years.

Jeff
 
OP
mgedit

mgedit

Jedi Knight
Country flag
Offline
Thanks Jeff ... that makes sense. I've got to order parts anyway, so I just order the Moss part when I do so. Cheers, Mike
 

TR3driver

Great Pumpkin - R.I.P
Offline
The lock nut really is a lock nut, it only locks the rod in place. The rod itself turns in the handle to remove/install it, and to adjust the pressure on the cork. There should be a small slot on the end of the rod (although it is frequently broken off) so you can turn the rod once the locknut is loose. My suggestion is to leave the locknut so it surrounds the slot (and use a small enough screwdriver to fit into the nut) so it helps reinforce the slot while you are turning it.

My experience was that cork didn't work all that well even before ethanol/MTBE; and got worse when CA started using MTBE. So I converted mine to a rubber seal, using a short length of nitrile rubber fuel line. Had some in the parts bin that was just the right outside diameter. Worked out quite well, although there is a very narrow range of adjustment between too tight to move and loose enough to leak. But once I found the right adjustment, it stayed stone dry for quite a few years. ISTR I tightened it once after about 5 years; then again about 10 years after that (when I moved the valve to my 'new' TR3).
 

TimK1955tr2

Senior Member
Offline
Hi, I rebuilt mine recently using fuel injection hose and fuel resistant gasket sealant as an extra measure. Had the fuel hose fitted carefully to the inner "rod" and inner diameter of the tap body.

It does take some fiddling to set up. The seal is slightly compressed by that "plunger" so it expands against the body. But too tight and the tap is impossible to turn and too loose it will obviously leak.

I also found that if you set up the tap on the work bench and then install in the car, it seems to go "out of adjustment". Maybe the torque of the other junctions or mounting twist the tap body slightly.

Anyway, I suggest mounting the tap and then readjusting the plunger so it is tight but still loose enough to turn.


Hope this helps! Tim
 
OP
mgedit

mgedit

Jedi Knight
Country flag
Offline
Randall ... you are right on with the diagnosis/prediction. The slot is gone from the top of the screw and it must have been beat on at some point in its life as the threaded part is not straight any more. The plunger only unscrews about half turn before it binds. Not sure if I can straighten it enough to get it out. Suppose I should be able to find a union that could just replace the tap, although I'd rather not do that. I also see the taps are still available, but it would be nice to fix the one I have if possible. Cheers, Mike
 

TR3driver

Great Pumpkin - R.I.P
Offline
mgedit said:
but it would be nice to fix the one I have if possible.
I've not tried it, but it looks reasonably easy to me. You can buy 8-32 threaded rod in brass (or steel), and cutting the slot should be easy. Finding a washer just the right diameter might be harder, but you could just drill the original washer and use it (with a nut below it).

PS, at this point you mostly want to save the threads in the knurled knob, the rod is already useless. So to get it apart, I would cut the seal off with a knife or Dremel, screw the rod into the knob as far as it will go, and then cut off the (bent) exposed end. But take some photos and measurements before you do that, so you know what you are trying to build.
 

Don Elliott

Obi Wan
Offline
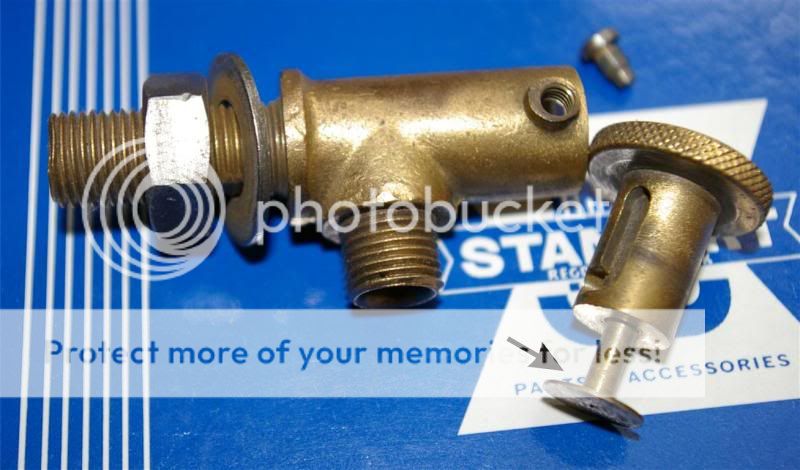
Mike - The cork goes where you have the arrow, As you tighten it all together, the cork starts to change shape due to the compression. It goes like a barrel shape and this seals it. But that only works if you have no veins in the cork. Remember cork is bark from the cork tree and when you tighten it all nicely so it won't leak, you will find that it's so tight that you can't move it up or down. So you loosen it a bit (less barrel-like and now it moves - BUT NOW IT ALSO LEAKS.

My friendly neighbour across the street from me has a lathe and he made me a steel piece just like the center shaft with the cork (but it's all steel). Then he turned two o-ring grooves in the OD where the cork would normally be and we reassembled it with two o-rings which are made of gas-resistant rubber. I think I had to buy 10 in a pack as a minimum, so let me know if you want to go this way and I can mail your a couple.

I don't have a drawing, but it's not too hard to do.

BTW, I have also just installed an electric solenoid operated fuel shut-off valve in the fuel line well hidden behind the main frame about in line where the driver's door handle is located but under the floor pans. So when I get in the TR, I reach far under the dash and flick on a toggle switch which opens the solenoid fuel valve and lets the fuel flow from the tank to the fuel pump. The brass one is just for the judges.
 

lbcs_r_fun

Jedi Hopeful
Offline
Don Elliott said:
BTW, I have also just installed an electric solenoid operated fuel shut-off valve in the fuel line well hidden behind the main frame about in line where the driver's door handle is located but under the floor pans. So when I get in the TR, I reach far under the dash and flick on a toggle switch which opens the solenoid fuel valve and lets the fuel flow from the tank to the fuel pump. The brass one is just for the judges.

Don: Do you have a manual bypass valve, in case of a solenoid failure?
 
OP
mgedit

mgedit

Jedi Knight
Country flag
Offline
Thanks for the suggestions Don. Nice to have a friend with a lathe :smile: Cheers, Mike
 
Similar threads
Thread starter Title Forum Replies Date
Joel Lester TR2/3/3A What size speedi-sleeve needed for pinion seal on a TR3? Triumph 6
luke44 TR2/3/3A TR3 pinion seal - leaked from sitting will it reseal? Triumph 12
Got_All_4 TR2/3/3A Tr3 rear differential seal Triumph 7
B TR2/3/3A TR3 Front Hub Felt Seal questions Triumph 2
mgbmedic TR2/3/3A Modern Seal for Front Wheel Bearings TR3 Triumph 8
Lbp TR2/3/3A Question about TR3 Rubber Windshield Seal Triumph 9
T TR2/3/3A Question on side seal on TR3 fender seal plate Triumph 1
AHS TR2/3/3A Which way does the TR3 front crankshaft oil seal face? Triumph 8
K TR2/3/3A TR3 Timing chain cover scroll seal...... Triumph 5
O TR2/3/3A TR3 Rear Main Seal Triumph 5
A TR2/3/3A More TR3 Rear main seal problems. Please Help!! Triumph 8
tinman58 TR2/3/3A Rear main seal TR3 Triumph 11
CJD TR2/3/3A TR3 Rear Door Seal? Triumph 2
G TR2/3/3A TR3 Rear engine seal issue Triumph 13
A TR2/3/3A TR3 REAR TRANS SEAL Triumph 6
M TR2/3/3A Who sells seal for early TR3 hardtop? Triumph 6
TR3TR6 TR2/3/3A TR3 rear oil seal Triumph 2
K TR2/3/3A TR3...Gas cap rubber gasket/seal in cap lid? Triumph 1
toysrrus TR2/3/3A Re: TR3 "Front" Main Oil Seal: Triumph 3
M TR2/3/3A TR3 crankshaft rear main seal opinions wanted. Triumph 8
Brooklands TR2/3/3A TR3 windscreen seal Triumph 6
W TR2/3/3A TR3 Door Seal Rubber Question photo request Triumph 4
mountainman TR2/3/3A Replacing Differential Tail Oil Seal TR3 Triumph 9
S TR2/3/3A TR3 rear oil seal conversion kit Triumph 3
martx-5 TR2/3/3A TR3 Differential Seal Triumph 5
aaronclark TR2/3/3A TR3 Rear Main Seal Questions Triumph 7
prb51 TR2/3/3A TR3 Dif Pinion seal and speedy sleeve Triumph 12
fad64b TR2/3/3A Rear main seal TR3 Triumph 12
RedTR3 TR2/3/3A TR3 Rear Hub Seal Triumph 7
S TR2/3/3A tr3 rear main seal Triumph 6
prb51 TR2/3/3A 56 TR3 pinion seal Triumph 8
S TR2/3/3A tr3 transmission front seal Triumph 3
S TR2/3/3A Tr3 rear axel oil seal and shim Triumph 0
S TR2/3/3A Tr3 original rear oil seal Triumph 9
bluemiata90 TR2/3/3A TR3 engine rear oil seal Triumph 23
56HealeyDan 100-4 Front Crankshaft Seal Austin Healey 2
B TR6 Crankshaft long seal surface Triumph 5
Michael Oritt Rear Crank Seal Kit Austin Healey 7
Got_All_4 TR6 Seal To Body Mounting Bracket Welded? Triumph 7
A Spitfire Spitfire Diff Pinion Seal? Triumph 2
ModifiedBJ7 BJ7 Windshield Surround Rubber Seal Austin Healey 2
D Top Door rubber and fuzzy seal Spridgets 5
J Rear Main Seal Kit Austin Healey 1
Popeye TR4/4A Door seal channel near top of windscreen Triumph 6
KVH General Tech Flywheel Bolts Too Long For Main Seal Triumph 13
D MG Midget 1275 rear oil seal. Spridgets 0
A Rear Axle Oil Seal Austin Healey 4
Bayless Door seal question Spridgets 3
B BJ8 Hood Bow and Seal Austin Healey 5
D Door Seal Fit Austin Healey 18

Similar threads

Top