• Hey there Guest!
    If you enjoy BCF and find our forum a useful resource, if you appreciate not having ads pop up all over the place and you want to ensure we can stay online - Please consider supporting with an "optional" low-cost annual subscription.
    **Upgrade Now**
    (PS: Subscribers don't see this UGLY banner)
Tips
Tips

TR4/4A Rotor,caliper and Pad replacement TR4

TR3pilot

Member
Country flag
Offline
Hi all,

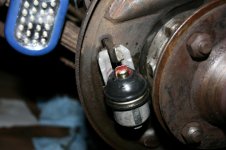
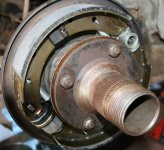
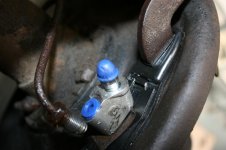
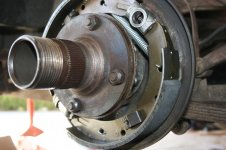
I'm learning bit by bit about my '63 TR4 wire wheel, tinkering, I guess you could call it. I'm currently working on the front brakes and have taken off the rotor,hub and splined extension. If it helps anyone out there I removed the dust cap with an easyout, broke the cotter pin, undid the nut and took the whole assembly off the stub axle in one shot. I then clamped the old rotor to a vise and separated the various parts for cleaning. I found this to be way easier than trying to separate anything whilst on the car.

However I have a few questions as regards putting things back on:

Is it possible to assemble everything off the car and put it back on the way it came off as obviously I dont want to clamp my nice shiny new rotor on my vice as I did with the old one?
Any tips to get some torque on those nuts and bolts that join the splined ext/hub/rotor whilst off the the car without doing damage to the new rotors?
I bolted the hub to the rotor but am not at all happy that it's tight enough and cant get at those bolts whilst on the car because of the dust cover, even if I could get at them how can I stop the rotor from turning whilst I try to tighten the bolts?

Whilst in place the darn dust cover is rubbing my new rotor, will the new calipers hold it back or should I bend it now whilst access it easier?

I hope I'm clear but have been known not to be :smile:

Thanks in advance
 

alanjohnturner

Jedi Trainee
Offline
Look up the correct torque for all these bits. There is an on line workshop manual if you dont have one.

The dust-covers are not vital. Bend or remove as required.
 

TR3driver

Great Pumpkin - R.I.P
Offline
If I understand you correctly, I don't think there is any practical way to install the splined adapter first. The adjustment of the nut is very important, not something you want to attempt at the bottom of a hole (the bore through the adapter). Also gonna be tough to install, bend and trim the cotter key working down that hole. It is also a good idea, when replacing the felt dust seal, to install the hub without the seal first, so you can find (and mark) the proper position for the nut without the felt giving a false reading. Then you remove the hub, set the seal into place and install the hub on top of it, so it finds it's own best position. This process is described in the TR4 workshop manual.

One way to hold the hub while you torque the adapter nuts is to wedge something between the brake pedal and the steering wheel (to hold the brakes engaged). A small child or even a wife works well, if you have one handy. I use a cheap bar clamp from HF, that I modified for use as a spreader instead of a clamp. (Drill out the rivet for the fixed jaw, turn both jaws around, insert a bolt in place of the rivet. Can be reversed if you need the clamp back.)

Another is to stack up some wood under the brake rotor and let the car down on it.

Since the dust shield mounts to the caliper bolts, I'd install the caliper and then make any adjustments required.
 
OP
T

TR3pilot

Member
Country flag
Offline
Thanks and you did understand me correctly. I was able to recruit the lovely wife to help me out with the attachment of rotor to hub and everything went well with caliper fitment and all that...until I discovered I had ordered the wrong pads! Duh.As a result I'll have to wait until tomorrow to drive her for the first time.


However as if to cheer me up my TR3 started right up after not wishing to do so for a week! It's a disease I tell ya.
 
OP
T

TR3pilot

Member
Country flag
Offline
Well I got the new pads in and as I was bleeding the system preping for my first drive the rear wheel cylinder started to leak :rolleye: So I got a new one from MM and installed yesterday following along here https://www.buckeyetriumphs.org/technical/Brakes/Rear/Rear.htm I didn't put the drum back on as I wanted to watch it operate but when my wife pressed the brake pedal fluid peeed out of the top of the rubber dust cover on the cylinder... I managed to catch it in a towel before it hit the new shoes I had also installed. Here's a few photos to see what I did, anybody spot my error or is it a crappy cylinder?

1st and 2nd Photo, after I'd finished installing new shoes,cylinder, and clean up adjuster
3rd photo aftermath of cylinder
4th rear shot and 5th Piston look crooked?

Thanks for any and all help. It's been 25+ years since she had a spin, but gotta be able to stop everywhere before I go anywhere :smile:
 

Attachments

  • 065.jpg
    065.jpg
    89.3 KB · Views: 79
  • 060.jpg
    060.jpg
    89.9 KB · Views: 78
  • 064.jpg
    064.jpg
    89 KB · Views: 86
  • 061.jpg
    061.jpg
    92.1 KB · Views: 75
  • 069.jpg
    069.jpg
    84.6 KB · Views: 76

alanjohnturner

Jedi Trainee
Offline
I would imagine that without he drum on the shooes have opened out far enough that the piston has been driven out of the cylinder.
Just have another go with the drum on.

Brake pipes are not great. But you know I expect.
 
OP
T

TR3pilot

Member
Country flag
Offline
Alan,

Ty that thought was just crossing my mind over my cornflakes :smile: Yes I'm gonna do the pipes next week, just want an itsy bitsy down the street spin first. Tut tut I know :smile:
 
OP
T

TR3pilot

Member
Country flag
Offline
I had a spare new cylinder so I threw it on and put the drum on this time, all's well. Now I can start her and stop her.. time to take her for a wee spin in the 'hood. :smile:
 
Similar threads
Thread starter Title Forum Replies Date
Sopwith_Camel MGA rotor pointing north MG 7
S For Sale Oil Pump Rotor Assembly for Sale Triumph Classifieds 0
K TR2/3/3A Spacers to centre the the front brake rotor? Triumph 11
steveg TR6 TDC - Position of rotor and wires Triumph 4
T TR2/3/3A Does your rotor wiggle Triumph 15
MY66AH Cap and Rotor Spridgets 4
PKPoole TR2/3/3A Distributor Rotor Failure Triumph 3
W Emergency rotor fix Austin Healey 2
mrv8q TR2/3/3A TR 3A brake rotor size? Triumph 3
I TR6 rotor specifications help Triumph 8
tr7andtvr Wedge TR8 Rotor Specs? Triumph 0
Michael Oritt Rotor specification needed Austin Healey 9
J EBC GD208 Brake rotor Austin Healey 5
pkmh Distributor rotor gone bad more than once. Austin Healey 5
B Traffic indicator rotor woes Austin Healey 5
Keith_M XJS 12 cylinder wires, cap, and rotor Jaguar 7
RJS Fouling Ignition Rotor Triumph 7
G TR4/4A tr 4a distributor rotor Triumph 0
J New brake rotor or get the old ones turned?? Triumph 12
H brake/rotor question Austin Healey 28
T Torque setting on brake rotor Triumph 4
H rotor thickness discrepency Austin Healey 7
M Rotor Failure MG 2
D TR2/3/3A TR3 brake rotor question Triumph 4
W Spitfire Spitfire Brake Rotor Removal Triumph 4
L TR2/3/3A TR3 Brake Rotor Thickness Triumph 18
W GT6 GT6 / TR6 Rotor Options Triumph 2
T Question I should know - which rotor for Toyota Triumph 9
RJS Carnbonized Rotor Triumph 8
memphis Rotor Paint Austin Healey 6
A Rotor thickness? Spridgets 7
Monark192 No Power - replaced coil, wires, rotor and cap MG 3
A Ignition rotor recommendations - odd failure Austin Healey 11
K TR2/3/3A Distributor Cap&Rotor:Who has the best for TR3? Triumph 6
Atrus Disc Rotor-to-backing plate interference Spridgets 13
nevets Rotor question Austin Healey 7
T TR4/4A TR4A front rotor questions Triumph 11
P Disrributor Drive and Rotor??? Spridgets 2
M XK150 Rear Brake Rotor Dimensions? Jaguar 1
19_again brake rotor replacement MG 12
newmexTR3 Spark plug / rotor condition analysis Triumph 7
T Advanced Distributo new red rotor Triumph 19
Brosky TR6 Answer to TR6 Rotor problems...and they're RED!! Triumph 18
ChrisS Distributor rotor Spridgets 5
2wrench New Rotor, Car starts, but..... Triumph 6
2wrench Can't believe I broke my rotor Triumph 12
D TR6 TR6 Rotor woes Triumph 0
boeingpilot Brake Rotor Clean Up Restoration & Tools 4
A T-Series Rotor orientation at TDC MG 2
B TR2/3/3A TR3 rotor thickness Triumph 1

Similar threads

Top