• Hey there Guest!
    If you enjoy BCF and find our forum a useful resource, if you appreciate not having ads pop up all over the place and you want to ensure we can stay online - Please consider supporting with an "optional" low-cost annual subscription.
    **Upgrade Now**
    (PS: Subscribers don't see this UGLY banner)
Tips
Tips

Replacing the brake/clutch fluid reservoir

nevets

Jedi Knight
Country flag
Offline
I was thinking of replacing my ratty looking brake/clutch fluid reservoir with a new one offered by Moss, which is painted with a type of paint that will stand up to brake fluid. Assuming I syphon off the fluid from the current reservoir, and then carefully disconnect the brake and clutch lines from the bottom, can I also assume that when I reconnect the lines to the new reservoir and fill with brake fluid, air will not enter the lines? Seems to make sense to me, since the brake and clutch lines are pointing straight up.

Any thoughts? Thanks.
 

CanberraBJ8

Jedi Trainee
Offline
I would make the same assumption as you. But I've been wrong before ;-)
 

healeyblue

Jedi Warrior
Gold
Country flag
Offline
Yes, just be sure the open pipes are above the horizontal plane of the master cylinder or air bubbles will find their way in.
 
5

57_BN4

Guest
Guest
Offline
To be really sure there is no possibility of air entering you can pump up the brake and clutch individually and lock them down with a piece of wood on each pedal. Then when you have the new reservoir filled, release the pedals and fluid will squirt back from the slave cylinders and push any air out with it. Andy.
 
Country flag
Offline
When the pedal pressure is relaxed the slave cylinder replaces the volume of fluid displaced but, also, the 'foot' valve opens which draws fluid from the reservoir which, theoretically, only adds the volume lost as pads or shoes wear in. If I were to replace a reservoir I'd plan on bleeding the brakes, just because if I didn't I'd always wonder if a bubble of air got in the supply line that might cause a softer pedal later. Since this isn't an urgent task why not wait until the fluid is a couple years old and a bleed is a good idea anyway?
 
OP
nevets

nevets

Jedi Knight
Country flag
Offline
Yes, bleeding the brakes is a good idea and would be a good time to replace the reservoir. I've been bleeding my brakes in an effort to purge all air from the lines after replacing the front wheel cylinders. It's proving to be a tedious process, but the pedal feel is improving so I think it's working. I've already gone through more than a gallon of brake fluid but I'm almost there, I hope.
 

steveg

Yoda
Gold
Country flag
Offline
Yes, bleeding the brakes is a good idea and would be a good time to replace the reservoir. I've been bleeding my brakes in an effort to purge all air from the lines after replacing the front wheel cylinders. It's proving to be a tedious process, but the pedal feel is improving so I think it's working. I've already gone through more than a gallon of brake fluid but I'm almost there, I hope.

In cases like this, maybe air is leaking in from around the threads of the bleeder screw. Make sure you hold the bleeder against the caliper or cylinder during bleeding. Also the correct order - LR, RR, LF, RF. I found gravity bleeding works OK. Is there any possibility your fluid is leaking into your booster if you have one.

Just a few shotgun ideas.
 
OP
nevets

nevets

Jedi Knight
Country flag
Offline
Thanks Steveg. I have no booster on my BN6 and air leaking around threads should not be an issue because I am using a pressure bleeder. I did bleed in the order you listed. I even tilted the rear end of the car up to facilitate bleeding the back did the same with the front. I also loosened the connection at the master cylinder while under pressure to allow air to escape from that location (there was none). I'm guessing there may be air trapped at one of the pipe unions. How did they ever manage to do it at the factory with the system dry???????
 

BoyRacer

Jedi Warrior
Country flag
Offline
Nevets,

If you have gone through a gallon of brake fluid then you have a problem with something else. I suspect your master cylinder is bad.

On a different note, if you tilt the rear end up when you bleed the rear brakes...as you stated...you are doing exactly the opposite of what you should. Actually, you should never have to tilt anything. The master cylinders are high enough that gravity should work just fine. You have no trapped air bubbles. You have a problem with your master cylinder. Rebuild it.... or just clean it out so it can function properly.
 
OP
nevets

nevets

Jedi Knight
Country flag
Offline
Richard M, thanks for the reply. MC does not leak and was working fine before I replaced to front brake cylinders and flex hoses, not that that means it's still functioning properly now. Is there a diagnostic test I can perform to verify its functionality?
 

kkaa

Jedi Hopeful
Offline
Hate to bring this up, but check under your carpet for fluid leaks. The master conencts through the firewall and on the inside where the peddle attaches is a seal. Check that to be sure no leaking because its hard to detect as it can go behind the carpet. The fluid will feel really slippery.....

Richard M, thanks for the reply. MC does not leak and was working fine before I replaced to front brake cylinders and flex hoses, not that that means it's still functioning properly now. Is there a diagnostic test I can perform to verify its functionality?
 
5

57_BN4

Guest
Guest
Offline
Bleeding the brakes can destroy the master cylinder seal if the fluid hasn't been changed regularly. Normal braking only uses the top portion of the travel and corrosion/dirt can build up on the unused section of the bore over time. When bleeding and pressing the pedal all the way down, the dirt/corrosion will shred the seal and it will draw a tiny amount of air back in with each pump.

Drum brake cars often don't bleed very well. My Ford didn't (virtually identical brake hardware to BN4) and the Healey didn't. Both of them I just left and drove gently with a soggy pedal for a couple of weeks and they came right. I think it is a combination of small air pockets that won't budge and shoes that aren't bedded in yet.

If an individual wheel is causing the problem it can be isolated by clamping off the appropriate hose with one of those brake line clamps. Obviously doesn't work on stainless braided lines though. On both of my cars the front cylinders were "the problem" equally between them and a little use and settling time seemed to be the cure.

Andy.
 
OP
nevets

nevets

Jedi Knight
Country flag
Offline
Thanks Andy, good information. I will check out the MC for leaks (under the carpet beneath the pedals), though I haven't noticed any change in fluid level in the reservoir. Pedal did improve with some driving and a few more bubbles escaped from the rear bleed screws with the most recent bleeding. At this point, stopping involves one quick stab of the pedal followed by a hard pedal with about 1/3 travel...not ideal but enough to make driving possible. Hopefully, it will improve and I may yet perform a master-cylinder-ectomy.
 

why

Jedi Trainee
Country flag
Offline
I have used the method of bleeding for junctions such as master cylinder by getting everything ready to tighten, putting a clamp on a short piece of rubber hose over the flared end of the brake pipe. Then filling reservoir, removing rubber hose so the fluid leaves reservoir and fills pipe, when it arrives at open pipe I put it into the fitting and letting it actively bleed for a few secs. then proceed to tighten it. Also prior to all this I make sure the female orifice has no air by using needle and syringe to inject fluid and gradually remove needle to insure convex fluid meniscus is at top (turkey baster and small tube will work). Also in some cars, fluid that bleeds out will run around master cylinder and drip onto footwell carpet, so protect. If your interest is only a hard pedal as opposed to some abstract concept of air free line (sorry but...) I have never had this method fail over 80 vintage car years of hobbyist work. Jay, '65 3000
 
OP
nevets

nevets

Jedi Knight
Country flag
Offline
Jay
Thanks for the detailed description. I made a sketch based on my understanding but I am sure I am missing something?
 

Attachments

  • photo.JPG
    photo.JPG
    29 KB · Views: 104

why

Jedi Trainee
Country flag
Offline
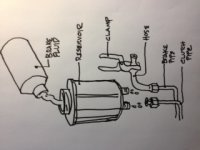
sorry, away at MOTOGP, great stuff. In case of '67 Etype brake master & '65 Healey clutch done in past year: disconnect inlet pipe from reservoir to master at the master, put a short piece of rubber hose on metal line that is then clamped off so no additional fluid runs out of reservoir. Disconnect other pipe of master and without letting it drop down in vertical direction, keep it in place above master in vertical dimension (avoid fluid loss from that side of system). Take out old master, rebuild or replace, then bolt into car with piston moved all the way to the back of the car, as if it were connected to pedal lever--in fact if you are under there why not do now. Make some form of item such as turkey baster connected to a small diameter cupla inches of hose. Suck up some brake fluid, new or previously opened container as long as sealed well last time opened. Put hose in either of the two openings and 1) inject fluid until it flushes out of other opening, tapping master cylinder a few times with a wrench will jiggle loose air, or 2) if hose is flexible enough push it in most forward of two mast cyl holes and inject fluid while slowly withdrawing, or 3)before you put master cylinder in car, push piston all way in and gradually fill as you move cylinder all way out (bench bleeding). Once this phase is over you have mast cyl bolted into car with two holes pointing upwards and two lines waiting to be connected. The holes in the master cylinder should have plenty of fluid in them, and top up if not. Now place fitting on line coming from clutch/brake system into appropriate hole in master cylinder and tighten, some fluid should run out as space occupying nature of nut-like fitting will push excess out of orifice. Next, make sure reservoir is full, position line coming from reservoir so it can easily be put in remaining orifice in master cylinder. Remove rubber hose with clamp and now insert line into the orifice and tighten fitting. Fluid will flow readily through this connection until its end is screwed down tight--be careful of where this excess tablespoon or 2 of fluid may run such as onto footwell carpet. A hard and functional pedal should be felt, you not sure and want some extra security, the only air that could enter is if for some non Newtonian reason some dripped out of clutch/brake to master line I have always found that just a clear container with a hose from the slave bleed or furthest from master brake wheel bleed-let it gravity flow until color change which means new fluid in reservoir has made its way through system. Also the air tight connection the end of the metal line being driven down into the bottom of the orifice from the shape of the fitting pushing against the shape of the end of the tube which itself is driven down into the bottom of the orifice in the master where it will conform to an airtight seal. The threads are the source of the air-tight seal,although no harm would be done by using Teflon tape and who knows maybe the gods will shine and an error in the machining of threads will block a very tiny leak thanks to the tape. Since I have never purposefully changed fluid other than when wheel cylinder etc begins a leak for as long as 20 years in my old cars, a true never ever after usually about 8 years and 70, 000miles in my daily drivers before they are let loose with nary a millimeter drop in reservoir level ('02 Outback 90,000 never even had to top up fluid so far, changed pads once. The fluid that comes from the clutch slave or brake wheel bleed screws should be a distinctly less dark color than the fluid that comes out the bleed screw once new reservoir fluid appears--Such utter laxity and casualness regarding change intervals is a definite no no for raced or even track day cars. Good luck, Jay, '65 3000
 

bob hughes

Luke Skywalker
Country flag
Offline
Hey using gallons of fluid is not right at all.

Try this method - I used a 2 + metre long thin bore tube glued into one that fits the bleed nipples. The thin bore tube is brought up and over a light stand or something that will raise it above the master cylinder. Stick the tube on the furthest nipple from the master cylinder, crack the nipple and pump the pedal. Watch the fluid and bubbles of air rise up the pipe. Stop pumping before the fluid reaches the top and let it fall back to be level with the master cylinder. Top up the master cylinder as required and start again. When you are satisfied that the air has gone repeat on the next furthest nipple etc. Keep going around the car until all the air has been displaced. You will lose some but not gallons and once you are satisfied that the air has been displaced then you can pump some to waste at each position before lock down. _ Works for me and I will be soon doing it again once the engine and gearbox are back in.

:cheers:

Bob
 
Similar threads
Thread starter Title Forum Replies Date
fpstude TR4/4A Replacing Rear Flexible Brake Hoses on TR4A w/ IRS Triumph 11
TimK Old brake hoses need replacing, if you need proof look here... Austin Healey 1
GTP1960 TR2/3/3A Question on replacing brake lines & converting to Dot 5 Triumph 9
F Advice replacing flexible brake pipes on BT7 Austin Healey 3
F Replacing brake master cylinder, fluid reservoir and flexible brake pipes - order? Austin Healey 4
bighealeysource recommendation on replacing rear brake cylinders Austin Healey 13
RJS TR4/4A Replacing front brake hoses Triumph 10
drooartz Any tips for replacing brake hoses MG 16
TonyPanchot TR5/TR250 250/6 replacing rear flex brake hose Triumph 5
T Replacing Jaguar Brake Mineral Oil Jaguar 2
T TR6 Any tips for replacing TR6 rear brake lines Triumph 10
nevets procedure for replacing brake fluid Austin Healey 14
77MidgetMkIV Replacing all metal brake lines... Spridgets 6
B Replacing the Brake Accumaltor Sphere Jaguar 5
J Replacing Brake pads Spridgets 4
S TR2/3/3A Pinion tail bearing replacing Triumph 12
B Replacing the Handbrake Cable Austin Healey 8
drooartz Replacing Bugeye windshield rubber Spridgets 6
K TR2/3/3A Replacing engine and gearbox mounts? Triumph 8
TR3Acustodian TR2/3/3A Replacing "H" front badge Triumph 11
K TR2/3/3A Replacing water pump pulley.....memory refresh. Triumph 7
I Replacing Windscreen Wiper Wheel Boxes Austin Healey 0
S MGB 1978, replacing the clutch. MG 3
PAUL161 T-Series Replacing Transmission MG 3
S TR2/3/3A Replacing the cam shaft Triumph 27
J TR4/4A Replacing springs Triumph 7
Got_All_4 TR5/TR250 Need guidance for replacing steering column bushings Triumph 11
L Replacing veneer on wood dashboard Restoration & Tools 14
D TR6 Replacing Horn insert in steering column Triumph 11
69MGC MGC Replacing an Outer Wheel Well panel MG 3
maxwedge5281 Replacing Factory Hardtop Rear Window Austin Healey 24
BN6_2197 Replacing gearbox switch of the overdrive system Austin Healey 10
TomMull replacing walnut veneeron the dash Lotus 17
R TR2/3/3A Replacing rear springs Triumph 51
Jer refresh my foggy memory - replacing clutch in my 67 Midget Spridgets 1
RAC68 Clutch Still Slipping after replacing 30W-Non-Det. for Red Line Austin Healey 52
T Replacing O/D switch with a clock Austin Healey 4
simon1966 Replacing the witches nose in-situ. BN1 Austin Healey 14
KVH TR4/4A Replacing Front Windshield Gasket Triumph 5
Michael Oritt Replacing timing chain tensioner and more Austin Healey 24
Rut Replacing rocker assembly Spridgets 1
T TR4/4A Replacing rear pinion seal - remove driveshaft? Triumph 21
J Replacing BJ7 Dash - Detailed Photos/Schematics Austin Healey 3
M Replacing front shocks, torque setting? Spridgets 2
T TR4/4A Replacing in situ oils sealing gearbox and rear axle Triumph 18
55modified TR2/3/3A warning indicator bulbs need replacing where and what to buy? Triumph 4
Jim_Gruber Replacing Wheel Studs Spridgets 10
P Replacing the crankshaft damper [harmonic balancer] Austin Healey 15
K TR4/4A Replacing a broken 4A turn signal switch indicator? Triumph 2
55modified Replacing rear spring eye bushings on a BN1. How difficult? Austin Healey 8

Similar threads

Top