• The Roadster Factory Recovery Fund - Friends, as you may have heard, The Roadster Factory, a respected British Car Parts business in PA, suffered a total loss in a fire on Christmas Day. Read about it, discuss or ask questions >> HERE. The Triumph Register of America is sponsoring a fund raiser to help TRF get back on their feet. If you can help, vist >> their GoFundMe page.
  • Hey there Guest!
    If you enjoy BCF and find our forum a useful resource, if you appreciate not having ads pop up all over the place and you want to ensure we can stay online - Please consider supporting with an "optional" low-cost annual subscription.
    **Upgrade Now**
    (PS: Subscribers don't see this UGLY banner)
Tips
Tips

Removing Passenger Rear Bearing Nut

pkmh

Jedi Warrior
Country flag
Offline
Hello Forum,

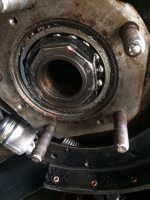
Came the time for me to purchase new set of chrome wheels, tires and hubs for my Healey. But in trying to remove the old passenger rear hub, one lug nut refused to come off.

To make a long story short, I was successful in removing the hub by cutting it out around the affected lug nut/stud (without scarring the brake drum), then the remaining lug nut. My big mistake was to cut a portion of the stud which now requires me to replace the stud by having to go through the process of removing the bearing nut at the axle, etc., so that I can remove the affected stud and drive in a new stud.

I've read some older posts indicating the torque settings recommended when reinstalling the bearing nut (150lbs.). That much is mentioned. I ordered the gaskets and seals which are forthcoming. I plan to reuse the bearings and bearing lock washer (but I do have a new set of bearings if necessary to use as a replacement, if need be).

My questions are simple, hopefully...

A. I wish to use a correct size socket to fit the bearing nut which the nut seems to measures shy of 2 1/4", but when applying a 2 1/4" socket, the socket is too big. Has anybody done this that can advise what size socket would work? I have the breaker bars already.
B. And for the passenger rear bearing nut, does the nut unfasten clockwise or counterclockwise? The question can apply to the driver side rear as well.

Thank you and very much appreciated any input on the above.

Paul
 

Attachments

  • Passenger Rear Bearing Nut.jpg
    Passenger Rear Bearing Nut.jpg
    39.5 KB · Views: 136

Michael Oritt

Yoda
Gold
Country flag
Offline
Paul--

I believe the correct socket size is 2-3/16". It helps to grind the chamfer off of the socket so you present a square edge to the nut. The nut on the right side of the car is normal (righty tighty) and the one on the left is the opposite. You can--and should--get a new locking tab washer from whatever source you are using to get gaskets, etc., as its role is important unless you like being passed by your wheel. Now would be a good time to inspect the bearing surface on the axle stub and if it is scored install a redi-sleeve.
 

dcarlg

Jedi Trainee
Country flag
Offline
I think the bearing nut is an octogon, not a hex shaped nut. Don't tell anyone, but I used a hammer and a drift to tap the nut loose. Driver side has left handed threads.
Good luck.
Douglas
 

John Turney

Yoda
Silver
Country flag
Offline
I just looked at my socket. It's 56 mm [Yes, it's metric] octagonal. AH Spares has them for a reasonable price [otherwise I wouldn't have bought it]. Torque it to somewhere in excess of 100 lb ft. Also, the gaskets from the usual suspects tend to be too thick. The outer race of the bearing has to be clamped in place to prevent spinning it. A gasket goo, like Permatex or Hylomar may be better choice.
 
Country flag
Offline
... get a new locking tab washer from whatever source you are using to get gaskets, etc., as its role is important unless you like being passed by your wheel ...

I believe the locking tab washer can be reused several times as long as there's fresh 'meat' on the edge (at least, I do).
 
OP
pkmh

pkmh

Jedi Warrior
Country flag
Offline
Thank you all very much for the above info and advice!

Will inquire to Healey Surgeons regarding wrench. Otherwise, good to know 2 3/16" socket will do and yes, I did grind the 2 1/4" so now I'm the proud owner of that! (But it only cost me $20- with the shipping so I can live with it.). And good to know the metric equivalent of 56 mm in size. I now understand, for the passenger rear, the lock nut is removed counterclockwise (clockwise for the driver side rear). Considering the time process getting all my wheels in place, I will go ahead and order a new lock washer and keep the old one as a spare. Probably be another couple of weeks before everything's back in place.

Looking forward to see how my car behaves at higher speeds since gyration starts at around 50 MPH.

Thanks again!!

Paul
 

Patrick67BJ8

Obi Wan
Silver
Country flag
Offline
Have you had your brake drums balanced? Scuttleshake comes from them too.
 
D

Duane_Rhynard

Guest
Guest
Offline
Thank you all very much for the above info and advice!

Will inquire to Healey Surgeons regarding wrench. Otherwise, good to know 2 3/16" socket will do and yes, I did grind the 2 1/4" so now I'm the proud owner of that! (But it only cost me $20- with the shipping so I can live with it.). And good to know the metric equivalent of 56 mm in size. I now understand, for the passenger rear, the lock nut is removed counterclockwise (clockwise for the driver side rear). Considering the time process getting all my wheels in place, I will go ahead and order a new lock washer and keep the old one as a spare. Probably be another couple of weeks before everything's back in place.

Looking forward to see how my car behaves at higher speeds since gyration starts at around 50 MPH.

Thanks again!!

Paul


Paul,

Another thread about the octagon nut!

https://www.britishcarforum.com/bcf/showthread.php?108737-Rear-Hubs-bearings&highlight=Duane
 
OP
pkmh

pkmh

Jedi Warrior
Country flag
Offline
Austin Healey Hub with Nut removed.jpg

Hi again everybody. Again, thanks for all the advice regarding ways to remove my passenger rear bearing nut.

I was finally able to remove the passenger rear bearing nut, but only after cutting the nut off (the 2 3/16" socket did fit, but even after the use of the socket with a breaker bar, the nut wouldn't budge). Carefully using a dremel so as to not cut into the threads of the outer shaft, then using a chisel and hammer on an angle, I got the nut loose andoff. A new nut is on order.

My next new headache...

...Removing the hub containing the bearing. So far, I have attempted to use a three jaw press which seats cumbersome around and behind the pentagonal shaped hub. Finally getting the press in a decent enough position and starting to press, I decided to stop applying further pressure in fear of possibly warping the hub. Has anybody had difficulty removing the hub with the bearings and what approach or technique can be suggested in removing the hub/bearing assembly without fear of damaging the hub?

Again, any suggestions greatly appreciated and thanks again!!

Paul
67 Austin Healey
 

dcarlg

Jedi Trainee
Country flag
Offline
Hi Paul.
I performed this operation last summer. Both sides.
Borrowed a slide hammer type bearing removal tool from Advanced Auto. Hub pops off easily.
Other parts stores have loaner tools also.
Good luck.
Douglas
 
Country flag
Offline
I think the bearing nut is an octogon, not a hex shaped nut. Don't tell anyone, but I used a hammer and a drift to tap the nut loose. Driver side has left handed threads.
Good luck.
Douglas
Hmmm, this car was from Michigan...

IMG_1984.jpg


Note that the direction of threads is stamped on this nearly obliterated nut.

IMG_1990.jpg
 
Country flag
Offline
OK, I'll be sure to use the proper spanner next time.
That looks pretty bad.
I've seen them removed/replaced with a chisel before, but while exercising more restraint. That one was almost cut through the nut (makes me wonder how long they wailed on it before trying the opposite direction?) making it a good visual aid ;)
 

Michael Oritt

Yoda
Gold
Country flag
Offline
You can use the axle shaft as a hub puller. Remove the hub extension and after removing the big nut and washer put the face of the axle shaft over the hub studs, then turn the nuts in so that the center of the axle flange is hard against the threaded end of the axle housing. Continuing to tighten the nuts one at a time will pull the hub off of the axle. You may need to put some spacers between the face of the shaft and the end of the axle housing. Once the hub has been moved from its full-in position it should come off easily.
 
OP
pkmh

pkmh

Jedi Warrior
Country flag
Offline
You can use the axle shaft as a hub puller. Remove the hub extension and after removing the big nut and washer put the face of the axle shaft over the hub studs, then turn the nuts in so that the center of the axle flange is hard against the threaded end of the axle housing. Continuing to tighten the nuts one at a time will pull the hub off of the axle. You may need to put some spacers between the face of the shaft and the end of the axle housing. Once the hub has been moved from its full-in position it should come off easily.

Sure do like your approach Michael of using the axle! Clever, economical idea!! I will give that a try first. If, for some reason, I should still experience resistance, then I will go with the slide hammer approach. Thanks to you and Randy on the solutions. Very much appreciated!

Paul
 
OP
pkmh

pkmh

Jedi Warrior
Country flag
Offline
Michael,

Applied your idea of using the axle shaft to remove the racer bearing Definitely working! Before doing, I decided to file any raised areas of each lug's back side and polish smooth just as an added measure to prevent the possibility of scoring up the back side of the axle shaft surrounding the studs. No scoring. Had to stop so I can purchase simple washers to serve as spacers to fit over the inner hub and complete the rest of the pulling process. I have a grinder if I need to grind the edges of each washer slightly to make a more custom fit over the inner hub. A couple of bucks. Again, terrific idea! Much appreciated!!

Paul
 
Similar threads
Thread starter Title Forum Replies Date
S MGB Removing the passenger seat from my 71 MGB..... MG 4
L Removing Master Cylinder Without Paint Damage Austin Healey 27
D Removing the steering wheel hub Spridgets 12
J General MG Thoughts on removing a stubborn 2-ear spinner MG 5
K TR2/3/3A Removing scratches and scrapes fro the wind wings that screw to the windshield? Triumph 9
Gatheringtree TR2/3/3A Removing the headlamp bezel rim Triumph 2
R TR6 Removing the charcoal cannister considerations Triumph 7
S TR2/3/3A Removing a stuck oil drain plug Triumph 13
K TR2/3/3A Removing TR3 windshield stanchions Triumph 4
KVH General Tech Removing Piston Wrist Pin Triumph 2
C Removing AH Sprite Mk 1 windscreen washer pump Restoration & Tools 2
M Need help removing the pinion assembly from a late 1275 steering rack Spridgets 7
jfarris TR2/3/3A Removing choke cable from dash insert Triumph 3
doakley Spitfire Removing facia Triumph 2
7 Wedge Removing sunroof frame Triumph 5
D Removing the last rust from pitted steel Restoration & Tools 11
D Removing Old Radio Austin Healey 4
S Removing Overdrive Shaft Lever Pin Austin Healey 7
L TR2/3/3A Any trick to removing TR3 doors? Triumph 12
M TR2/3/3A Removing Wires From Stator Tube Triumph 7
BN6_2197 Removing connecting link between shock absorber and rear axle Austin Healey 4
T TR2/3/3A Requesting help on removing TR3A steering column and box Triumph 21
longbridgehealey Removing BN4 Bonnet Austin Healey 9
C Removing the Healey "Flash"? Austin Healey 11
Gliderman8 TR6 Removing Left Rear brake line... help! Triumph 9
maxwedge5281 Removing Complete Rear End From BN6 Austin Healey 5
Jim_Gruber Removing a Spridget Engine Checklist Spridgets 5
S TR2/3/3A removing the temp gauge needle Triumph 5
Sarastro General Tech Any good ideas for removing liners? Triumph 20
R TR2/3/3A Removing WD-40 Triumph 6
F Removing oil and water guage from BT7 dash Austin Healey 17
R TR2/3/3A Removing transmission Triumph 3
Joe Schlosser Removing Control Knobs Spridgets 9
W TR2/3/3A Tell me there is a trick to removing lower control arm pin... Triumph 45
Bona42na Spitfire Removing Transmission/Gearbox from underneath Triumph 3
BN6_2197 Advice on removing the float from the chamber Austin Healey 6
B TR6 Removing the ckoke/heater control knobs Triumph 4
Jim_Gruber Removing the Rear Axle Seal Spridgets 4
Jim_Gruber What is the correct tool for removing brake lines from a BE Master Cylinder Spridgets 10
K TR2/3/3A Removing windshield stanchions? Triumph 8
R TR2/3/3A removing sending unit from tank of TR-3. Triumph 8
Jim_Gruber Removing back Radius Arm Bolt Spridgets 12
KVH TR4/4A Removing Rear Differential Seal--Solid Axle Triumph 1
JimTR4 TR4/4A removing the rheostat Triumph 5
Z MGB 1979 Timing problems after removing distributor - Help Please! MG 28
M TR2/3/3A Can radiator be fixed without removing it? Triumph 20
KVH TR4/4A Removing Glass Windshield Triumph 4
KVH TR4/4A Removing the Differential Triumph 7
T TR4/4A Removing wiper motor - inner cable Triumph 4
Joe Reed MGB Removing stuck blade on factory electric cooling fan??? MG 7

Similar threads

Top