• Hey there Guest!
    If you enjoy BCF and find our forum a useful resource, if you appreciate not having ads pop up all over the place and you want to ensure we can stay online - Please consider supporting with an "optional" low-cost annual subscription.
    **Upgrade Now**
    (PS: Subscribers don't see this UGLY banner)
Tips
Tips

TR2/3/3A Early Lockheed Master Cylinders

CJD

Yoda
Country flag
Offline
I have 2 master cylinders for the TR2. They are frozen and really rusty. Now I've been boning up on them and figured out that both of the ones I have are 5 screw aftermarket replacements instead of the original style 4 screw cylinders. So now I have a choice.

The aftermarket, non-original MC's are still available new. No rebuilding, and I know they will work with no effort on my part. I can go this route, but they are noticeably NOT like the original with only 4 screws holding the top on.

I can also get an original Lockheed MC off EBay. The catch there is they are all advertised as "frozen". Having attempted rebuilds on frozen hydraulics, I fear this could be bad. As in, very bad. Re-sleeving the bores is no big deal for a decent machine shop...but that is only if the pistons can be removed at all. And, if the pistons are trash, are they even available?

I would prefer to rebuild an original MC. But does anyone have experience with these once they're frozen to give me some insight into how bad they can be...and parts availability?
 

TR3driver

Great Pumpkin - R.I.P
Offline
FWIW, I believe it was Lockheed that changed the cover pattern to 5 bolts, because the 4 bolt covers always distorted and leaked. That soft "pot" metal just wasn't strong enough to hold a gasket with so little support. (Even the 5 bolt covers are somewhat troublesome from what I hear.) So perhaps it wouldn't be quite so bad to use the later improved cover.

Sorry, the only one I've owned wasn't stuck, so no experience getting them unstuck. But some of the things I would try are:
1) Soak in PB Blaster for several days or weeks. It will slowly attack and dissolve the original seal.
2) Use a BFH and suitable punch to drive the piston back into the body, against the spring. With any luck, you'll find a place where the spring will push the piston back out. Keep working it back and forth, pushing against the spring and then letting it move back, until it frees up enough to come out.
3) If the spring won't move it back out, pressurize the outlet with first compressed air, and then grease from a hand grease gun (which can develop a lot of pressure). Try working the piston around that way.
4) If you can get it out far enough that the air or grease starts flowing into the reservoir, but still can't get the piston out, build a steel cover for the reservoir and pressurize it as well.
5) Or, as a last resort, drill and tap the piston for a threaded rod puller.

I don't see replacement pistons available anywhere; but they don't look too hard to turn on a lathe.

PS, before doing step 5) above or maybe even before 3b), you might try building something that would expand and lock inside the existing hole in the piston. I'm thinking maybe some 10-32 threaded rod or a long 10-32 SHCS with nuts, flat washers and an O-ring or two. Then use that to pull on the piston.
 
OP
CJD

CJD

Yoda
Country flag
Offline
Thanks Randall. That's about how I figured it will go. At any point something can go wrong that turns the MC into scrap. I missed the bid on the cheap Ebay MC. The only other one is $200....and still frozen at that price. I went ahead and ordered the aftermarket for $90.

I'll still keep my eyes open for an original MC to play with...so if anybody finds one, please let me know!
 
OP
CJD

CJD

Yoda
Country flag
Offline
Quick update...with some info for anyone following my route.

I picked up a "correct" four screw master cylinder from Marv. I also received the 5 screw repo MC off Ebay. At first I was bummed that I spent money on two, but it turned out for the best.

The original came with 2 different pistons. One was correct, but the other was apparently from a long since discontinued aftermarket rebuild kit. There are no seals available for the aftermarket piston. And, after 2 days of intense searching, it turns out the original pistons are completely and forever, NLA. That means I had seals that won't work with the piston...or a piston that won't work with the seals. Either way the situation was untennable.

When it became desperate, I took apart the 5 screw repo MC, for lack of any other ideas. I had planned to use the Repo as a backup, or possibly "re gift" it back to Ebay. For once, it worked out. The repo has the "correct" style 7/8" pistons that will take either the NOS seals or the readily available new replacement seals. Hurray for that. The 5 screw repo MC even has a fairly accurate steel filler cap. So the cost of the repo MC became justified. More hurrays!

Now I am down to the problem of the bores in the original MC being rust pitted. It may work as is, but I have decided to have the bores sleeved. It sounds like it's pretty common, but this will be my first time having it done.

Has anyone had MC's sleeved, and have any tips? Bronze vs stainless...the best way to find a shop that will do it...or things to watch out for?
 

sp53

Yoda
Country flag
Offline
I think the place was called Apple hydraulics in NY. They at least use to rebuild all kinds of British stuff. I have had some really stuck hydraulics come apart with heat. I guess the heat burns the rubber apart.
 

mgedit

Jedi Knight
Country flag
Offline
The early Lockheed MC that came with my car had already been resleeved and I rebuilt from that point on. Think these guys did the resleeve https://www.whitepost.com (NFI) as I found an old receipt in one of the boxes of parts. Mine was redone in bronze (not stainless anyway). Have also used Apple Hydraulics on some TR6 stuff. Cheers, Mike

image.jpg
 
Country flag
Offline
John
Do contact me on some of these things. I have a couple more early type MCs, I haven't looked to see if they are 4 or 5 screw tops. All that I sent you were cleaned and boxed up from PO. Bet I can find you an original piston.

Marv
 
OP
CJD

CJD

Yoda
Country flag
Offline
Mike, thanks for the tip...I'm all set, now. I have the MC on the way to White Post Restorations. They sleeve the bores and replace all the internals, including the pistons. It even carries a lifetime warranty when they send it back. Best of all, the price is half what the local machinists were going to charge for just the sleeves!

So, to recap....in 2014. You can get repro Master cylinders with not correct 5 screw lids for as low as $90 on EBay. They are actually pretty decent, and they even take the original seal repair kits. From the big three, the identical MC goes for about $300.

Seal kits now days run from $20 to $129. From what I can tell they are the same, regardless of price.

A complete rebuild of your original MC by White Post Resto in Va runs $225. They turn a boat anchor into a lifetime guaranteed MC in 3 days. Local machine shops want about $350 just to sleeve a double cylinder.

So the TR2 pedals and MC are taken care of. Time to reach my hand into the parts pile and see what comes up next to work on. Thanks again to all of you for you inputs! SP, I did not get a response from Apple hydraulics, so I'm not sure if they are still doing our MC's or not, but thanks also for the lead.
 
Last edited:

mgedit

Jedi Knight
Country flag
Offline
John, glad that worked out for you. Will be interested to hear what you think of the rebuild. Three day turn around is great. Cheers, Mike
 
OP
CJD

CJD

Yoda
Country flag
Offline
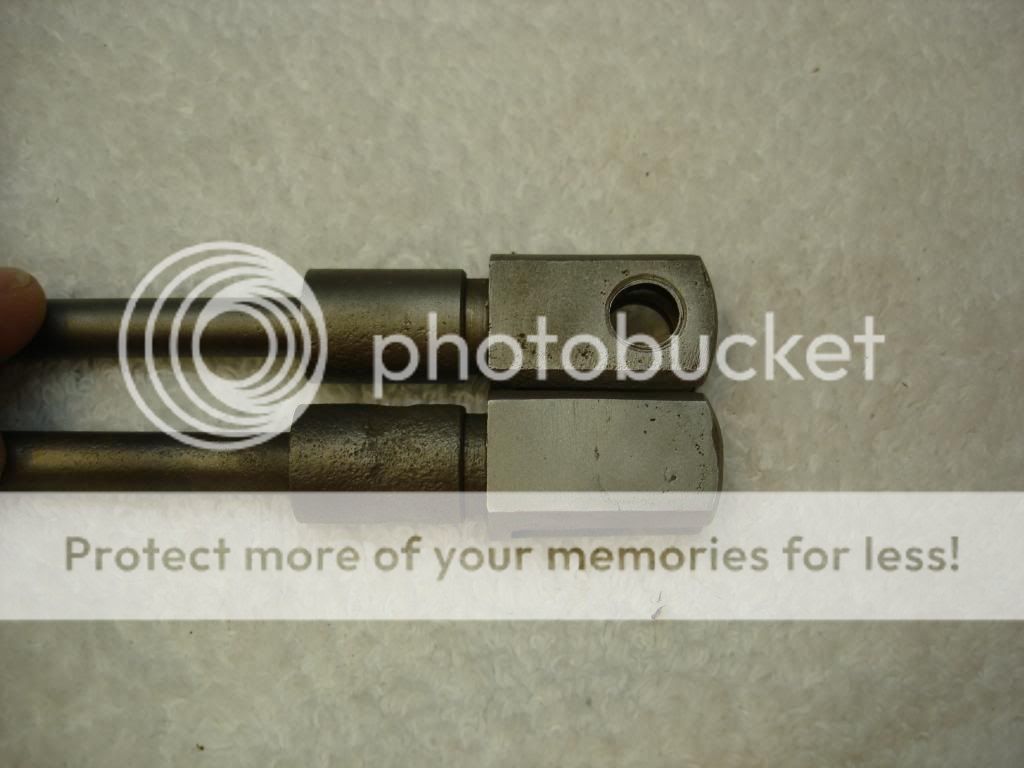
Still waiting for the MC to return home. In the mean time, I'm stuck on the Master Cylinder pushrods. Here is what is going on:

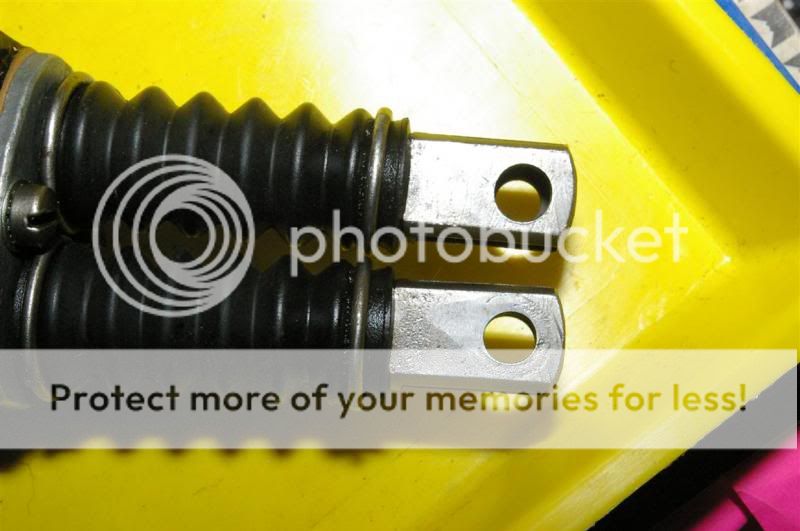
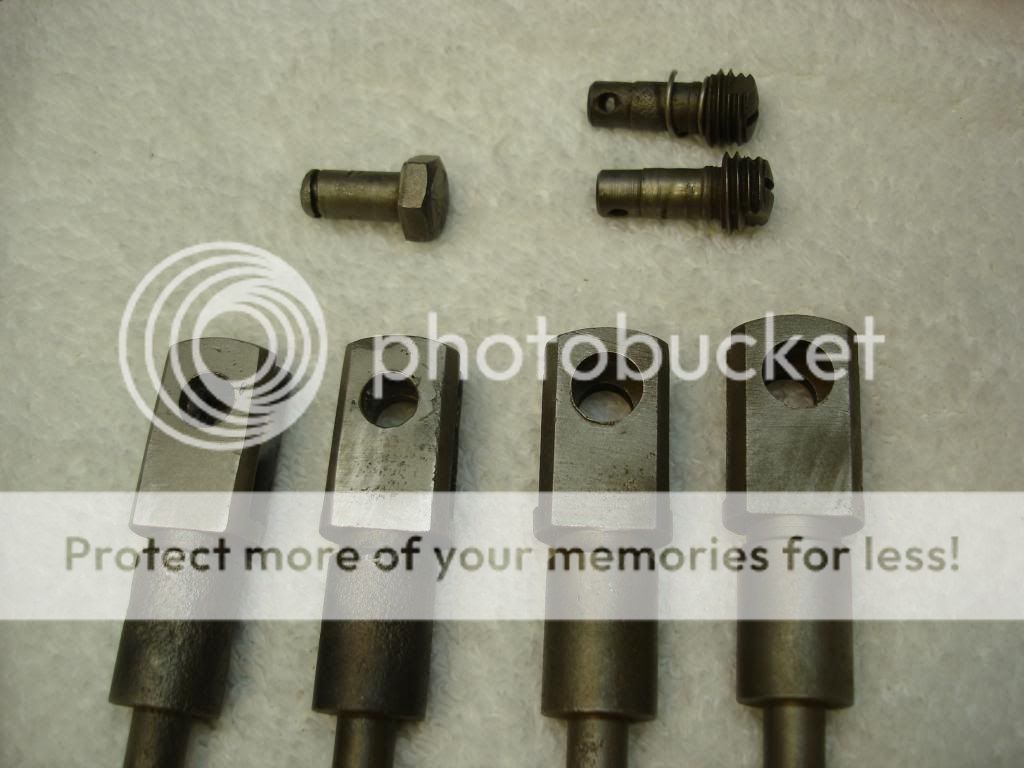
I have 4 pushrods. All 4 have a large hole on one side, and a small hole on the other. The pins that came with the rods do not seem to match. Since the rods had 2 size holes, I originally assumed the pins had to have a step so as to be larger at the base than at the tip. I spent several hours studying parts diagrams and pictures online. Now I don't know what the pins are supposed to look like.

The parts diagram shows a plain pin with a spring on the cotter key end. The pictures on VTR have a plain pin with no spring. If it is a plain pin, why is the hole on one side of each rod larger than the other side...that won't work with a straight pin??

Can anybody with knowledge of the original Lockheed enlighten me on what I am looking for for the pushrod pins?
 

mgedit

Jedi Knight
Country flag
Offline
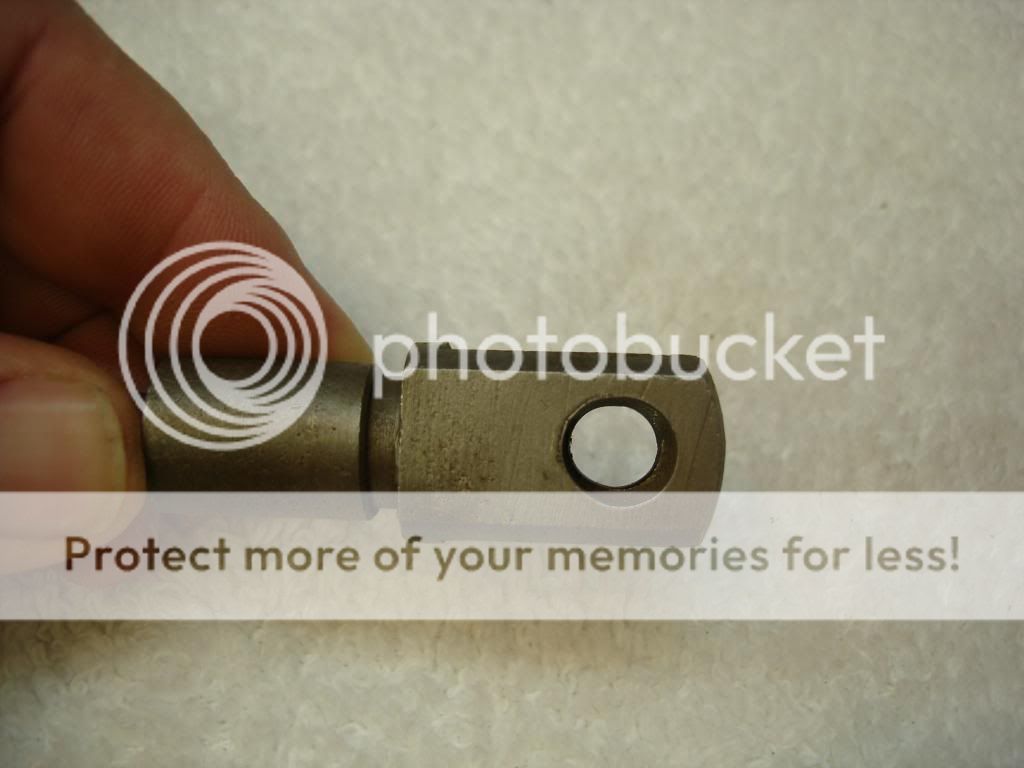
John, I ran into the same issue. Not near car/home just now, but I will check when I get home and try to sort out what I did and post some pictures. I think I finally bought some clevis pins and had then "stepped" at a local machine shop. Cheers, Mike
 

mgedit

Jedi Knight
Country flag
Offline
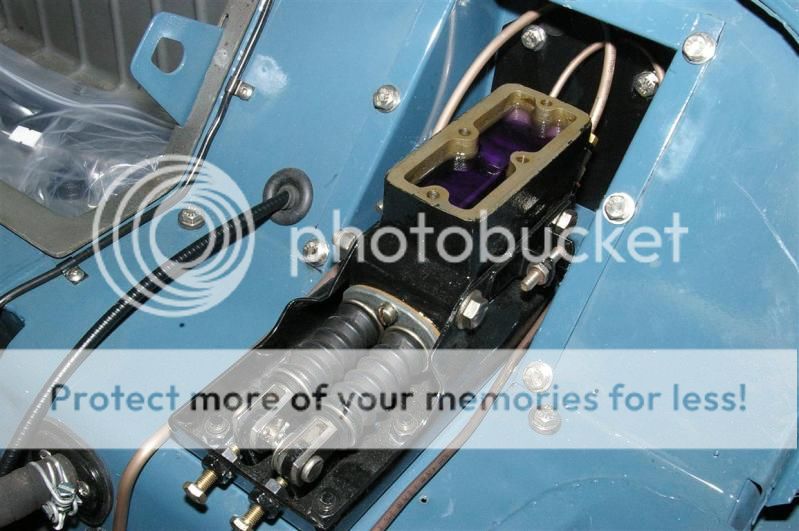
John. Found some pictures. As I said I had this part made from a clevis pin (rough sketch attached). I ordered new pins from TRF originally but they were not stepped. I don't think I used a spring. Cheers, Mike


OP
CJD

CJD

Yoda
Country flag
Offline
Thanks Mike!

I was hoping for an easier answer, but I'd rather do it right like you did. I ordered the pins from the only supplier that still lists them...VB, but I bet they arrive as just straight pins with no steps. All four of the pins that were in the rods I have were also straight. I think that accounts for the severe wallowing out of the pin holes.

I'm envious at how round the holes in your rods are! I will need to weld plugs into my rod holes and then re-drill the holes to eliminate the wallowing. By then the pins should be here and I'll decide whether to fashion stepped pins, or just drill the holes the same size.

Thanks again!
 

mgedit

Jedi Knight
Country flag
Offline
John, if you are going to make replacement pins, might you be able to drill out the holes in the rods just slightly to make them round and then get pins to fit slightly larger holes? Of course, you could drill out the smaller hole to same diameter as larger one and go with a straight pin. I almost did that but was stubborn enough to try making the stepped pin.

Tim, No idea about those rings. Fortunately there were four in the boxes of parts my car came in.

Cheers, Mike
 
OP
CJD

CJD

Yoda
Country flag
Offline
Apparently I have that stubborn streak too! Your idea would have been much easier, although I'm not sure there is enough meat in the pedal levers to open them up too much. What I have done is take 2 of the pushrods, welded and drilled them for 9/32", which is what was in the pedal levers. I left the best of the pushrods original, so I now have 2 original and 2 for straight clevis pins. It was a pain, but now I am ready for whatever type pin VB sends.

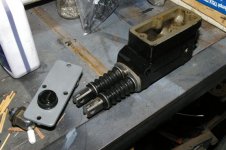
This is one of the wallowed out pushrod holes


After plug welding the hole


And these are the finshed rods, along with the pins that they came with. The re-drilled rods are on the left, with the still wallowed original rods on the right. You will notice that 2 of the pins are those screw-in types used on the handbrake forks. They are why I was really confused, as the larger hole almost took the threaded portion of the screw in pin, but was not threaded.


Tim, I don't have the boot retainer rings either, but I find that the boots are made such that they stay in place without the rings. I'll keep looking and let you know if I find a source for them...
 

vivdownunder

Jedi Warrior
Offline
The original pushrods were non adjustable and used a plain clevis pin. However, these have been unavailable for many years, so are sometimes replaced by later adjustable length pushrods which use a different pin.

With adjustable length pushrods, the larger hole in the fork is threaded. This accepts a stepped pin with a corresponding thread on the large diameter side. The pin has a coil spring which creates tension to stop it rotating freely. They are slotted on the large end for a plain screwdriver, and also have flats for a small spanner.

Viv
 
OP
CJD

CJD

Yoda
Country flag
Offline
Thanks, Viv. That explains a lot. So, it looks like I have the older pushrods, and somebody tried using the later, screw-in pins, with them.
 

mgedit

Jedi Knight
Country flag
Offline
Viv, the pushrods on my early 56 are non adjustable and the holes were definitely different diameters and the larger one was not threaded. Wonder if they originated elsewhere or there is yet another variation in the configuration?

John, nice work. You have lots of options now.

Cheers, Mike
 

TimK1955tr2

Senior Member
Offline
Hi John, thanks for the reply, yes I will be checking around too... it seems saddle or hand bag supply companies sell metal rings but I haven't tracked down the exact size yet...
 
Similar threads
Thread starter Title Forum Replies Date
S TR2/3/3A differential hubs early tr3 and tr2 Triumph 22
S TR2/3/3A Tr2 and early tr3 differential. Triumph 10
C Wanted Early MGB soft top and/or tonneaus, condition not very important MG Classifieds 0
drooartz Early 60's Bentley S3, maintainable? Other British Cars 13
mctriumph For Sale Odd bit for Tr3 and early 3A Triumph Classifieds 0
Joel Lester TR2/3/3A Is "later" style rear view mirror taller than the "early" style? Triumph 6
G TR2/3/3A TR3 starter disassembly rebuild early M428G bomb Triumph 6
vpanza TR2/3/3A EARLY TR3 hubs for wire wheel????? Triumph 5
mctriumph For Sale hood for early Tr4 Triumph Classifieds 0
V MGB Replace late intake manifold angled breather with early model straight? MG 1
Racer-X- Looking for old parts catalog(ue)s with listings/part numbers for early 1960s Vanden Plas 4 Litre Princess Restoration & Tools 3
S TR2/3/3A early tr3 and tr2 kick panels Triumph 3
S TR2/3/3A TR2 and early TR3 wipers Triumph 7
9 TR5/TR250 What is this? Appears to be aluminum fuel cap for TR250 and early TR6 Triumph 13
drooartz MGB Early tail lights on later car MG 17
T Wanted: Early BN1 Sidescreens Austin Healey 2
S TR2/3/3A Rebuilding the early tr3 starter Triumph 5
R For Sale Original AC Ace/Cobra seats. Early 60's, hand made Leveroll by A.W. Chapman, London Other British Classifieds 12
J TR2/3/3A Early Lucas Ignition Switch Triumph 4
J Early BJ8 Armrest Latch Austin Healey 2
B Austin-Healey early 3000 BJ8 Electrical Diagram Austin Healey 0
Boink Early Mini Fuel Gauge - adjusting it British Motor Corp 0
A Early 1967 AH Sprite - installing steering column and new directional switch? Spridgets 0
A TR2/3/3A Early TR3 starter (bomb style) bushings sizes Triumph 7
JPSmit Pre-War Is it too early to write Santa? 1933 MG J1 MG 13
Twit early TR4 Crank Handle wanted Triumph Classifieds 0
T Early BJ7 Vent Window Seal Austin Healey 2
S For Sale Early Sprite & Midget Speedometer/Tachometer/Generator etc. Spridgets Classified 2
Twit TR4/4A early tr4 check straps Triumph 4
oldbagpipe Wanted Early TR4 Silver [Aluminum] Dash Cluster Triumph Classifieds 1
rr64 Wanted Early MGB Inner Steering Track Rods Wanted MG Classifieds 1
oldbagpipe Located Early TR4 Glove Box Hinges Triumph Classifieds 0
PAUL161 MGB Early B Banjo Rear Gears MG 2
R TR4/4A Early TR4 seat pans Triumph 26
oldbagpipe SOLD!! Early TR4 Short Bubble [Bulge] Bonnet/Hood Triumph Classifieds 5
HealeyRick Early Healey History Austin Healey 2
red57 Wanted WTB Early Austin Healey Horns Austin Healey Classifieds 1
K MG Midget Early and Later model rear brake shoes.... Spridgets 2
oldbagpipe For Sale Early 1969 TR6 'Stalled Project' $4500 Triumph Classifieds 0
CharlesBN1 Wanted WTB Shelley Jack [6 INCH DL] for Early BN1 Austin Healey Classifieds 0
J For Sale Early 70s TR6 seats in new red vinyl, with new tracks, $500 OBO Triumph Classifieds 0
oldbagpipe For Sale Early 1969 TR6 Project for sale Triumph Classifieds 10
CharlesBN1 Wanted wanted to buy - sidescreen trim/strips for early BN1 Austin Healey Classifieds 5
M Old English White Paint Code for early BE Spridgets 1
B Side window question for early Longbridge BN4 Austin Healey 4
M MGB Early MGB engine compatible with later transmission MG 2
B Wanted 100-6 or early 3000 upper and lower grille opening pieces Austin Healey Classifieds 1
John Turney BN4 to Early BJ8 Rear Axle Austin Healey 12
S TR2/3/3A shifting tower shifting rods on an early tr3 tower Triumph 11
Csarneson Early BN4 steering box pitting Austin Healey 16

Similar threads

Top