• The Roadster Factory Recovery Fund - Friends, as you may have heard, The Roadster Factory, a respected British Car Parts business in PA, suffered a total loss in a fire on Christmas Day. Read about it, discuss or ask questions >> HERE. The Triumph Register of America is sponsoring a fund raiser to help TRF get back on their feet. If you can help, vist >> their GoFundMe page.
  • Hey there Guest!
    If you enjoy BCF and find our forum a useful resource, if you appreciate not having ads pop up all over the place and you want to ensure we can stay online - Please consider supporting with an "optional" low-cost annual subscription.
    **Upgrade Now**
    (PS: Subscribers don't see this UGLY banner)
Tips
Tips

Dash Recovering - Almost done

David_Doan

Jedi Warrior
Country flag
Offline
Dash Recovering - DONE!

UPDATE: Done!

DSC_2499.JPG


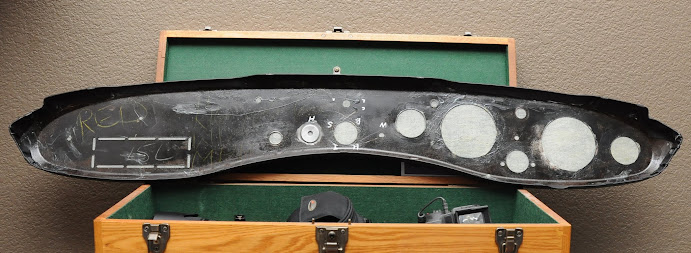
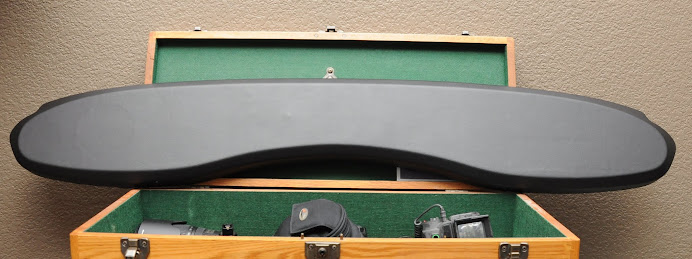
Glued the vinyl on the dash this evening.


I put 2 coats of Weldwood contact cement on the dash and on the vinyl with about 15 min drying time in between - it was about 100 degrees in the garage. Using a piece of plywood and some clamps, I stretched the vinyl very slightly lengthwise and just dropped the dash on it. Then I released the clamps and started pulling it around the sides.

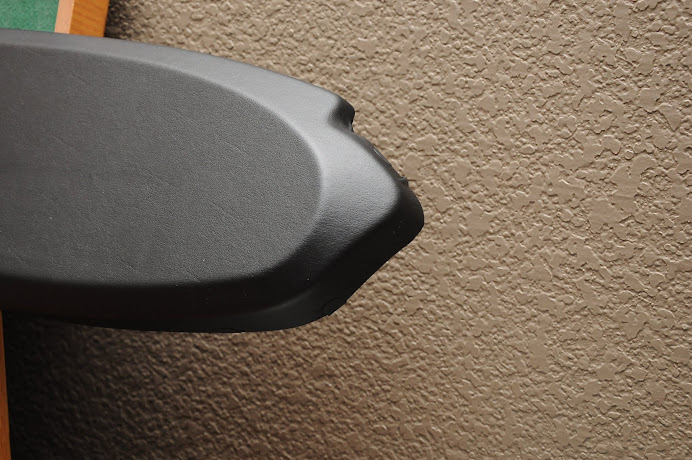
At first just pulling it straight up to get it close, then wrapped around the edges and started trimming the excess. I did not end up doing any relief cuts. The vinyl (seat vinyl from AH Spares) was very stretchy. I ended up with only one little crease on the outside at each left-right tip.

The vinyl wrapped to the inside of the dash was not sticking well, I did not put glue on the inside of the dash. I used upholstery clips in some key areas and let it dry for a couple hours. Then re-applied the glue in those areas and let it set up for about 15 minutes. Then it stuck down and stayed.

I'm going to leave cutting out the holes for another day. The whole process was not as hard as I had expected. I think I was lucky that I got good stretchy vinyl.

Here's pics of the progress so far:

DSC_2492.JPG


DSC_2493.JPG


DSC_2494.JPG


DSC_2495.JPG
 
Last edited:

Jim_Gruber

Yoda
Country flag
Offline
Looking good so far. Are you planning on replacing gauge glass and trim rings. Don't forget gauge O rings.
 

Rut

Obi Wan
Country flag
Offline
David,
Great job! When you cut out your gauge and switch holes use the 'pie' method and glue the strips to the inside of the dash. This will prevent the pulling you experience after the vinyl is stretched across the dash that makes the edges of the hole bunch up.
Rut
 

Bayless

Yoda
Silver
Country flag
Offline
Nice job. Looks really good.
 

Whitephrog

Luke Skywalker
Country flag
Offline
I didn't use the "pie method". My vinyl well secured. After a few days, I used a very sharp small Swiss Army knife to cut the holes. Worked very well.
 

Jim_Gruber

Yoda
Country flag
Offline
McNaster car or Nissongers
 

nomad

Yoda
Offline
I didn't use the "pie method". My vinyl well secured. After a few days, I used a very sharp small Swiss Army knife to cut the holes. Worked very well.

I'm with Ray.....if the vinyl is glued well I don't think you need the "pie" method. I used a exacto knife. The O rings are sold by e-bay vendors. I haven't checked catalog suppliers.
 

Jim_Gruber

Yoda
Country flag
Offline
So tips for getting gauge face/ trim off without breaking glass.
 

HealeyRick

Yoda
Silver
Country flag
Offline
Just pry up the little tabs on the back of the trim ring.

Be careful prying the tabs. The trick is to pry them as little as possible until they no longer make contact with the rim of the gauge, then twist the trim ring until it lines up with the slots in the gauge and lift the ring off. If you try prying the tabs too far, they will either break off or tear the metal on the side of the trim ring. I use a rubber jar lid gripper to grasp the trim ring and twist because the ring and glass will usually be stuck on by the rubber sealing ring:

51XOTiSVt5L._SX342_.jpg
 

Jim_Gruber

Yoda
Country flag
Offline
k thanks guys. It's all stuck together so a future task.
 

Whitephrog

Luke Skywalker
Country flag
Offline
The rubber o-ring between the glass and the bazel deteriorates and tends to stick the two parts together.
 

Whitephrog

Luke Skywalker
Country flag
Offline
Thanks Ray, some solutions are too obvious.... I was going to just skip those, but now it's too easy.

For the gasket inside the gauge that goes between the glass and the trim ring I used the ribbing that is used to hold screens in windows.

Here's sources for the square profiled slip ring (p/n 27H406) that goes between the glass and the bazel.

https://www.ebay.com/itm/NEW-4-Squa...g-Seal-for-SMITHS-JAEGER-Gauges-/231003089300
https://www.nisonger.com/smiths-parts.htm

Also here's a good read on gauge restoration.

https://www.74tr6.com/gauges.htm
 

Jim_Gruber

Yoda
Country flag
Offline
Tks
 
OP
D

David_Doan

Jedi Warrior
Country flag
Offline
David,
Great job! When you cut out your gauge and switch holes use the 'pie' method and glue the strips to the inside of the dash. This will prevent the pulling you experience after the vinyl is stretched across the dash that makes the edges of the hole bunch up.
Rut

Note: I tried the pie method on the fuel Gauge, the vinyl wrapped around the edge made the hole too small for the gauge. I went back and cut it flush with no issues. The same with all the other holes.

As others have said, you need a very small, very sharp knife. An X-Acto number 11 is perfect.
 
Similar threads
Thread starter Title Forum Replies Date
Russ Austin TR2/3/3A Recovering Dash TR3 Triumph 11
C Need tips for recovering my BE dash Spridgets 3
M TR2/3/3A TR3 Dash Recovering Triumph 24
Aeroken Recovering Dash Support Triumph 0
T Recovering the dash Spridgets 20
J For Sale TR 3 dash warning light lens, used Triumph Classifieds 0
J Spitfire No start after fiddling with dash Triumph 2
Patrick67BJ8 Custom BJ8 Dash Switch Panel Austin Healey 7
K TR2/3/3A Switching to green LED dash panel bulbs? Triumph 3
R For Sale TR3 Dash Triumph Classifieds 0
V For Sale Hard Top and Solid Walnut Dash for Sale Triumph Classifieds 2
KVH General TR Green Turn Signal Dash Indicator Triumph 8
timsgolf Center Dash Switch Plate Painting Austin Healey 5
C MGA Dash removal MG 0
C For Sale BJ8 original dash Austin Healey Classifieds 3
rjc157 For Sale Dash Austin Healey Classifieds 1
Bocaray TR2/3/3A Headlight Dimmer conversion to dash switch Triumph 6
M MGA RHD MGA dash finisher MG 0
A MGB MGB dash painted MG 13
Rob Glasgow LED Dash Light Upgrade Austin Healey 28
jfarris TR2/3/3A Removing choke cable from dash insert Triumph 3
BoyRacer Blue Vinyl Dash Material Austin Healey 3
jfarris TR2/3/3A Dash Lights Triumph 3
E Wanted wanted Austin healey 3000 adjustable steering wheel & dash pad Austin Healey Classifieds 2
R Ground wires under dash Spridgets 5
EWD TR6 74 TR6 Renegade Dash Wire Triumph 7
B TR4/4A Dash Color? Triumph 3
EWD TR6 TR6 top dash trim paint Triumph 2
TomMull Dash wiring Plus 2 S Lotus 16
I TR6 Dash light issues Triumph 19
J Attaching BT7 Dash Facia Panel Austin Healey 2
EWD TR6 Dash Pad Replacement Triumph 3
longbridgehealey Bugeye dash Spridgets 6
J TR2/3/3A Wooden piece under scuttle with dash Triumph 6
Basil New Dash Cover in the Telly Other Cars 3
oldbagpipe Wanted Early TR4 Silver [Aluminum] Dash Cluster Triumph Classifieds 1
steveg TR6 Metal Dash - does anyone make one? Triumph 13
charleyf TR2/3/3A Under dash fuse Triumph 7
F TR2/3/3A Dash repair Triumph 7
M Getting behind the dash on BJ8 Austin Healey 4
Rut TR4/4A Dash color Triumph 9
Rut TR4/4A TR4 wood dash Triumph 26
J Walnut veneer for the dash, Look what I found! Austin Healey 12
I TR6 Thickness of original TR6 dash Triumph 2
S TR2/3/3A Dash Pot Oil Triumph 14
TRMark T-Series Dash for Sports/Racer MG 5
S BJ8 Choke Cable- How to tighten the nut behind the dash? Austin Healey 6
TomMull replacing walnut veneeron the dash Lotus 17
K TR2/3/3A Dash Lights Triumph 3
EWD TR6 ‘74 TR6 Interior - Padded dash and heat/sound material Triumph 4

Similar threads

Top