• Hey there Guest!
    If you enjoy BCF and find our forum a useful resource, if you appreciate not having ads pop up all over the place and you want to ensure we can stay online - Please consider supporting with an "optional" low-cost annual subscription.
    **Upgrade Now**
    (PS: Subscribers don't see this UGLY banner)
Tips
Tips

Body Panel measurements and angles

BOBBYR

Jedi Trainee
Country flag
Offline
Hi Gang and Happy Holidays to All ,
This year I built a new shop out back and in the spring I'll be starting a total restoration on my 65 BJ8 . I've done my research over the years and still I feel I'm walking into this project blind . If anyone can steer me toward any technical manuals or materials on body and frame panel placement to help in this quest , could you please let me know or drop me a PM . Any help would be appreciated . I hope you all have a wonderful and safe holiday .
Bobby R
 

roscoe

Jedi Knight
Silver
Country flag
Offline
Body panels and fitment of parts is as much an art as a science. Before you touch a spanner or screwdriver start taking photos. Thanks to digital photography there is no reason to not take dozens, if not hundreds. This is especially useful for wire harness routing, hardware recognition etc. If you do this, take more and different angles of everything, you will still find you lack the photo that shows exactly what you look for. You can never have enough photos. Do not worry about super close up shots unless there is good reason. I have some shots that to this day I can't easily figure out what I'm seeing because there is no reference I can recognize. I had boxes full of parts when I bought my car in pieces so I didnt have the luxury of "before" pictures. Every Healey book I had had at least a few unique photos that proved valuable but no reference had them all.

I hate using plastic but I caved and bought zip lock bags I could label for hardware.

Depending on how much cutting and welding of new steel parts you end up doing you can make measurements before you cut something out, relative to structure that will remain. Many new repair panels need to be trimmed or have slightly different shapes and you need to deal with those if they happen. If you like your door gaps you might measure the opening every-which-way because you will want to know if they change at all when you pull the engine and transmission. I think door gaps were my biggest time suck when I went back together but your mileage may vary. If for some reason you buy any new full panels like fenders, boot or bonnet the chance that they will fit perfectly is about zero. That is what pannel beating is all about. If you find significant amounts of Bondo when you get down to metal, figure out how to go back together without it. Spot putty is ok for small defects but large scale polyester layering is a cop out for good metal working. Be especially glad about milestones. For me the biggest was when I realized, disassembly is done, the frame has been repaired and I actually got to bolt something back together.
 

Healey Nut

Luke Skywalker
Country flag
Offline
Theres no manuals or drawings available that I know of . I had the metalwork on my restorations done by a pro restoration shop . They built a frame for my 64 so it could be flipped upside down while the frame rails were repaired .
Also you will need to weld on temporary braces to hold the car structure steady if you plan on cutting out a structural piece so the car doesnt fold in on itself .
Pictures pictures pictures and notes sketches etc and ooodles of patience.
When my cars were being done I would go visit every few days and take more pics of progress .
 

Attachments

  • 09AEBC78-1452-4D68-99AA-5720C4236159.jpg
    09AEBC78-1452-4D68-99AA-5720C4236159.jpg
    66 KB · Views: 123

red57

Jedi Knight
Country flag
Offline
The only dimensional info I found was the chassis drawing in the Bentley manual. I didn't have the luxury of having someone else do the work for me so I first built a rotisserie - I blended ideas from some plans I found on the internet. I think the rotisserie was the most helpful piece of equipment I had. I agree with pictures, pictures, pictures and, even more important, back-up the files.... I had a computer hard drive die a couple of years ago and lost almost all of my detailed disassembly photos, including component disassembly,repair and reassembly photos and I am still sick about that. So pictures & back-up and lots of notes of any measurements you can - one of the difficulties with measurements is that almost nothing is square or straight so finding a proper reference point to measure from can be really tough.

It also think it's very important to jig/brace things so you don't loose overall shape of the car when cutting out old metal. In my case I had hit a deer so I needed to straighten the frame as well as replace the rotted sills, floors and the right shut pillar completely and several places I had to replace sections of outriggers. In order to replace the sills, you have to cut off the bottom of the hinge pillars and replace them.

So, bracing things is important but IMO having access to the areas you will be working on is even more important - this also means the ability to install doors, fenders, shrouds to check fit as you go (lots and lots of times:smile:
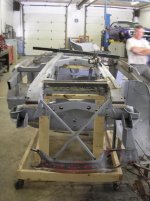
)....not as easy as it sounds. Below are some pictures of the jig I came up with. It kept the frame straight with no sag and prevented twist in the frame and worked pretty well at giving access to things and is strictly bolt/clamp in with no welding on the car. You will need to decide what you will be replacing and what access you need so this jig may not work for you - hopefully you only need to replace some rusted sections but the car is already straight?
IMG_1933.jpgIMG_1934.jpgIMG_1935.jpg
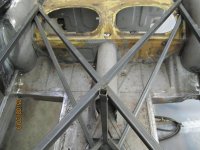
It consists of 1" square tubing and some 1/4" flat bar and a small piece of 4" channel. It's a bit hard to see in these pictures.
In the front I laid a piece of flat bar across the top of the heater cross tube and clamped thru the various openings.
In the rear I bolted pieces of flat bar to the bump-stop holes in the inner fender arches.
In the bottom I bolted a piece of 4" channel to the transmission mounting holes.
Then I shimmed as needed to get the frame straight with no sag and no twist.
Then laid the pieces of square tubing in and tacked - checking the frame for straight/true as I went and when all the pices were in place it was very rigid with no deflection as it turned on the rotisserie.
Before cutting anything apart, I loaded about 15 50# bags of pellet stove pellets in the passenger area and checked for any deflection - and this is on the rotisserie which has more of a tendency to produce flex than loading on the suspension points would.

So I did all frame/chassis repair and pre-hung doors & fenders and rebuilt the damaged shrouds and installed body patch panels and made sure they fit with decent gaps, all on the rotisserie.

I removed the brace to blast and prime/paint the chassis and will do all final hanging/fitting of body parts without it.
When I removed it there was about a 1/16 movement in the chassis between the front where the braces clamped to the heater tube and the rear where it bolted to the rear inner fender arches.

Anyway, this system worked well for me and if you have any questions, I have a few more pictures.

Dave
 

Attachments

  • IMG_1936.jpg
    IMG_1936.jpg
    66.7 KB · Views: 137
OP
BOBBYR

BOBBYR

Jedi Trainee
Country flag
Offline
Hello to All ,
I'd like to thank you all for your responses in the last couple days . Reading each one , has somewhat calmed me down and put the excitement back into starting this project . You've all come up with good points and I'm including them in the journal I'm writing on this journey . The body panels on my healey are pretty straight so I'm planning on making templates at all steps of disassembly. I think doing that and actually using the forum during the times I get stuck will get the job done . Like I said , I really do appreciate your help and I'm sure I will be keeping you up on my progress . Thanks again .
Bobby R
 

blueskies

Jedi Warrior
Country flag
Offline
You might want to contact Jule Enterprises for help with this. They may be able to help you. Jule builds frames and the various attached structural pieces and likely has a lot of the crucial dimensions.
 

vette

Darth Vader
Country flag
Offline
Bobby, All the aforesaid suggestions are good. If you have a complete car that is very good to start with measurements. Think about this concept, depending on your goal the complete car does not have to come apart. As an example I did not take my shrouds off. They were not damaged and the joint to the understruture was very good with no corosion or oxidation so I didn't feel it was necessary. That saved a lot of work.
The next element that was significant to me was that my doors, which fit very well, were hung with no shims. That told me that the A-pillars were right where they were suppose to be and that in the end my doors should hang with no shims. That is exactly what was achieved. The latch pillars were badly rusted and needed to be replaced. So here's the point. My front "A" pillars became my reference for the whole rest of the build. i hung the doors on the "A" pillars with no shims and that dictated where the latch pillar was going to be. Later with achieving appropriate gaps where they were suppose to be the rest of the car falls into place. Good Luck, Merry Christmas & Happy New Year.
 
Similar threads
Thread starter Title Forum Replies Date
M BJ8 Inner Body Panel Repair Austin Healey 2
Csarneson Body panel assembly order? Austin Healey 6
Tinkerman TR2/3/3A 1960 TR3 A More body panel assembly questions. Triumph 5
S TR2/3/3A body work on the spare tire panel Triumph 7
GTP1960 TR2/3/3A New left front wing body panel from TRF? Triumph 11
W Likely need a few Bugeye inner body panel parts Spridgets 0
BOBBYR Body panel alignment Austin Healey 24
J Best body panel parts Austin Healey 8
Tinkerman TR2/3/3A 1960 tr 3a body panel allignment Triumph 8
wangdango inner body panel painting/welding/etc Austin Healey 3
O TR2/3/3A TR3 Body Panel Fitting Triumph 4
P Body Panel Numbers Austin Healey 7
C Body panel beading Austin Healey 6
R BJ7 body panel reassembly- seals etc question Austin Healey 7
71tr body panel seam sealer Triumph 1
J Can a TF engine be installed in a TD body? MG 7
D Wanted Square body LCS fuel pump Austin Healey Classifieds 13
D Wanted Wanted square body fuel pump Jaguar Classifieds 0
Got_All_4 TR6 Seal To Body Mounting Bracket Welded? Triumph 7
K TR6 Goodparts Trail arm kits mounting just to the frame( no body) and shims? Triumph 9
Editor_Reid V-12 E-Type Body Number Location Jaguar 3
5 MGA Body and Chassis Separation? MG 2
Bayless How does '67 Sprite top attach to body? Spridgets 3
Rod-H TR4/4A TR4 Body Number Plate Supplier Triumph 6
1 TR2/3/3A Best Rustproofing for inside of body. Triumph 7
K TR2/3/3A The "wide body" TR3? Triumph 6
W TR2/3/3A Interior and Body Colours Triumph 14
PatPink TR6 Hello, I am new to the site and want to post some photos of my 1973 TR 6. I have done all mods to this car except body and paint. Triumph 10
Ericstammer TR4/4A TR4A body on TR4 frame Triumph 0
D Body/Paint Shop Recommendations Austin Healey 1
apbos TR5/TR250 TR250 rolling chassis and body for sale Triumph 3
T TR2/3/3A Question on TR3A front body mounting Triumph 6
T For Sale Free - Body Jig for TR3/TR3A Triumph Classifieds 6
T TR2/3/3A Body Tub Weight Triumph 8
D Wanted: Healey 3000 MkIII body and chassis Austin Healey Classifieds 0
T TR2/3/3A Should there be a body ground strap to battery on TR3 Triumph 7
J TR2/3/3A Need help with pivot and body bracket for hood Triumph 2
D TRIUMPH TR6 BODY SHELL Triumph Classifieds 1
B After bead blasting the body I noticed some interesting things… Spridgets 2
S Inner Body Alignment Austin Healey 0
B Body Reassembly Austin Healey 2
S TR2/3/3A Body Mounting Bolts. Triumph 14
F TR2/3/3A front body mounts Triumph 7
jdubois GT6 After over two years stalled at the body shop, my GT6 is starting come back to life! Triumph 5
J Wanted WTB Triumph TR6 Body/ Rolling Chassis Triumph Classifieds 0
Lotuswins Wanted TR4 H6 rear carb body Triumph Classifieds 4
nichola TR6 Recommendation for tail lamp to body gasket Triumph 16
X Production year based on body number ? TVR 3
TRclassic3 TR2/3/3A Body leans to right side Triumph 10
S For Sale Austin Healey Sprite and MG Midget Factory Body Parts Manuals - 1958 - 1974 Austin Healey Classifieds 0

Similar threads

Top