• Hey there Guest!
    If you enjoy BCF and find our forum a useful resource, if you appreciate not having ads pop up all over the place and you want to ensure we can stay online - Please consider supporting with an "optional" low-cost annual subscription.
    **Upgrade Now**
    (PS: Subscribers don't see this UGLY banner)
Tips
Tips

TR2/3/3A 1960 tr3 a seat tack strips

Tinkerman

Darth Vader
Offline
After some interuptions I'm back to working on my seats. I made a jig to bend the luan plywood for the back. I soak the 1.5 " wide strip, in fact I soaked it most of all day Tuesday. I put it in my jig and clamped it down and let it sit overnight and for half the day I took it out of the jig and it is not holding the curve. What am I doing wrong?
My other question is: How many tack strips do I need?
I want to express my appreciation to Randy and Gerry of the Houston club for their hospitality and help during my recent visit there.
Randy really pulled my OX out of the ditch with a set of seat springs


Your thoughts and help greatly appreciated.
Tinkerman
 

martx-5

Yoda
Country flag
Offline
There are two tack strips IIRC. They are different. One for the fixed seat, and one for the folding seat. The one for the fixed seat is attached to the bottom of the pan following the curve of the back. It's flat. The one for the folding seat is the one that needs to be bent as it has to follow the curve of the seat back. I didn't use plywood, rather solid wood. I just bent it over a hot pipe, say 3"-4" in diameter, heated from the inside with a propane torch. Much the same way that luthiers bend the sides on guitars. A little bit of water applied helps steam things up a bit, but no clamping time is really necessary if done correctly, although clamping for awhile wouldn't hurt. I don't remember offhand what type of wood I used, but it was medium hard, probably maple. I tried to pick a tight, straight grained piece.

I don't think that just soaking is enough to soften the wood sufficiently to hold a bend. You need some heat. When I built guitars, one method used other then the hot pipe was to boil the wood for awhile and then clamp in the form overnight. Steam would be better, but building a steam box is more involved.

Here's a link on hot pipe bending...
https://americanwoodworker.com/blogs/techniques/archive/2011/07/12/hot-pipe-bending.aspx

you can google other methods.
 

Rhodyspit75

Jedi Knight
Silver
Country flag
Offline
If you have access to a table saw or band saw you could cut very thin strips of wood. Use at least three strips four would be better, make them into a sandwich with white glue between the strips. Wrap them in plastic wrap and clamp them in your jig. When they are dry they will maintain the shape. You could also steam bend them as suggested above. All you need is a kettle a piece of pipe and rags. Put the filled kettle on a burner, I used my gas grill, slip the pipe over the spout and stuff a rag around the opening. Light the burner and when you get steam slip a piece of wood in the open end of the pipe and stuff another rag in the end. Check the wood after a while and when it is flexible put it in your jig to dry and set its shape. Solid wood would work better then plywood. Be careful steam burns at nasty.
 

Lukens

Jedi Warrior
Offline
I used a cellular pvc material. I got mine from a sign board, but it's the same material as the "fake wood" trim you find in HD or Lowes. Chose a piece of lattice or similar shape. You may have to pass it thru a table saw to get the cross section you're looking for.
Bends easily and hold staples well. It'll be there for your grand kids.
 

mgedit

Jedi Knight
Country flag
Offline
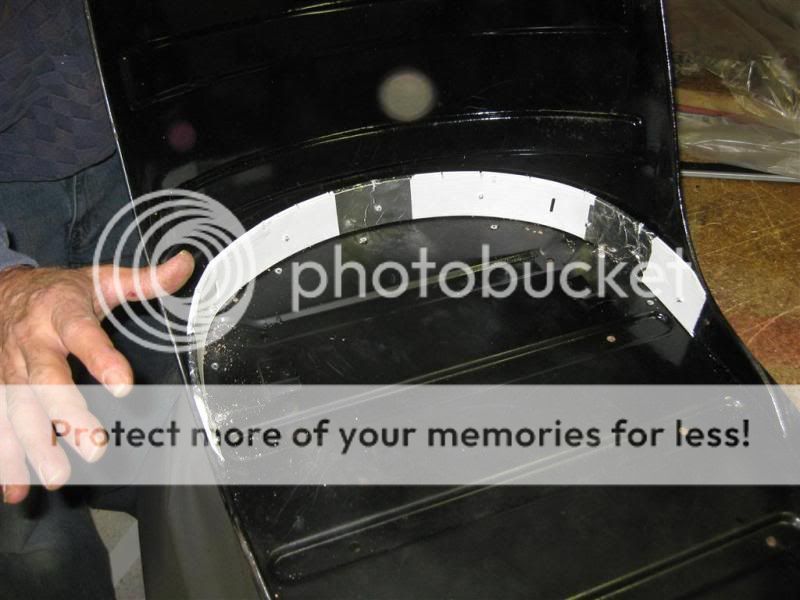
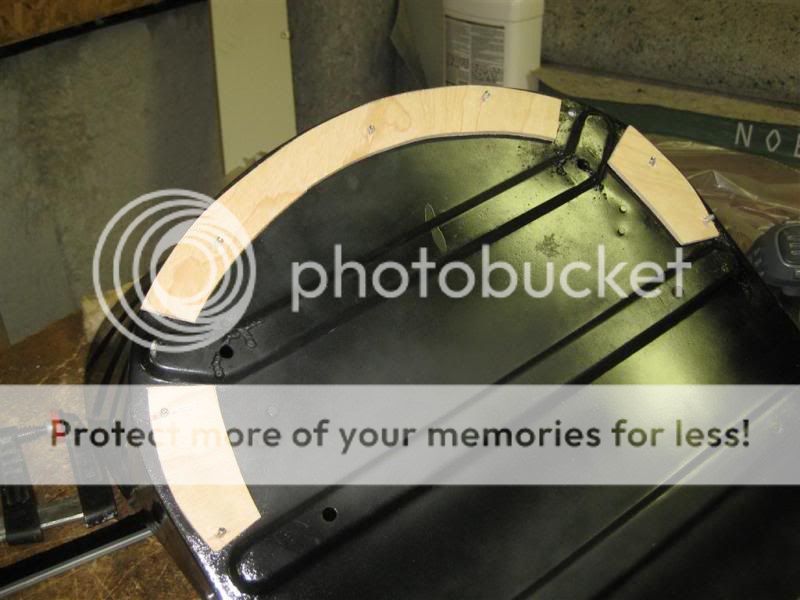
Dick, I encountered trouble trying to bend the plywood after long soaking, making a jig, cutting slots in wood etc. Just did not find it to work well with the plywood that I had at hand. I used the plywood for the tacking strips on the bottom of the seat. For the inside back of the seat I used some plastic venetian blind slats (about 1.5 inches wide). Taped them together with aluminium tape and just folded them around and pop riveted in place. They are flexible, won't rot, and hold the staples well. Cheers, Mike

SeatBack.jpg


SeatBottom.jpg
 
OP
Tinkerman

Tinkerman

Darth Vader
Offline
My thanks to all of you. Please excuse the double thread. This is the first time for me to use the old format and at my advanced age, heh.d I get confused easily, sigh. Pictures really helped Mike thanks! I shall press on with renewed vigahh.
Dick
 
OP
Tinkerman

Tinkerman

Darth Vader
Offline
My thanks to all of you. Please excuse the double thread. This is the first time for me to use the new format and at my advanced age, heh. I get confused easily, sigh. Pictures really helped Mike thanks! I shall press on with renewed vigahh.
Dick
 
OP
Tinkerman

Tinkerman

Darth Vader
Offline
Needless to say I still have cobwebs in the old noggin. I guess I will have to study the tutorial, sigh

Dick
 

MDCanaday

Jedi Knight
Offline
Dont make it harder than it has to be. The best way to go is to get a nice big leather belt.cut
it up and glue it into place.This takes stapples like a champ and holds together for a very long time
(like the leather you are sitting on). It is also termite resistant.......
MD
 

JohnB

Jedi Hopeful
Bronze
Country flag
Offline
Dick,As others have suggested, I also went the "make my own plywood" method with my first TR2 seat, but it was a lot of work ripping and glueing and bending and clamping around forms. Way too much work! For the second seat I happened upon a very workable high density plastic at TAP plastics. As I remember it was called HDPE. Great stuff, took and held nails very well and was very bendable. If I ever have to do it again, HDPE will be my first choice. Check it out.
 

martx-5

Yoda
Country flag
Offline
Dont make it harder than it has to be. The best way to go is to get a nice big leather belt.cut
it up and glue it into place.This takes stapples like a champ and holds together for a very long time
(like the leather you are sitting on). It is also termite resistant.......
MD


MD, you're taking all the fun out of the restoration process with suggestions such as this.

BTW, didn't you use to call yourself Mad Dog?? I haven't seen you use that sobriquet in a long time...or am I mistaken??
 

PeterK

Yoda
Offline
If the luan ply cracks, just soak it some more, maybe use a little HOT steam from an old steam iron before placing it in the form. The rivets will hold it in place on the seat frame even it it does crack a little.

Also note : The pieces of luan that I attached were directly copied from (what was left of) the old pieces so the shapes on the webpage are correct, if that matters to you.
 

MDCanaday

Jedi Knight
Offline
Yes the old mad dog is very fond of the KISS, Just because the factory used crummy wood strips
is a very poor reason to try and do the same. You will also find that I love re-purposing a thing that
might have gone to waste.......
I re-use old seat belt materials for the webbing on convertible tops.(modern cars come with exploding belts)
This is a light year or two better than factory used,and FREE to all my customers,since some poor dumb
insurance company had to buy new ones on some Toyota.
MD(mad dog)
 
OP
Tinkerman

Tinkerman

Darth Vader
Offline
Thanks MD, I have several old leather belts that I can use. What did you use for glue? Contact cement? Maybe I can get this part of the project behind me.

Cheers, Dick
 

PeterK

Yoda
Offline
My crummy wood strips lasted over 50 years. No animals were harmed in the process although leather is a good idea for an easy replacement.
 

TuffTR250

Jedi Warrior
Country flag
Offline
Would it work to just glue the vinyl to the metal seat base using a strong upholstery glue rather than putting the tack strips in?
Regards,
Bob
 
OP
Tinkerman

Tinkerman

Darth Vader
Offline
Quized my upholstery buddy and he prefers the wood tack because it is easier to work with and is much easier to reposition if needed.

Cheers, Dick
 
Similar threads
Thread starter Title Forum Replies Date
G For Sale 1960 TR3 A Triumph Classifieds 0
Pool Dad 1960 TR3 engine serial number Triumph 14
O For Sale New Member from NJ 1960 TR3 Triumph Classifieds 1
R TR3 1960 refurbish Triumph 14
B Wanted Wanted: Trailer hitch for 1960 TR3-A Triumph Classifieds 7
T TR2/3/3A Accelerator Say 1960 TR3 Triumph 11
B 1960 TR3 With rust in cylinders Triumph 7
Tinkerman TR2/3/3A 1960 TR3 A More body panel assembly questions. Triumph 5
Tinkerman TR2/3/3A TR3 A 1960 adjusting apron Triumph 4
pbraun TR2/3/3A 1960 TR3 photos Triumph 17
Tinkerman TR2/3/3A Bonnet stay rod 1960 tr3 a Triumph 11
Tinkerman TR2/3/3A Original wind screen 1960 TR3 A [free to a good home] Triumph 2
Tinkerman TR2/3/3A 1960 TR3 A Door Check Assembly Triumph 13
Tinkerman TR2/3/3A 1960 tr3 a to gasket or not to gasket Triumph 35
Tinkerman TR2/3/3A 1960 tr3 a petrol tank front millboard question Triumph 6
Tinkerman TR2/3/3A 1960 tr3 a upholstery question Triumph 2
Tinkerman TR2/3/3A DOOR PANEL HELP NEEDED 1960 TR3 A post 60000 car Triumph 5
Tinkerman TR2/3/3A 1960 TR3 A Hood stick mounting point? Triumph 11
Tinkerman TR2/3/3A Apron installation 1960 tr3 a Triumph 11
Tinkerman TR2/3/3A 1960 tr3 a carpeting the floor Triumph 8
Tinkerman TR2/3/3A 1960 TR3 A hood stick color? Triumph 2
Tinkerman TR2/3/3A Windshield glazing TR3 A 1960 Triumph 7
Tinkerman TR2/3/3A Wind scereen support bracket tr3 a 1960 Triumph 3
Tinkerman TR2/3/3A 1960 TR3 A Additional steering question Triumph 4
Tinkerman TR2/3/3A 1960 TR3 A Steering wheel play or Lash Triumph 2
Tinkerman TR2/3/3A Parts help needed 1960 tr3 a Triumph 5
R TR2/3/3A 1960 TR3 Restoration Triumph 8
O TR2/3/3A 1960 TR3 Front Brakes Triumph 2
Tinkerman TR2/3/3A 1960 TR3 Post 60000 elec equipment Triumph 12
boxofparts TR2/3/3A Dads TR3 way back in 1960 Triumph 16
J TR2/3/3A New Member 1960 TR3 Triumph 11
L TR2/3/3A 1960 TR3 cooling???? problem Triumph 9
R For Sale 1960 Healey BN7 Oil Pan For Sale Austin Healey Classifieds 0
W For Sale 1960 TR3A for sale Triumph Classifieds 0
J Wanted Hood (Bonnet) for a 1960 BT7 Austin Healey Classifieds 0
G For Sale 1960 TR3A for sale $11,999 Triumph Classifieds 0
W TR2/3/3A 1960 TR3A Radiator replacement recommendations Triumph 11
dougie 1960 Austin Healey 3000 Works Lightweight vs. 1962 Ferrari GTO Austin Healey 6
G For Sale 1960 BugEye..Very Good..$20,500 Austin Healey Classifieds 0
5 Sold My 1960 Bugeye Spridgets 10
M TR2/3/3A 1960 TR3A--intake manifold-to-SUH6 carbs studs Triumph 3
B Fluctuating Fuel Gauge 1960 Bugeye Spridgets 4
J Wanted 1960 Sprite Bonnet Spridgets Classified 3
KellyRob BMC GEARBOX 1960 British Motor Corp 2
Fanch00 My 1960 BT7 History Search Austin Healey 1
poolboy General TR LeMans 1960 Triumph 8
jlaird 1960 AH Sprite Spridgets 96
C 1960 BT7 Thoughts Austin Healey 14
L For Sale 1960 Austin Healey steel oem wheels Austin Healey Classifieds 0
F Installing AC in my 1960 Healey Austin Healey 14

Similar threads

Top