• Hi Guest!
    You can help ensure that British Car Forum (BCF) continues to provide a great place to engage in the British car hobby! If you find BCF a beneficial community, please consider supporting our efforts with a subscription.

    There are some perks with a member upgrade!
    **Upgrade Now**
    (PS: Subscribers don't see this gawd-aweful banner
Tips
Tips

Windshield Replacement.

Bob McElwee

Jedi Warrior
Gold
Country flag
Offline
On the way to Road America this weekend, we managed to get a stone crack in the passenger side windshield to match the one we got on the drivers side going to Open Roads in 2002. The car is a 62 BT7 and I have another complete windshield frame with good glass I bought last summer anticipating the need to replace the cracked windshield.
What are the pros and cons of removing the good glass and replacing the cracked glass OR completely swapping out the whole unit?
thanks.
 
Swapping the whole unit would be far easier than just the glass. If you just replace the glass, you will still need to remove the entire assembly. Removing the glass requires removing corner brackets with stuck fasteners, removing & replacing all seals, reassembly, & installation. It can be a real war, plus the cost of seals & corner brackets. In either case, you may want to replace the bottom windshield to scuttle seal. Also, you may have to shim the post mounts or otherwise adjust the fit to prevent stressing, twisting the glass. You can see the parts here:
https://www.mossmotors.com/Shop/ViewProducts.aspx?PlateIndexID=28953
D
 
[ QUOTE ]
On the way to Road America this weekend, we managed to get a stone crack in the passenger side windshield to match the one we got on the drivers side going to Open Roads in 2002. The car is a 62 BT7 and I have another complete windshield frame with good glass I bought last summer anticipating the need to replace the cracked windshield.
What are the pros and cons of removing the good glass and replacing the cracked glass OR completely swapping out the whole unit?
thanks.

[/ QUOTE ]
Oh man, have you got timing!

I am just catching my breath from assembling the windshield for my BN6. I've had the glass about ten (10) years and managed to keep it from getting broken. I had the windshield frame rechromed about 1-1/2 years ago. It's taken me this long to be in the right frame of mind (i.e. work up the courage) to tackle the project /ubbthreads/images/graemlins/thirsty.gif

I took some pictures when dismantling the donor windshield; they show the layout of the rubber strips. I only took a couple of pictures during the reassembly stage. I'll try to get all those up on the 'net and included in this thread later on tonight.

I have to say that I was amazed at how many times (and how hard) you can wail on a windshield frame (wrapped around a piece of laminated Tudor Glass) without inflicting any damage.

I should mention that it was a rawhide mallet /ubbthreads/images/graemlins/angel.gif

In closing, it's doable, certainly not fun, but doable.
 
I am not sure of the difficulty involved in replacing the windshield to scuttle seal on a BT7. However, for a BJ8, it is a real challenge. I spent a lot of time on mine. Finally, I took it to an auto glass shop. They worked on it an hour before giving up. I believe the Moss seal was probably made incorrectly, making this a difficult task. Anyway, replacing the glass and seals turned into an all day job.
 
THIS windsheild ?

6420.JPG


Tim
 
I'm not sure how many pictures I can attach per post (most mb it's only 10 pp) so I'll just try this out...

These pictures show how far the rubber strip runs to the ends of each frame piece.

Underside of top piece:

ws_002.jpg


ws_003.jpg


ws_004.jpg


Side pieces are shown next to each other (flange overlapping):

ws_005.jpg


ws_006.jpg


ws_007.jpg
 
These shots were grabbed today during reassembly.

The frame loosely assembled with rubber strips and glazing rubber to verify glass position:

ws_009.jpg


ws_010.jpg


ws_011.jpg


ws_013.jpg


Trimmed corners prior to tightening corner bracket screws (some judicious __rawhide__ mallet work is helpful getting corners to come together):

ws_015.jpg


ws_016.jpg


Excess rubber glazing trimmed off and all cleaned up:

ws_020.jpg


ws_021.jpg


After final assembly but before the side pillars were fitted, I took out each corner backet screw one at a time to coat the threads with Kopr-Shield. You just never know when you might have to do this again...
 
Randy,
Those photos are great!!! A big help to those of us who will be undertaking the same task. So if I understand, you assemble the glass, seals and chrome frame completely, and then screw into the aluminum body pillars as the final step?

Thanks, again.
Lin Rose
1960 BT7 in restoration
1959 Bugeye
 
Tim - yes, that windshield.
Dave and Randy - thanks for the advice. I'm leaning to the complete change because I don't have the patience and attention to detail that I think Randy's pictures indicate. Either way, the job will wait till after the driving season finishes in Oct. or Nov.
What I'm going to miss the most is losing the "Around the World in 80 Days" decal given to us by Peter and Ann Hunt and the "Healey Drivers Club" decal given by Bic Healey when we were in Perranporth with the UK-2K tour. If I can figure out a way to transfer them I'll try otherwise they will get framed and join the other 'stuff' on the wall.
Again, thanks for the responses and Randy, when is the coming out party! Is the AUHC race at Mid-Ohio to soon?
 
[ QUOTE ]
Randy,
Those photos are great!!! A big help to those of us who will be undertaking the same task. So if I understand, you assemble the glass, seals and chrome frame completely, and then screw into the aluminum body pillars as the final step?


Thanks, again.
Lin Rose
1960 BT7 in restoration
1959 Bugeye

[/ QUOTE ]
That is correct (or at the very least, the way I did it).

I used Victoria British for the rubber strip, glazing rubber, frame to body weatherstrip and the eight (8) frame to pillar mounting screws. While the lower seal was fat, and difficult to put in (took me 1/2 hour for that alone), I suspect that no matter where you source it, they'll all be similar in that regard.

Too bad I didn't order the (exposed) pillar to body screws that go up on the cowl; I'm hoping to find some nice stainless oval head screws at the local hardware (xlnt selection of unique fasteners; comes in really handy for the bimmer __metric__ projects).
 
[ QUOTE ]
Tim - yes, that windshield.
Dave and Randy - thanks for the advice. I'm leaning to the complete change because I don't have the patience and attention to detail that I think Randy's pictures indicate. Either way, the job will wait till after the driving season finishes in Oct. or Nov.
What I'm going to miss the most is losing the "Around the World in 80 Days" decal given to us by Peter and Ann Hunt and the "Healey Drivers Club" decal given by Bic Healey when we were in Perranporth with the UK-2K tour. If I can figure out a way to transfer them I'll try otherwise they will get framed and join the other 'stuff' on the wall.
Again, thanks for the responses and Randy, when is the coming out party! Is the AUHC race at Mid-Ohio to soon?

[/ QUOTE ]
Yes, I think that is too soon. It would be different if I had a car trailer (I have the tow vehicle...). Just need to spend more time on the Healey, it gets interspersed amongst all the BMW projects (I do a unique __at present anyway__ upgrade to the weak differential mount on the M Coupe/M Rdstr cars; I get cars shipped in from all over the country to work on).
 
I ordered some polished stainless oval head screws for the pillars from Gardner-Wescott, I believe. They look great.
Lin
60 BT7 in restoration
59 Bugeye
 
Nice pics, etc......Randy - great job!
Best regards,
 
It's taken me a bit to get a finished (relative term_ _ _ ) picture of the windshield posted:

ws_022.jpg
 
[ QUOTE ]
On the way to Road America this weekend, we managed to get a stone crack in the passenger side windshield to match the one we got on the drivers side going to Open Roads in 2002. The car is a 62 BT7 and I have another complete windshield frame with good glass I bought last summer anticipating the need to replace the cracked windshield.
What are the pros and cons of removing the good glass and replacing the cracked glass OR completely swapping out the whole unit?
thanks.

[/ QUOTE ]
Hi Bob, why not do both! Replace the frame/windshield unit, then drive the car while you have Kirkwood auto glass install a new ws in your original frame. The glass shops don't use the original rubber components, they use their own material, probably a caulking rubber compound. It's supposed to seal better and look better as well. Good idea to have the rubber seal from ws to shroud replaced also. That would be original.
 
[ QUOTE ]
Hi Bob, why not do both! Replace the frame/windshield unit, then drive the car while you have Kirkwood auto glass install a new ws in your original frame. The glass shops don't use the original rubber components, they use their own material, probably a caulking rubber compound. It's supposed to seal better and look better as well. Good idea to have the rubber seal from ws to shroud replaced also. That would be original.

[/ QUOTE ]
If the're using a butyl rubber compound, that may be the last piece of glass your original windshield frame may ever see. That stuff doesn't release very easy and the way our channels are made doesn't lend itself well to the piece of wire type tool used to remove the glass from modern cars.

As always, this is just my opinion and yours might vary /ubbthreads/images/graemlins/wink.gif
 
This applies to the BN1, BN2, & some later cars.
Windshield to scuttle seal:
Over the years I have read much discussion on how to fit the seal & which seal is the best. I went through the following drill quite a while ago & still have a perfect tight fit even though the car has been in very hot sun, rain, & snow for three years now.

I purchased a straight section replacement seal from BCS in Stockton. With the seal were instructions for a perfect fit. No pre-curved seal needed. I have not seen this mentioned before.

1- Work the top of the seal into the windshield channel a bit at a time, don't slide it in from one end, this will stretch the seal in the wrong places. A thin dull putty knife works well.

2- When the seal is solidly seated in the channel, apply a heat gun to the ends of upper thicker part of the rubber & stretch the outer end as far as possible. Use a metal heat shield to prevent overheating the glass. Hold the stretch until the rubber cools. It took me several trys to get it hot enough & stretch it far enough. A wet rag helped to cool the rubber faster. The stretch & cooling causes the thicker part of the seal to be longer than the bottom thin part, because the thick part springs back less. This forms a very tight fitting & permanent curve in the ends of the rubber. Trim the ends to length.
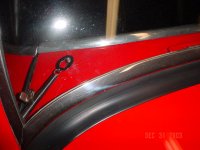
See the attached pic.
----------------------
Windshield to channel seals:
The earlier cars used a glazing which fits flush with the chrome windshield surrounds. Does not overlap onto the glass.

Rather than use some of the variously available preformed rubber seals, I used one to two layers, as needed, of glazing tape. A tape similar to two sided friction tape available from auto glass shops. The tape was wrapped over the glass edges & the chrome U section pieces lightly forced into place over the tape with a rubber hammer. A little lighter fluid applied to the tape softens, actually makes a sticky goo, which allows the parts to go together & mold tightly to the various gaps. After the fluid evaporates, this makes a very solid, waterproof bond.

Assemble the parts to the glass, let the solvent evaporate, & trim the excess as needed. Easy to fit, assemble, water proof, & looks like original.
D
 

Attachments

  • 116352-Windshield.jpg
    116352-Windshield.jpg
    79.7 KB · Views: 266
Back
Top