• Hi Guest!
    You can help ensure that British Car Forum (BCF) continues to provide a great place to engage in the British car hobby! If you find BCF a beneficial community, please consider supporting our efforts with a subscription.

    There are some perks with a member upgrade!
    **Upgrade Now**
    (PS: Subscribers don't see this gawd-aweful banner
Tips
Tips

water temp bulb loose

RestoreThemAll

Jedi Warrior
Country flag
Offline
Hey guys,
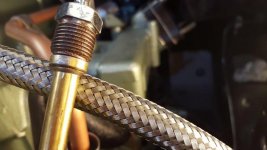
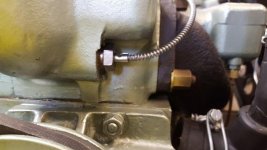
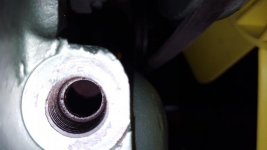
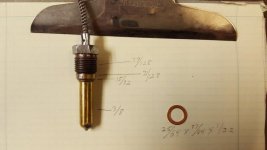
I sent my gauges to Nisonger for a full rebuild. Nice work. They installed a new water temp line and bulb. I cleaned up the threads in the head and used copper never seize. The nut screws in by hand all the way. I ground down an open end wrench and used it to tighten the nut. The line can be moved slightly, and I'm sure coolant will blow by. I've tightened the nut as much as possible with an open end wrench. This nut seems soft so I'm a little nervous about over tightening. I'm considering modifying a 5/8" deep well socket as suggested by some guys on this forum. How much do I dare torque this nut? 20#? More?

I could also put a tiny smear of sealer on the seat but at this point it's still too loose for that to cure the problem.

Dale
 

Attachments

  • water temp bulb.jpg
    water temp bulb.jpg
    47.3 KB · Views: 133
  • water temp 1.jpg
    water temp 1.jpg
    43.1 KB · Views: 134
  • water temp 3.jpg
    water temp 3.jpg
    26.5 KB · Views: 142
I've used a Snap-on crow foot wrench on that, but that nut is really soft and I don't think an open end wrench is very good for avoiding damage. I'd definitely try the modified socket which should give you a better grip. As far as how much torque all I can say is twist it until it rounds off, then you know you went too far.
 
Do you have another gauge, working or not? If so, compare that to your rebuilt parts at the bulb/nut end. Even try fitting the other nut and bulb to see whether that tightens up. that might help you understand what is going on. As one possible cure, could you add in a copper or brass washer at the joint between the sending unit and the bottom of the hole to take up the slack?
 
"Twist it until it rounds off, then you know you went too far." Thanks Rick! Sounds like something my friends would say. :highly_amused:


Blueskies, I don't recall if Nisonger sent back the old one. I think not. I did consider a copper washer. The seat is tapered but the copper should deform to match. I'll try the socket first and see what it feels like.

Dale
 
Do you have another gauge, working or not? If so, compare that to your rebuilt parts at the bulb/nut end. Even try fitting the other nut and bulb to see whether that tightens up. that might help you understand what is going on. As one possible cure, could you add in a copper or brass washer at the joint between the sending unit and the bottom of the hole to take up the slack?

I agree and to modify a socket for tightening use an old spare and ct a slot in it just wide enough to pass the copper tube allowing it to fit on the tubes nut .Waterpump pliers will let you grab it for tightening.
 
After you modify the socket, use a hose clamp around the socket as well when you are tightening the nut. It will help prevent the socket from opening up and slipping on the nut.
 
Dale,

Sounds like you and I are walking parallel paths right now. Just had the same "problem" with my Nosinger combo gauge. After tightening the nut the bulb was loose, so what I elected to do was go to the local hardware store for a rubber O-ring. I bought a couple of sized, but I think the one that fit was 3/8" ID x 1/16" thick. Once installed, no more loose bulb. Plus with an O-ring you do not have to cinch the nut down so tight as to deform a brass washer.

Griz
 
I'd go for a brass crush washer rather than on O-ring.
 
Sounds to me like Nisonger is using an incorrect nut. I've had two safety gauges overhauled by MoMa and West Valley--Morris in both cases, I suspect--and both pulled down nicely (they might have been the same nuts I sent them).

I cut a slot in a cheap HarborFreight--but I repeat myself--boxed end wrench. Just don't tighten like a gorilla.
 
...all I can say is twist it until it rounds off, then you know you went too far.

As an old mechanic once said: "Make it on until it strips, then back off a quarter-turn."

My dad used to refer to that as the "Bigger hammer - longer lever school of mechanics" :joyous:
 
Non-Healey answer here. The typical Smiths expansion bulb for most applications is a male 5/8-18 thread. The expansion bulb is pressed against a conical seat in the head to make the seal. If that is true for Healeys, then the nut is too short or the straight portion on the expansion bulb behind the cone is too short.

A possible fix in addition to those listed above is to use the bulb spacer used on shallow A-series cylinder heads. This spacer is also used on Triumphs when a mechanical temperature gauge is installed instead of an electric gauge sending unit.

Spacer = Mini Mania part 11K2846

EDIT: From what I have learned by additional Googling, it looks like the big Healeys use an expansion bulb similar to those on Jags where there is an male/male adapter to connect the bulb to the cylinder head and the gauge has a female nut. If that is true... totally disregard my information above as it is for gauges with a male threaded nut to secure the expansion bulb to the head. Sorry.
 
A long while back, I had considered a number of approaches to remove and reinstall the temperature gauge nut and found cutting a slot in a box wrench was best. Apposed to the cutting a slot in a socket, I found that the slotted box wrench allowed for both quick and easy creation of the tool as well as allowing for easy insertion and removal from the nut with the greatest copper tube clearance when working the nut. This approach also provides the handle to provide both positioning and the application of sufficient torque.

Although I have only needed to remove the gauge tube from the head once since the engine was reinstalled in the mid 1980, and at the time really concerned I could fracture the tube, all went well with, as I remember, my biggest aggravation being handle clearance with before the removal of radiator hoses and fan blade repositioning.

Just my memories,
Ray(64BJ8P1)
 
'... cutting a slot in a box wrench was best.'

Agree. Good idea to use anti-seize or teflon tape--not sure which is best--on installation. I used teflon tape last time I installed the bulb, and was able to remove it with an (unmodified) end wrench as my 'custom' HF slotted box end wrench was in another city.
 
Copper washer. I think that you'd actually have a difficult time to find a brass one ( ;) ) but copper is dead-soft and will easily conform to the shape.

BMWs use a lot of both copper and aluminum crush washers, down to a 10mm ID, (12 & 14MM ID being the most frequently used ones here at Sports Cars Plus, LLC) if you can get me the OD of the bulb and the ID of the bore, I may be able to select one that fits from the assortment that I keep on hand.

The copper washers from the local auto parts store, often available in an assortment kit, are too "wide" (OD too large compared to ID) while the BMW ones can be had in quite narrow to not quite wide in the ID/OD relationship.

Sitting on my tool cabinet is one of the adapters as used on the A-Series engine__I have no idea why, as I haven't touched one in decades__but I keep it around, "just in case" (I'm of Scottish decent, and therefore genetically impossible to throw things away). Along the same lines as everyone else, I thought of both of these kluges to get you out of a bind.

Personally, I can't think of any fitting or fastener on an automobile engine, transmission or chassis, where it's a good idea to use Teflon tape; save it for when you're working on your shop's compressed air lines (which should never, ever be PVC) and the faucets in the kitchen or bathroom.

Here's an example of aluminum 14mm, and copper and aluminum 12mm sealing washers on the Banjo Bolts of these oil temperature/pressure sending unit/VANOS adapter blocks that I make; you can see what I mean about them being narrow (and also not as thick as the generic variety) to be easily molded into shape.

ocab_001.jpg
 
Just a thought about using the A-series adapter. Is the threaded portion where the nut fits into any deeper than the threaded portion of the C-series cylinder head? If not, I don't see how it solves the problem. In this Moss publication, they give a P/N for the copper sealing washer: https://www.mossmotors.com/graphics/products/PDF/361-761.pdf
 
Ok. Copper washer with a modified box end wrench.

Randy, I'll see if one of my copper washer can be made to work. Either way I'll post the measurements for the thread history.

Dale
 
Randy is, as usual correct and I should have said a copper--not brass--washer. Ideally you should anneal the washer to make it nice and soft.
 
The attached pic shows the measurements of the water temp bulb and the nut. I found copper washers in the brake parts section of the parts store. As Randy said finding the best size is a small challenge. The one washer that I found, if my math is correct, is less than 3/100 over the widest point on the bulb. The threads in the hole bore measure the same as the widest point on the bulb. It fits the hole snug. This washer would have to be shaved. Emery cloth would probably work. Then add a very light smear of non hardening gasket sealer.

I did email Nisonger to see what his advice would be.

Thoughts anyone?
 

Attachments

  • Bulb measurements 2.jpg
    Bulb measurements 2.jpg
    28.6 KB · Views: 115
Back
Top