• Hi Guest!
    You can help ensure that British Car Forum (BCF) continues to provide a great place to engage in the British car hobby! If you find BCF a beneficial community, please consider supporting our efforts with a subscription.

    There are some perks with a member upgrade!
    **Upgrade Now**
    (PS: Subscribers don't see this gawd-aweful banner
Tips
Tips

Vinyl Dye

Paul, the 8 looks great!, I have used the off the shelf Dupli-color vinyl spray. The one thing I would add is be careful with cleaning agents, citurs cleaner or some medium duty degreaser sounds like a good idea, I got a little carried away trying to clean some pretty old and dirty parts and used automotive paint reducer and it starts to eat away at the vinyl.
 
Joanne said to only use citrus based cleaned before and after the sanding, so that will be it. I will do a pictorial in a few weeks when I get this project going.
 
Hi Paul,

Glad to hear you got together with Joanne @ "Color Plus".

When I did my 1st Int (`58TR3) & applied her dye; I thought I was going to have a "HEART ATTACK"! When I started to apply the dye in a "CRISS CROSS" motion; It was coming out "STREAKY" as heck looking & really "UGLY". I stopped at that point really dis-appointed at the outcome. "(CRISS CROSSING" motion fills in all the pours).

I came down stairs the next day & to my amazement; The darn seat looked like it was "BRAND NEW"!! I finished the entire Interior at that point.

Apply in "ROOM TEMP". "CRISS CROSS" pattern. "DO NOT" go over what you`ve already dyed. (Wait till the next day for a 2nd coat if necessary). Let dry overnight & You`ll be one "HAPPY" camper in the AM!

Of course; If your going from a "Dark to Light" color change; You`ll probably want to put a 2nd. coat on. Oh; You simply rinse out the brush in warm water & re-use anytime. I`ve had mine for years & Its still as soft as the day I bought it.

Can`t wait to see your pics & your reaction!!

Regards, Russ
 
Russ,

I have not done the project yet. A bunch of other unforeseen projects got in the way, but in the next two weeks it's going into storage for the winter. I'll be pulling the rear panel and the convertible boot before that so that I can do those in the basement over the winter.

I will be cleaning with citrus solution, per Joannes instructions and I will follow what you said to do above,

Did you sand your finish with 800 paper prior to dyeing it?

Thanks,

PR
 
Howdy Paul,

"No"; I never sanded any of the Interiors I`ve re-dyed with Joannes dye (Too Lazy). I`ve never had any problems either.

I have to guess its probably not a bad idea especially if you`ve been using "Armour All" or something like that. That kind of stuff is what "Prevents" the dye from getting into all the pours etc etc.

Have Fun,

Russ
 
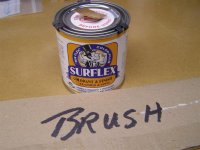
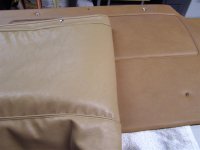
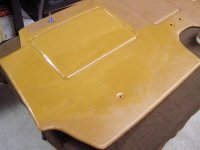
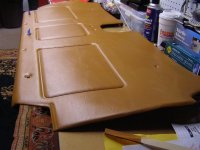
I never used that stuff, but I don't know what PO's have used. I dropped the car off for storage today and I'll be stopping back to get the rear seat panel on Weds. I kept the convertible boot cover, so maybe next weekend I'll start the project, beginning with the rear seat trim panel.

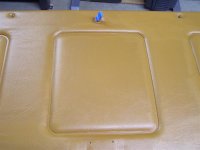
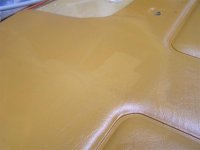
Joanne recommended the sanding more for adhesion than anything else. The rear panel is hidden to a larger degree than the boot cover, so I'll experiment with it first.

Now if I could just get my upholstery guy to get the visors done. Oh, good story on that one.

I stop at his shop last Thurs night to check on the visor rebuilding and he's apologizing and telling me how every job is turning to crap and nothing is going right, but I do notice that he is really upset. So I asked what happened and he shows me this Saab with the lift up boot cover that works off two hydraulic cylinders when the top s going up and down and now it's broken and he can't get the top to go down.

So I crawl in the trunk with a light and watch while they try to work the electrics and hydraulics and I see a shaft that is moving on one end, but not the other. I crawl back out and show him the problem and how you have to look really close to see the busted shear pin hidden on the dark side. I help them take out the u-joint and lift actuators and in 10 minutes the pin is out and he's putting a new one in. They wasted 4 hours trying to find that problem, so I did get a few brownie points. As I left, I asked if I could pick up the visors by next Friday and heard a loud YES as I walked out the door.
 
Hi Paul,

Its always a "Good Thing" to have an "IOU" from a shop of anysort.

I`m sure the upholster is more than happy to complete your visors by Friday.

Nice Goin`

Russ

PS: I agree with Joanne relative to sanding to make for better adhesion. Its just like priming a car for paint. It also allows for better penetration of the dye thru the mat`l. Your going to "LOVE" the outcome!!
 
Howdy Paul,

If you have`nt taken a look at Joannes "Wall of Fame" section; Take a peek there and You`ll see my "Bugeye" Int. in "Red" that was entirely "Black".

Regards, Russ
 
Russ,

Your interior looks great. I have included some shots that show a before and after cleaning, the cleaner that I used (before a quick drying body wash right before application) and the boot cover which is much lighter than the tan interior that I want it to eventually match.

By "CRISS CROSS" do you mean an "X" pattern, by going back over what you have done?

Thanks.....

For some detail, #1 was before cleaning and you can see the fading, #2 was after one cleaning, #3 was the cleaner used, #4 was after the second cleaning and how much dirt that gets baked in came off on the towel, #5 is the material to be applied and #6 shows the boot cover and the trim color difference that I want to become the same.

First I'll do the rear panel and next will come the cover.
 

Attachments

  • 23491.jpg
    23491.jpg
    37.6 KB · Views: 404
  • 23492.jpg
    23492.jpg
    44.2 KB · Views: 405
  • 23493.jpg
    23493.jpg
    51.2 KB · Views: 393
  • 23494.jpg
    23494.jpg
    42.1 KB · Views: 388
  • 23495.jpg
    23495.jpg
    61.2 KB · Views: 392
  • 23496.jpg
    23496.jpg
    44.2 KB · Views: 393
Russ,

One last question. How long did you let yours cure before handling?
 
I answered my own question when I read the can again and started the application process. I did one final cleaning with a body wash just to be sure that I got the remaining silicone or oils off of the vinyl.

I started in the lower left corner and worked my way around. In hindsight, if a big flat panel like this can be sprayed, that would seem to be the ideal way to do it. I did my best not to go over previously done areas, but it's hard on a panel of this size, with few break patterns to do the wide open spaces without blending a bit.

We'll see how it looks after drying later today and tomorrow. I'm hoping that my results are equal to Russ's and that it all evens out.
 

Attachments

  • 23497.jpg
    23497.jpg
    55.3 KB · Views: 459
  • 23498.jpg
    23498.jpg
    47.5 KB · Views: 453
  • 23499.jpg
    23499.jpg
    58.7 KB · Views: 449
  • 23500.jpg
    23500.jpg
    51.8 KB · Views: 442
  • 23501.jpg
    23501.jpg
    55.1 KB · Views: 446
  • 23502.jpg
    23502.jpg
    49.8 KB · Views: 447
  • 23503.jpg
    23503.jpg
    40.6 KB · Views: 444
  • 23504.jpg
    23504.jpg
    50 KB · Views: 455
Howdy Paul,

"CRISS CROSS" brush strokes like an "X" pattern is correct. Of course; You`ll always probably go over a bit of what you covered but it surely won`t hurt anything. Just think like your painting something "ABSTRACT". Go with the Flow.

The main reason for "NOT" going over the area which you have already applied the dye is simply not to have "TOO MUCH BUILD UP" and If you do; It may bubble or peel. Your certainly better off with a "LIGHT 1st COAT" appl. & "IF" necessary; Your "2nd" coat will fill in the gaps.

Due to the fact that your basically applying a similar color; You should be just fine with one coat.

By the way; This dye goes a "Long Way". My Bugeye had a "Black" Int. & as you can see; I changed "EVERYTHING" to "RED". That took 2 coats & still had some left over.

I let mine dry overnight (24hr period).

I just thought of something. "DON`T STIR" the dye like you would normal paint. That creats "Air Bubbles" in the dye & You don`t want that. Also; The "3 Clips" on the lid; Make sure you save those cause after re-using the dye; Those clips create an "AIR TIGHT SEAL". "NO BUBBLES" & of course, store in Room Temp.

Have Fun,

Russ

PS: I just saw your pics. You`ll be real happy this AM!!
 
Russ,

It didn't come out as well as I would have liked. I did email Joanne some pics, but the differences in shades that you can make out in the pictures above, did not go away after sitting overnight. I may have to do a second coat, but I'm going to wait for her evaluation before I do anymore. I will need a lot to do the boot cover and I'm hoping to have enough in the pint to get it done after doing the rear panel.

I'll be posting more back on this. And on another note, I stopped by Eddie's to check on the visors. They look great!! He was clamping them to form a uniform pattern around the bar that attaches into the center holders mid windshield. They are custom stitched just like or better than factory units and the trim is what I used for the color for the rear panel, so it's all going to match a lot better.

I told Eddie that I'd pick them up late Monday, so I'll start a new thread for that project.
 

Attachments

  • 23521.jpg
    23521.jpg
    61.2 KB · Views: 414
  • 23522.jpg
    23522.jpg
    72.1 KB · Views: 416
  • 23523.jpg
    23523.jpg
    41.2 KB · Views: 417
  • 23524.jpg
    23524.jpg
    52.5 KB · Views: 414
  • 23525.jpg
    23525.jpg
    27.8 KB · Views: 405
  • 23526.jpg
    23526.jpg
    36.3 KB · Views: 410
  • 23527.jpg
    23527.jpg
    37 KB · Views: 413
Hi Paul,

Thats a surprise posting to me! When you did the cleaning prior to dying; Did you wait till the panel thoroughly dried?

Something is wrong there but I`m sure Joanne will be able to make some professional suggestions. Certainly; The 2nd. coat should do the trick.

How Happy are you with the color match?

Regards, Russ

PS: Say "Hello" for me while your talking to her.
 
Russ,

The color match is fine and it's more like the long camera shot of the entire panel in real life. Different angles make it look different.

The panel dried for two full days in my 75 degree 50% humidity basement, so I know it was dry and the wax remover was applied , wiped off and given an hour to dry, so I know it was fine.

I think that the panel will need a second coat and I'll use a larger brush, or maybe wipe it on, depending what Joanne says to do.

I will pass along your greeting to her when we next speak. I expect an email back from her later today.
 
Hi Paul,

I was just thinking; Did you by any chance "STIR" the dye before applying?

I really don`t know if that would make a difference but "A passing thought".

Ask Joanne for me; When is She coming down to SC & get out of that "Ugly" weather you folks are having!

Its pretty darn "Cool" even down here. Today & Tomorrow highs expected in the Upper 30s to Low 40s (BURRRRR). Finally on Fri. kind of getting back to normal; At least in the Low 50s. Normal for this time of yr should be "Mid 50s" here in the NW SC area.

When "Florida" is in a deep freeze; You know its cold.

"Is this what they consider "GLOBAL WARMING"?!??!?!?!?!?!?

Russ
 
Well, two more coats and I either end up with lines or streaks.

Next move may be spraying. I even gave my wife a brush today and we applied it together to try to beat the drying ans subsequent lines and now I have streaks. AARRGGHH!!!

It maybe time to spray this thing. But I think I'll call the guy at the Lincoln dealership to see who does their vinyl repair and give him the dye and let him shoot it. I don't want the mess in my basement.
 
Hi Paul,

I`m really surprised to hear about your results!!

What does "Joanne" have to say? I can only guess you gave her a call?

Man; "3 Coats" of Color-Plus & still streaky! Something is really wrong but ???

Regards, Russ
 
Russ,

It's not so much that it's streaky, but rather there is no way to blend it without getting into a "brush over" of a dried or partially dried spot and you know what that means. most of it looks great, but I just hate the seams, for lack of a better word.

I dropped it off at my buddy Al's A& E Auto Body. He's going to spray it for me today or tomorrow. That should fix the time of drying in sections problem over the large area.

He is meeting with his paint supplier today for an idea for the convertible boot to make that easier, as it's another big piece with long panels to blend. More on that later.

Just for the record, I am very satisfied with the product and Joanne and her help. I just think that panels this big need to be sprayed to look perfect.
 
I think the problem will be solved by Friday. My buddy Allan at A&E had the DuPont rep in today. they took a color swatch from leftover material from the visors to run under their computer analyzer and matcher. They mixed and delivered a pint of their product (which I don't really know what it is) and Alan will spray it tomorrow.

I also asked him to spray the boot cover to match, but he was ahead of me and the DuPont rep had already looked at it and gave him a procedure for cleaning and prepping that surface. All I had to do was remove all of my brand new snaps, as they would have been a royal pain to mask and it would have looked stupid to have missed spots for the price of installing new snaps.

So the plot thickens and more pictures to come Friday.

This is just in time, as Woody at the Wedge Shop is completing a lot of repair work and getting the car ready for storage at his facility for the winter. It will now go back to sleep all back together.
 
Back
Top