-
 Hey Guest!
British Car Forum has been supporting enthusiasts for over 25 years by providing a great place to share our love for British cars. You can support our efforts by upgrading your membership for less than the dues of most car clubs. There are some perks with a member upgrade!**Upgrade Now**
(PS: Upgraded members don't see this banner, nor will you see the Google ads that appear on the site.)

Tips
- We have a special forum called "Member Articles" where you can submit actual articles for consideration for publication. Learn More
- Don't have an Avatar? If not, your avatar will default to the 1st character in your username. Go into "Account Details" to change your Avatar.
- Some basic forum navigation info: click
 Hey - did you know if you click on the title of a thread it will take you to the first unread post since you last visited that thread?
- Hey Guest - Is your British Car Club in our Clubs database? If not, send me a PM - Basil

- Looking for a local club? Click the "Clubs" tab above and browse hundreds of clubs world-wide.
- Add Android or iPhone APP: click
- Did you know - any picture or video you add in your posts in any marque-specific forum will also get added to the Media Gallery automatically.
- A few more tips about posting and replying: click
- Hey there Guest - be sure to keep your profile page up to date with interesting info about yourself: learn more
- More tips and tricks on Posting and Replying: click
 but were afraid to ask:
  STOP!! Never post your email address in open forums. Bots can "harvest" your email! If you must share your email use a Private Message or use the
  smilie in place of the real @
- Want to mention another member in a post & get their attention? WATCH THIS

- So, you created a "Group" here at BCF and would like to invite other members to join? Watch this!
- Hey Guest - A post a day keeps Basil from visiting you in the small hours and putting a bat up your nightdress!
- Hey Guest - do you know of an upcoming British car event?
 Pretty Please - add it to our Events forum(s) and add to the calendar! >> Here's How <<
- Hey Guest - you be stylin' Change the look and feel of the forum to fit your taste. Check it out
- If you run across an inappropriate post, for example a post that breaks our rules or looks like it might be spam, you can report the post to the moderators: Learn More
- If you would like to try some different "looks" or styles for the site, scroll to the very bottom, on the left and click the Style Selector.
You are using an out of date browser. It may not display this or other websites correctly.
You should upgrade or use an alternative browser.
You should upgrade or use an alternative browser.
TR2/3/3A Tr6 a type overdruve in my tr3 too long
- Thread starter Got_All_4
- Start date
charleyf
Luke Skywalker
Offline
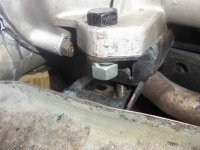
You need to modify the lower plate under the transmission mount, by drilling two holes rear of the existing two. Apparently this is needed because the front flange on the transmission is thicker on the later transmissions. You will also need to use longer bolts for mounting it to the engine. You may also need to cut down the raised portion of the mounting bracket as it may well hit the bottom side of the transmission.
Charley
Charley
TR3driver
Great Pumpkin - R.I.P
Offline
Nope, it's an A-type. J-type mounting is totally different and the body of the OD passes through where the mount would be on an A-type.
Charleyf nailed it, but the extra length is due to the synchro on 1st gear. Even the TR4 box with the thin flange was roughly 3/8" longer than the 3 synchro box.
Charleyf nailed it, but the extra length is due to the synchro on 1st gear. Even the TR4 box with the thin flange was roughly 3/8" longer than the 3 synchro box.
GTP1960
Jedi Knight
Offline
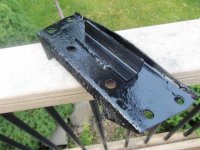
So what do I do with the angled part of the plate? I thinking it's there to give it some extra strength. As you can see in the pic if I just drill the 2 holes and bolt it down then the rubber mount will hit the angled piece.
I elongated the holes & flipped it over ( ground down the shorter flange a little & used a ridge cover for more protection, but that was probably unnecessary )

TR3driver
Great Pumpkin - R.I.P
Offline
On my mount, there wasn't room to modify the upper plate. So I drilled the crossmember, and bent the back edge down (big Crescent wrench plus a BFH IIRC) so it would clear the mount.
I've lost track of long it's been that way, but the crossmember looked fine even after the accident that ruined the body (and some pretty aggressive driving including an autoX trophy).
I've lost track of long it's been that way, but the crossmember looked fine even after the accident that ruined the body (and some pretty aggressive driving including an autoX trophy).
Last edited:
charleyf
Luke Skywalker
Offline
I cut the rear flange enough for the transmission to clear. That is very sturdy piece of metal. If something is going to fail it will be the welds at the frame. Which on one car I restored did have cracked welds on those mounts. I do believe that the car had been raced in a previous life. I also found weld cracks in the front suspension.
Charley
Charley
OP
Got_All_4
Luke Skywalker
Offline
Hear is what I did. Kind of a combination of all the ideas. I was concerned of loosing strength in the bracket by cutting it. Now with drilling 2 holes so close together that there could be the possibility of getting some stress cracking between the holes. So to fix the original holes and strengthen the bracket I took an old transmission mount that the rubber was missing, wacked the ends off then made a long cut about an inch wide down the length. Basically made a piece of angle iron. Clamped it to the bottom side of the bracket and made sure I covered the holes then plug welded the holes shut. Also ran a bead on each side of the angle iron to the bottom of the bracket. Still had to cut some of the back edge off and bend it down too a lot. Even more then in the pic.