• Hi Guest!
    You can help ensure that British Car Forum (BCF) continues to provide a great place to engage in the British car hobby! If you find BCF a beneficial community, please consider supporting our efforts with a subscription.

    There are some perks with a member upgrade!
    **Upgrade Now**
    (PS: Subscribers don't see this gawd-aweful banner
Tips
Tips

TR4/4A TR4A IRS-SC?!?!?!

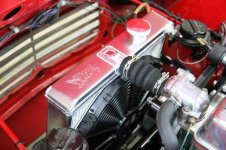
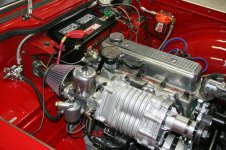
Well, it's been a bit since I've posted an update. I hit one snag, after I installed the pulley on the water pump, I noticed a lot of runout. The guys at Moss replaced it no problem. I also decided to get a Wizard aluminum radiator, so I was blocked for a while waiting for both of those. In the meantime I did to a lot of little piddly things to be ready.

Anyway, this past weekend I got the new pulley and radiator, and got those in. Then I went to install the serpentine belt, and it was too short. Since it was the weekend, I hit up NAPA and found another belt that was about 2" longer. But when I got in touch with Moss on Monday, it turns out that they changed the belt routing to get more wrap around the supercharger pulley, but that update didn't get into the instructions. Armed with the correct routing, the belt included in the kit was installed.

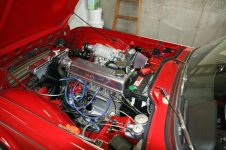
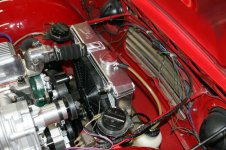
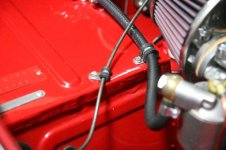
I wired up the radiator fan and the fuel pump relay yesterday. One of my goals is to do a better job with my wiring, and I'm pretty happy with how it came out.

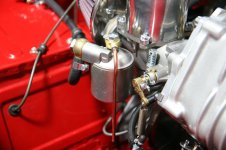
I tried to pressurize the fuel system, and got lots of leakage around the banjo fitting on the float bowl. After some more email with the tech team at Moss, we determined that the banjo fitting was the wrong way around.

In my zeal to stop the leakage, I of course tried to tighten the bolt even more, which distorted the sealing washer. Moss is sending me new ones, but I couldn't wait, so I found a copper oil plug gasket that was about the right size. But I couldn't get that to seal, so I worked over the original aluminum washer and finally got the fuel sealed up.

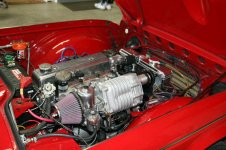
With that done, I was ready to try to start the engine. And, it started right up! After warming up a bit, I pushed the choke in and it settled down to an 800 RPM idle. I don't think I've ever had the engine reliably idle that low!

I'm letting it cool down a bit so I can top off the coolant, then I may venture out for a drive, if it isn't raining (or at least, raining too hard!).
 

Attachments

  • 24323.jpg
    24323.jpg
    42.2 KB · Views: 818
  • 24324.jpg
    24324.jpg
    54.5 KB · Views: 818
  • 24325.jpg
    24325.jpg
    90.9 KB · Views: 804
  • 24326.jpg
    24326.jpg
    54.4 KB · Views: 797
  • 24327.jpg
    24327.jpg
    63.9 KB · Views: 811
  • 24328.jpg
    24328.jpg
    65.6 KB · Views: 791
Sweet Darrell,

Hope you were able to make it out for that ride.

Cheers,
M. Pied Lourd
 
I'm not too familiar with superchargers but wouldn't the air intake being where it is only draw hot air from the engine compartment? Do you need to duct cool air to the carb or is this just not an issue with this setup?
 
M_Pied_Lourd said:
Sweet Darrell,

Hope you were able to make it out for that ride.

Cheers,
M. Pied Lourd

Just got back! A little cold and wet for much of a drive (the top is down, and really no way to get it up at these temps), but it is running great. Very responsive.
 
karls59tr said:
I'm not too familiar with superchargers but wouldn't the air intake being where it is only draw hot air from the engine compartment? Do you need to duct cool air to the carb or is this just not an issue with this setup?

It would certainly be better if there was a cold air intake, though I doubt this position is really pulling any hotter air than the stock carb location (directly over the exhaust manifold). I do plan to take some under hood temp readings this summer, though the TR4/TR4A engine compartment is pretty open compared to many others.
 
Darrell,

Very nice looking and I'm glad to hear that your first venture out seems to be a positive one!

Scott
 
Great! Very nice work Darrell, quite impressive.

So how much more zip did she have? I bet a bunch of folks here are dying to know. If you have an iPhone download Dynolicious which will give you pretty good ballpark on horsepower.
 
Looks great Darrell! I think its cool that Moss used the S.U carb for the TR4 version of the kit. I concur with your observations that the idle is fantastic with the single S.U/supercharger, as is responsiveness even when not under boost.

Scott
 
Thanks, all!

I only did a quick trip to the gas station, so didn't really get to try to open it up. Being that is was around 40 degrees, raining, and the top was down, I wasn't up for a longer drive :smile:.
 
Great looking engine bay! whats that filter under the PCV valve?
 
mtlman8 said:
Great looking engine bay! whats that filter under the PCV valve?

Well, I haven't completely decided what to do about venting the crankcase. Originally I was going to just use that filter on the pipe in the valve cover. Later, I decided that I would pipe the PVC valve to the back plate of the air filter. But I haven't yet found a fitting that will work well for that. So I just stuck the filter on the bottom of the PCV valve for now.
 
Now that the install is mostly done, I thought I'd write up a quick review. I've only driven with it twice, and both were short, low-speed trips, so nothing much to report on that end of it.

The kit is very complete and well thought out. Moss attempted to include every screw/hose/clamp/wire/etc that you might need. I ended up not using everything, mostly because I used the electric fuel pump I already had installed (they include a pump in the kit).

The new intake manifold seems well made. The flanges are thick and wide, and nicely machined, much nicer than either of the Weber manifolds that I had. I did have problems with the intake and my old header (but I also had problems with that header and the Weber manifolds), but it worked well with the new header I got, and would have been fine with the stock manifold. I am a little jealous that the MG manifolds have a cute MG logo cast in them, it would have been a nice touch if Moss would have added something to the manifold (do they own the "TriumphTune" name?).

My install was the first TR4A installation, and we did find one issue. The bracket provided for the throttle cable was make to go down the firewall, but on the 4A there is a gusset there. I worked with Moss, and we came up with a simple solution, cut off the bottom of the bracket. There is plenty of bracket left to mount.

The kit includes a new Lucas 18ACR alternator. I was a little sad about not being able to use my little Nippondenso alternator, but I didn't see an easy way to make it work. I think Moss came up with a pretty slick solution to mounting the idler pulleys for the serpentine belt, using the generator mounting bracket holes. And once the blower is mounted, you can't really see the alternator, anyway.

I had do to a bit of extra work as my narrow-belt conversion kit used a non-standard-sized timing cover oil seal. So I had to change that out, and in the process discovered a very worn timing chain tensioner.

Initially I thought the choice of the SU HD8 carb was odd, certainly there must be a better choice out there! But I've come to like it, and it helps keep the look somewhat period (at least more than the Holley that the TR6 kit uses). It will also make it easy to convert to a TBI system (using adapters from Rick Patton), if I choose to do so in the future.

I think the kit could be installed in a day, if you had some experience working on your car, and don't run into anything unexpected. But given the changes that are likely to have happened to these cars over 45+ years, most likely something will come up. I installed mine over the course of a month, but I never spent more than an hour or two at a time. And while I saved some time by not having to install the fuel pump, I did install new headers, and had to deal with the timing cover. And by being an "early adopter", there was some dialog with the crew at Moss. I gave them several pages of feedback on the installation instructions, for the most part things that I would have figured out myself, but they are going to be rolling much of it in.

I still need to get the new wide-band O2 sensor connected, and the boost gauge that I've added. I also installed a Wizard aluminum radiator, and I'm waiting for the new Goodparts radiator shrouds for the TR4/4A/250 to come out.

Once I've had a chance to drive it more, and make any obvious tuning changes, I do plan to do a dyno run. Unfortunately I don't have any pre-blower measurements to compare with.

Overall, I'm very pleased with the kit and conversion so far. It is spendy, and clearly not for everyone. I recall a survey from Moss quite some time ago (maybe even 10 years?) to gauge interest in the kit, and I'm glad it finally came out. I think this kit benefited from their experiences with the MG and TR6 kits.
 
You will be at Portland or Bellevue, or better yet Vancouver BC to show it off won't you?
 
DNK said:
You will be at Portland or Bellevue, or better yet Vancouver BC to show it off won't you?

I may make the Portland show (since PIR is like 10 minutes from my house), depending on my son's college move-in schedule.
 
Well, it's been too wet to do any more driving, but I've been fixing up a few things. I wasn't really thrilled with how the float chamber cover was attached, there was a split segment of rubber tube that served as the vent. This didn't allow you to really snug down the cover. I saw that some HD8 carb had a banjo fitting and tube arrangement, and Moss lists it. I also got a gasket for the cover, an the two washers (one aluminum, one special fiber washer).

The banjo fitting came with about 2 feet of copper tube. I'm not sure how other cars route it, but that is almost enough to reach the ground. I cut it to go just below the float chamber. I might shorten it even more. When I removed the float cover, the aluminum and fiber washer were already installed, though I don't think they were doing anything useful with the rubber tube.

Anyway, it is now all installed, and I can tighten down the cover now. It should also help in keeping the fuel in the float chamber from evaporating so quickly.

The bonnet release cable was also rubbing against the air cleaner. I put a section of rubber tubing around it, but even in the two short drives I've managed, the rubber was already wearing. So I added a clamp to hold it out of the way.
 

Attachments

  • 24708.jpg
    24708.jpg
    81.4 KB · Views: 627
  • 24709.jpg
    24709.jpg
    33.7 KB · Views: 631
That's the way I have my vent set up, although slightly shorter -- the tube is just long enough reach the bottom of the bowl, and oriented so that any fuel would drip onto the body tub well away from the exhaust.
 
I took the day off today to do a few things, including getting my wideband O2 sensor and boost gauge hooked up. Got that done, and the weather even cleared up for a bit of a drive. Finally got a chance to open it up a bit.

First, I'm getting just under 5 psi of boost. So I may be trying out the big boost kit at some point. I also noticed that it doesn't boost at all in 1st or 2nd, I assume not enough load to disengage the bypass? I'm checking with the folks at Moss to see if that is expected. But when when it does boost in 3rd and 4th, it gives a real nice kick.

I'm still impressed with how responsive it is even when not under boost. The only thing I can come up with is that the single HD8 (2") carb has less area than two HS6 carbs (1.75") (3.14 sq in vs 4.8 sq in), so the intake velocity stays higher. Whatever the reason, I like it!

The A/F ratio is showing just above 10:1, quite rich. So I may play with adjusting that.

I do need to figure out what I'm going to do about venting the crankcase, as there was some oil seeping out of the filler cap after my drive. I'm not sure just plumbing the current PCV into the air cleaner will be sufficient, I may have to bite the bullet and try to get the plug out to install a road draft tube.
 
The engine being "quite rich" will lead to more CC vapors & higher pressure. I suggest you get the mixture where it needs to be and see if you still have the oil seep.
 
I exchanged some email with the folks at Moss, and the "lag" I'm seeing in getting boost isn't expected. So I'll be checking to see if the bypass is binding, or if there is a problem with the actuator. I have a MightVac somewhere, so I can use that to operate the bypass, and see how it is responding. I can also just disable the bypass altogether.
 
Wondering whether the excessive rich condition and the boost lag are related ... is it possible that fuel got into the plumbing for the actuator valve? What does your vacuum gauge read when accelerating in 1st or 2nd gear ... does it rise to nearly 0? And what does the gauge read at idle?

Scott
 
Back
Top